Keyboard: Dell Inspiron 1100 and 5100 Service Manual

Back to Contents Page

Keyboard

Dell™ Inspiron™ 1100 and 5100 Service Manual


Removing the Keyboard

CAUTION: Before working inside your Dell™ computer, read the safety instructions in your Owner's Manual.
CAUTION: To prevent static damage to components inside your computer, discharge static electricity from your body before you touch any of your computer's electronic components. You can do so by touching an unpainted metal surface.
  1. Follow the instructions in "Preparing to Work Inside the Computer."

  2. Use a small flat-blade screwdriver or plastic scribe to lift the notched right edge of the hinge cover, and pry the cover loose from the hinges and computer base.

1

notched edge

2

hinge cover

  1. Lift the hinge cover up and away from the hinges and computer base.

  2. Remove the four M2 x 3-mm keyboard screws.

1

M2 x 3-mm screws (4)

2

keyboard

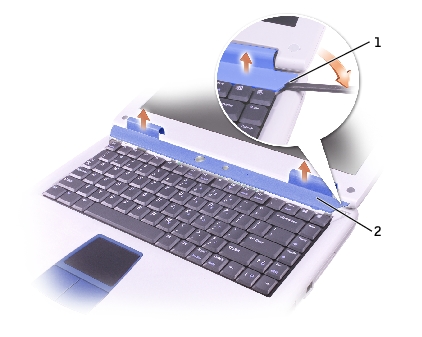
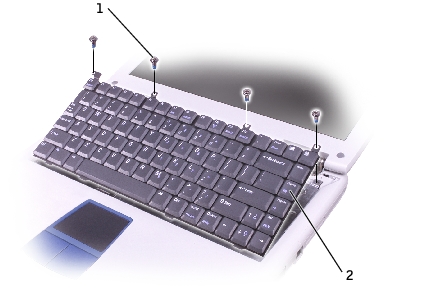
NOTICE: The keycaps on the keyboard are fragile, easily dislodged, and time-consuming to replace. Be careful when removing and handling the keyboard.
  1. Lift the top of the keyboard out of the computer base, and pull the keyboard out at an angle (towards the display). Rest the keyboard face down on the palm rest.

  2. Grasp the keyboard flex cable near the connector, and pull up on the flex cable to disconnect it from the interface connector on the system board.

1

keyboard connector

2

interface connector

  1. Remove the keyboard from the computer base.

Installing the Keyboard

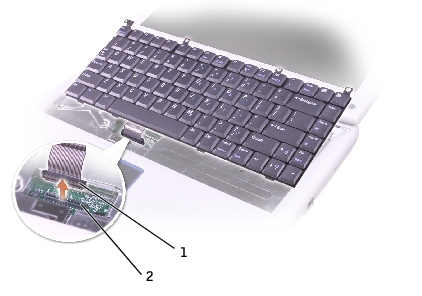
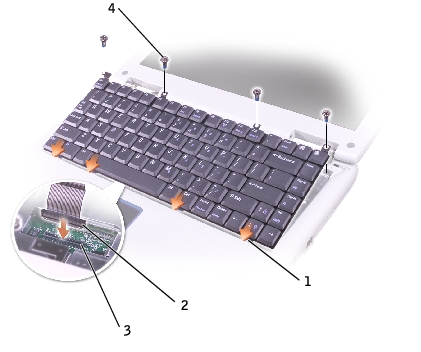
NOTICE: To avoid damage to the connector pins, press the keyboard connector evenly into the interface connector on the system board, and do not reverse the keyboard connector.
  1. Connect the keyboard connector of the replacement keyboard to the interface connector on the system board.

1

securing tabs (4)

2

keyboard connector

3

interface connector

4

M2 x 3-mm screws (4)

  1. Insert the four securing tabs on the keyboard into their respective slots in the palm rest, and lower the keyboard into the computer base.

Ensure that all four securing tabs are engaged before trying to completely seat the keyboard.

  1. Replace the four M2 x 3-mm keyboard screws.

  2. To replace the hinge cover, first insert the left side of the hinge cover into the notches. Snap down the hinge cover, and ensure that it is flush with the palm rest.


Back to Contents Page