

|
428.515 bytes |
Service Hints & Tips |
Document ID: GSMH-3EQDHR |
TP 365X/XD - 1085 LCD Panel
Applicable to: World-Wide
1085 LCD Panel:
Battery Pack (1020)
Insulator Sheet (1025)
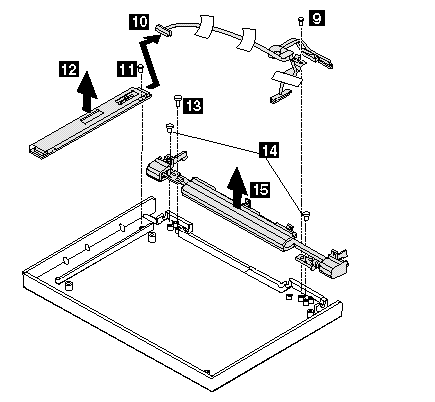
Diskette Drive / CD-ROM Drive (1040)
Hard Disk Drive (1050)
Top Cover (1060)
Keyboard Unit (1070)
LCD Assembly (1080)
DSTN LCD Panel:
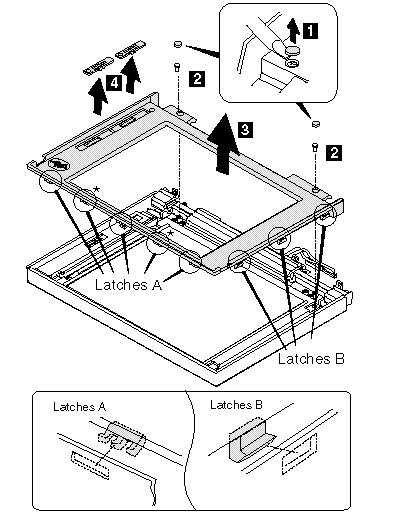
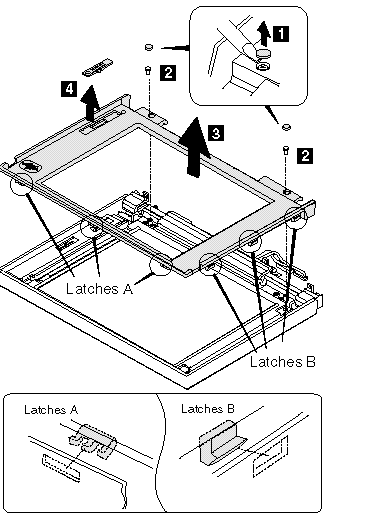
* Latches only for 11.3-inch LCDs (total 5 latches).
|
Step |
Screw Location (Quantity) |
Length |
|
2 |
LCD Front Cover (2) |
M3 x 6 mm |
|
Note: |
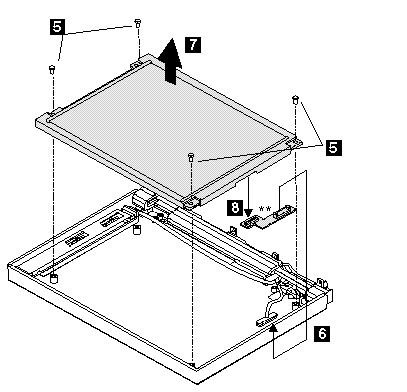
** Part only for 10.4-inch LCDs.
|
Step |
Screw Location (Quantity) |
Length |
|
5 |
LCD Panel (4) |
M3 x 6 mm |
|
Note: |
|
Step |
Screw Location (Quantity) |
Length |
|
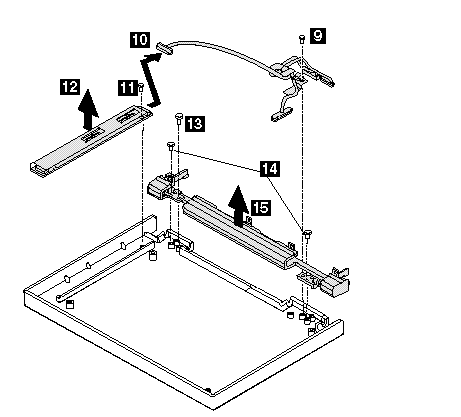
9 |
LCD Cable (1) |
M3 x 6 mm |
|
11 |
Inverter Card (1) |
ST2.9 x 4.5 mm |
|
13 |
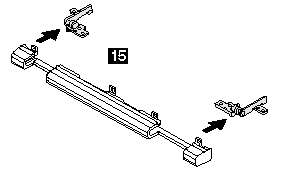
Right Hinge (1) |
M3 x 6 mm |
|
14 |
Hinge (2) |
M2 x 4 mm |
|
Note: |
|
Note: |

|
Step |
Screw Location (Quantity) |
Length |
|
2 |
LCD Front Cover (2) |
M3 x 6 mm |
|
Note: |
|
Step |
Screw Location (Quantity) |
Length |
|
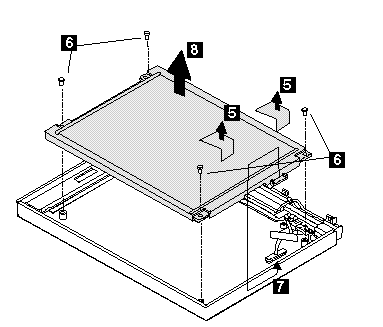
6 |
LCD Panel (4) |
M3 x 6 mm |
|
Note: |
|
Step |
Screw Location (Quantity) |
Length |
|
9 |
LCD Cable (1) |
M3 x 6 mm |
|
11 |
Inverter Card (1) |
ST2.9 x 4.5 mm |
|
13 |
Right Hinge (1) |
M3 x 6 mm |
|
14 |
Hinge (2) |
M2 x 4 mm |
Note:
Make sure you use the correct screws when replacing.
When replacing:
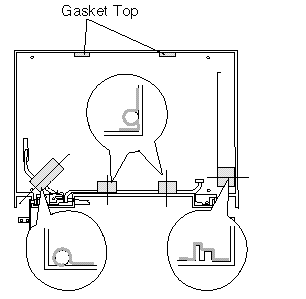
When replacing the LCD cable, replace the copper tape and gasket top as shown below.
TFT 10.4-inch LCD Panel (B):
TFT 10.4 (B) P/N 83H5349 83H5350
Note:
You can replace the entire 10.4-inch TFT LCD unit (A) with the entire LCD unit (B), or vice versa. But you cannot replace parts of (A) with parts of (B), or vice versa.
|
Step |
Screw Location (Quantity) |
Length |
|
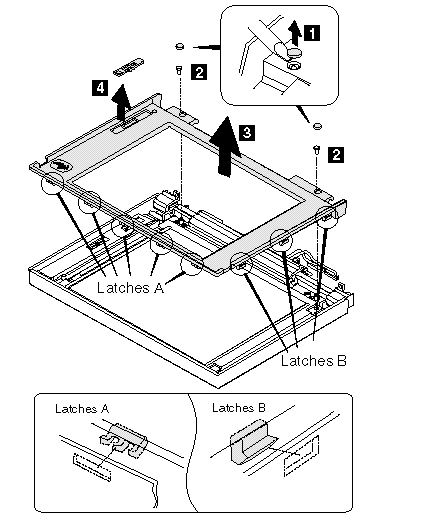
2 |
LCD Front Cover (2) |
M3 x 6 mm |
Note:
Make sure you use the correct screws when replacing.
|
Step |
Screw Location (Quantity) |
Length |
|
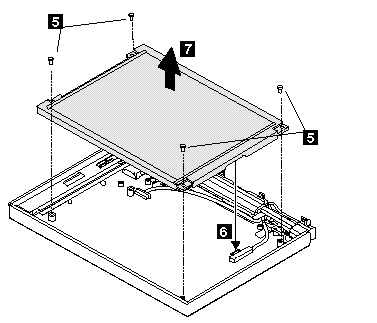
5 |
LCD Panel (4) |
M3 x 6 mm |
Note:
Make sure you use the correct screws when replacing.
|
Step |
Screw Location (Quantity) |
Length |
|
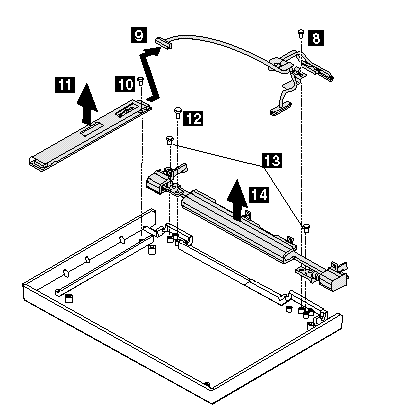
8 |
LCD Cable (1) |
M3 x 6 mm |
|
10 |
Inverter Card (1) |
ST2.9 x 4.5 mm |
|
12 |
Right Hinge (1) |
M3 x 6 mm |
|
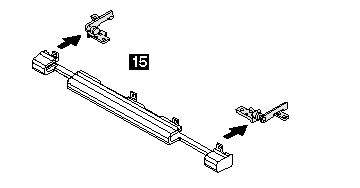
13 |
Hinge (2) |
M2 x 4 mm |
Note:
Make sure you use the correct screws when replacing.
TFT 11.3-inch LCD Panel:
|
Step |
Screw Location (Quantity) |
Length |
|
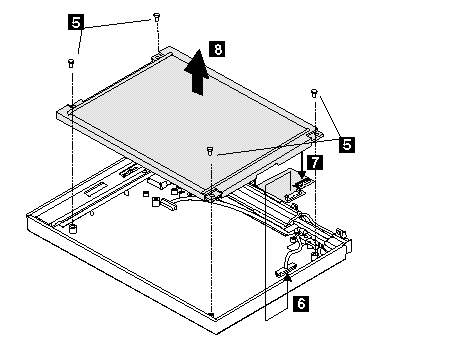
2 |
LCD Front Cover (2) |
M3 x 6 mm |
Note:
Make sure you use the correct screws when replacing.
|
Step |
Screw Location (Quantity) |
Length |
|
5 |
LCD Panel (4) |
M3 x 6 mm |
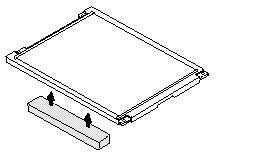
When replacing:
When replacing the LCD panel, glue the rear foam on the rear of the LCD as shown below.
|
Step |
Screw Location (Quantity) |
Length |
|
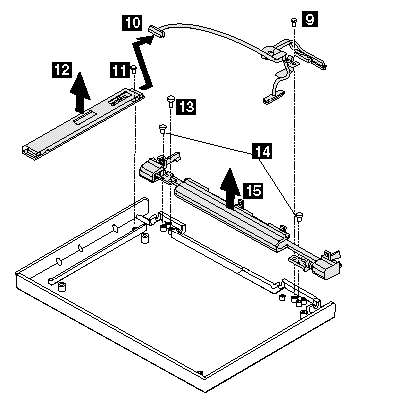
9 |
LCD Cable (1) |
M3 x 6 mm |
|
11 |
Inverter Card (1) |
M3 x 6 mm |
|
13 |
Right Hinge (1) |
M3 x 6 mm |
|
14 |
Hinge (2) |
M2 x 4 mm |
Note:
Make sure you use the correct screws when replacing.

|
Search Keywords |
| |
|
Hint Category |
Display/Monitor, Hardware Maintenance Information | |
|
Date Created |
28-02-97 | |
|
Last Updated |
19-08-98 | |
|
Revision Date |
18-08-99 | |
|
Brand |
IBM ThinkPad | |
|
Product Family |
ThinkPad 365X/XD | |
|
Machine Type |
2625 | |
|
Model |
Various | |
|
TypeModel |
| |
|
Retain Tip (if applicable) |
| |
|
Reverse Doclinks |