
|
757.859 bytes |
Service Hints & Tips |
Document ID: RMIE-3ABHP5 |
TP 760 - FRU Removals & Replacements
Applicable to: World-Wide
The following information is intended for IBM Dealers and Authorized Servicers only. Customers attempting to follow any of the procedures below may void their warranty.
FRU Removals and Replacements
This section contains information about removals and replacements.
The system board is sensitive to, and can be damaged by, electrostatic discharge. Establish personal grounding by touching a ground point with one hand before touching these units.
An electrostatic discharge (ESD) strap must be used to establish personal grounding.
Do not damage any parts. Only certified, trained personnel should service the computer.
The arrows in the "Removals and Replacements" section show the direction of movement to remove a FRU, or to turn a screw to release the FRU. The arrows are marked in numeric order, in square callouts, to show the correct sequence of removal.
When other FRUs must be removed before removing the failing FRU, they are listed at the top of the page.
To replace a FRU, reverse the removal procedure and follow any notes that pertain to replacement. See "Locations" for internal cable connections and arrangement information.
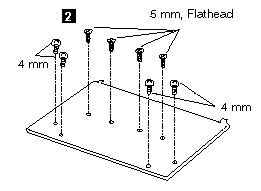
When replacing a FRU, use the correct screw size as shown in the procedures.
1)Before the computer is powered-on after FRU replacement, make sure all screws, springs, or other small parts, are in place and are not left loose inside the computer. Verify this by shaking the computer and listening for rattling sounds. Metallic parts or metal flakes can cause electrical short circuits.
2)The battery pack contains small amounts of nickel. Do not disassemble it, throw it into fire or water, or short-circuit it. Dispose of the battery pack as required by local ordinances or regulations.
3)Before removing any FRU, power-off the computer, unplug all power cords from electrical outlets, remove the battery pack, and then disconnect any interconnecting cables.
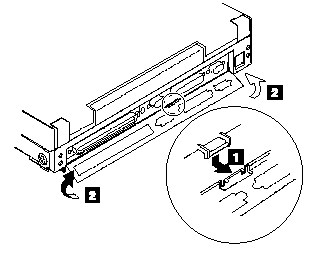
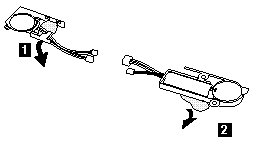
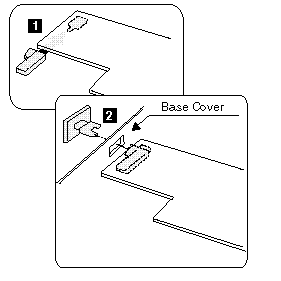
1010 Rear Connector Door
Remove the center latch (1) ; then remove the rear connector door by flexing it (2).
1020 Diskette Drive/CD-ROM Drive
Diskette Drive (Model unique)
Note: If the security latch (A) is at the left position, push and slide it to the right position (unlock).
CD-ROM Drive (Model unique)
Warning
Remove the CD-ROM drive exactly as shown in the figure. Do not apply any extra force to the CD-ROM drive when removing it.
Note : If the security latch (A) is at the left position, push and slide it to the right position (unlock).
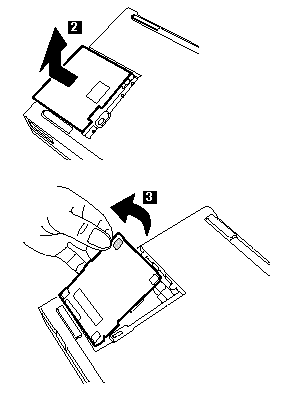
1030 Battery Pack
CD-ROM Drive (Model unique) (1020)
Note : Be careful that the computer does not fall backward when the battery pack is removed.
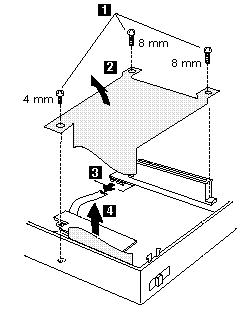
1040 Hard Disk Drive
Diskette Drive/CD-ROM Drive (1020)
Battery Pack (1030)
Warning
Do not drop or apply any shock to the hard disk drive. The hard disk drive is sensitive to physical shock. Incorrect handling can cause damage and permanent loss of data on the hard disk. Before removing the hard disk drive, have the user make a backup copy of all the information on the hard disk. Never remove the hard disk drive while the system is operating or is in suspend mode.
Note : Remove the hard disk drive exactly as shown in the figure. Do not apply any extra force to the hard disk drive when removing it.

Note : After replacing the hard disk drive, latch the removal strap into the correct position.
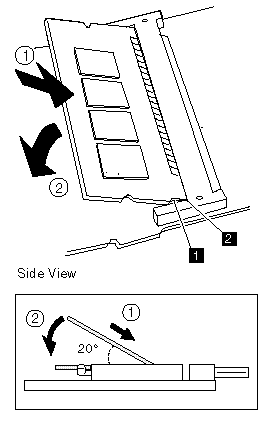
1050 DIMM Adapter and DIMM

Turn the computer upside down.
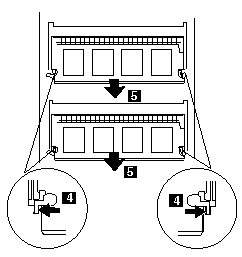
When installing the DIMM, do the following:
1. Find the notch (1) on the side of the DIMM.
2. With the notched end of the DIMM toward the right side of the socket (2) , insert the DIMM, at an angle of approximately 20 degrees, into the socket; then press it firmly.
3. Pivot the DIMM until it snaps into place.
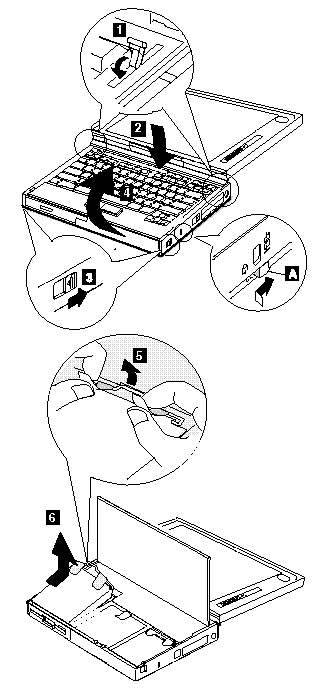
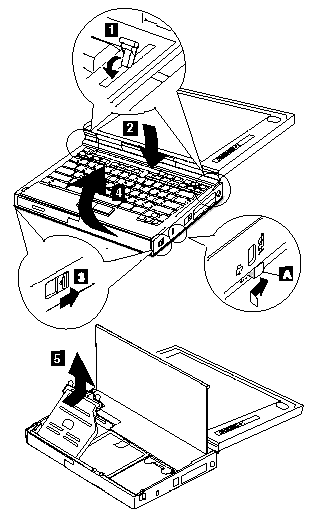
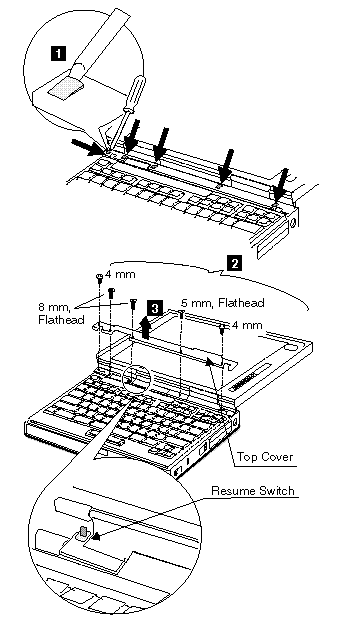
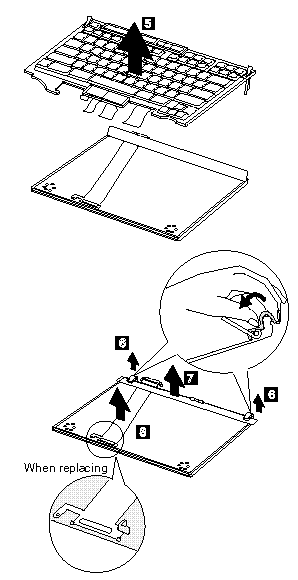
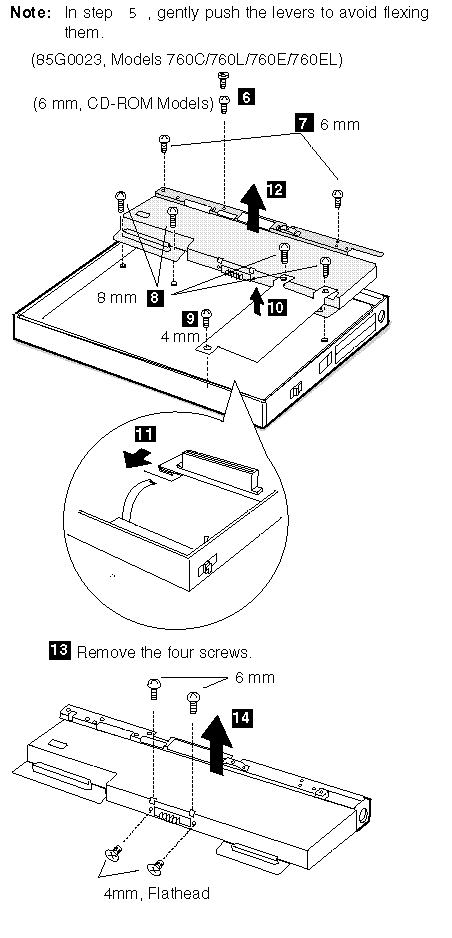
1060 Top Cover
Diskette Drive/CD-ROM Drive (1020)
Battery Pack (760C/760L/760E/760EL) (1030)
Hard Disk Drive (1040)
Note : When replacing the top cover, be careful not damage the resume switch shown in the figure.
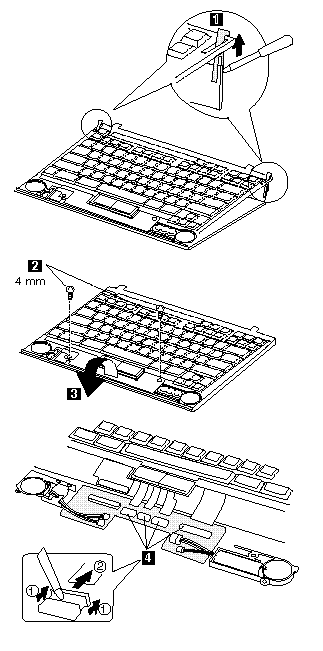
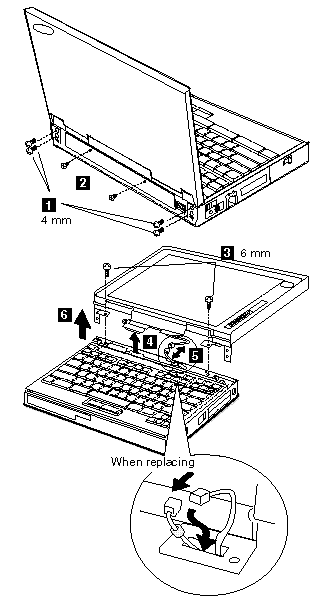
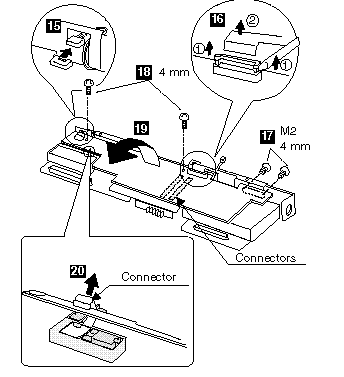
1070 Keyboard Unit
Top Cover (1060)
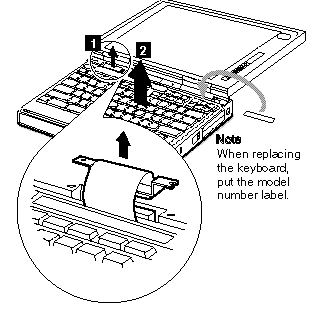
When replacing the keyboard unit, connect the keyboard connector as shown in the figure; then replace the keyboard.
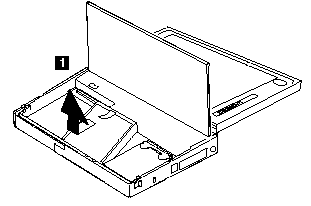
1075 Palm Rest
Top Cover (1060)
Keyboard Unit (1070)
(1) Turn the keyboard upside down.
(3) Turn the keyboard right-side up.
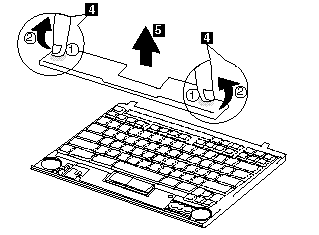
1076 Keyboard, Information Panel
Top Cover (1060)
Keyboard Unit (1070)
Palm Rest (1075)

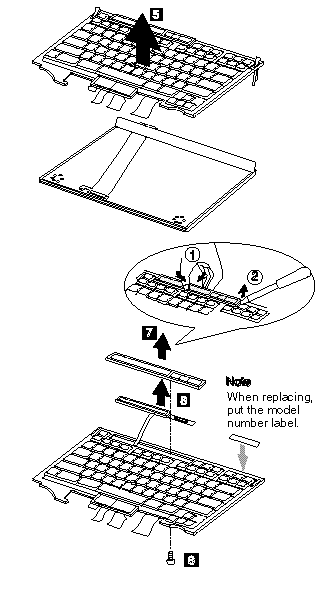
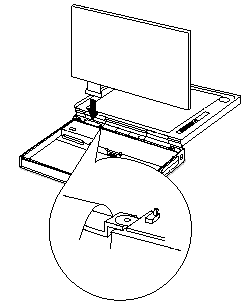
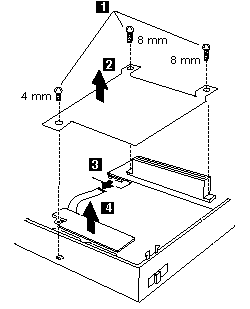
1077 Keyboard Cable
Top Cover (1060)
Keyboard Unit (1070)
Palm Rest (1075)
Note : When replacing the keyboard cable, place the cable correctly as shown by the artwork in the circle.
1080 Keyboard Card
Battery Pack (760C/760L/760E/760EL) (1020)
Diskette Drive/CD-ROM Drive (1030)
Hard Disk Drive (1040)
Top Cover (1060)
Keyboard Unit (1070)
Palm Rest (1075)
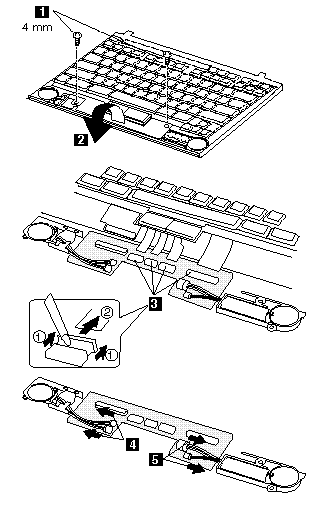
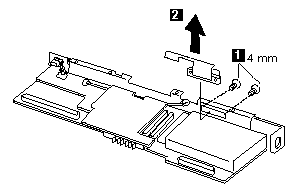
1085 Backup Battery, Speaker, Standby Battery
Diskette Drive/CD-ROM Drive (1020)
Battery Pack (1030)
Hard Disk Drive (1040)
Top Cover (1060)
Keyboard Unit (1070)
Palm Rest (1075)
Keyboard Card (1080)
3) Some standby batteries contain a small amount of nickel and cadmium. Do not disassemble it, recharge it, throw it into fire or water, or short-circuit it. Dispose of the battery as required by local ordinances or regulations. Use only the battery in the appropriate parts listing. Use of an incorrect battery can result in ignition or explosion of the battery.
4) The lithium battery can cause a fire, explosion, or severe burn. Do not recharge it, remove its polarized connector, disassemble it, heat it above 100C (212F), incinerate it, or expose its cell contents to water. Dispose of the battery as required by local ordinances or regulations. Use only the battery in the appropriate parts listing. Use of an incorrect battery can result in ignition or explosion of the battery.
(1) for Backup Battery
(2) for Standby Battery
(1) (2) for Speaker
Note : When replacing the speakers, backup battery, and standby battery, position the cables as shown.
1100 LCD Assembly
Diskette Drive/CD-ROM Drive (1020)
Battery Pack (1030)
Hard Disk Drive (1040)
Top Cover (1060)
1110 Front IR and Rear IR
Front IR
Diskette Drive/CD-ROM Drive (1020)
Battery Pack (1030)
Hard Disk Drive (1040)
760C/760CD
Other Models
Rear IR
Diskette Drive/CD-ROM Drive (1020)
Battery Pack (1030)
Hard Disk Drive (1040)
Top Cover (1060)
LCD Assembly (1100)

1120 Video Card
Diskette Drive/CD-ROM Drive (1020)
Battery Pack (1030)
Hard Disk Drive (1040)
Top Cover (1060)
Keyboard Unit (1070)
LCD Assembly (1100)
Front IR and Rear IR (1110)
Note : In step 1, gently pushing the shaded area(1), lift the switch cover halfway up (2) as shown. Then pull the switch lever out to remove(3).

Note : In step (5) , gently push the levers to avoid flexing them.
Video Card Check
There are two models of 760ED:
S-Video Card built-in
Enhanced Video Card built-in
If you install the wrong video card, the LCD will not work. Verify the 760ED model you are servicing.
S-Video Card
(760C/760L/760E/760ED/760EL/760LD/760ELD)

Enhanced Video card
(760CD/760ED)
Note : When replacing the video card, align the power switch and power actuator (2). Check that the power switch operates correctly before tightening any screws.
1115 External Diskette Drive Connector
(760CD/760LD/760E/760ED/760EL/760ELD)
Diskette Drive/CD-ROM Drive (1020)
Battery Pack (1030)
Hard Disk Drive (1040)
Top Cover (1060)
Keyboard Unit (1070)
LCD Assembly (1100)
Front IR and Rear IR (1110)
Video Card (1120)
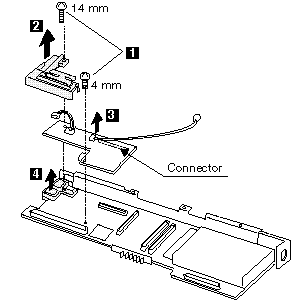
1130 DC/DC Card
Battery Pack (760C/760L/760E/760EL) (1020)
Diskette Drive/CD-ROM Drive (1030)
Hard Disk Drive (1040)
Top Cover (1060)
Keyboard Unit (1070)
LCD Assembly (1100)
Front IR and Rear IR (1110)
Video Card (1120)
1140 DSP Card/ Audio (ESS) Card
Diskette Drive/CD-ROM Drive (1020)
Battery Pack (1030)
Hard Disk Drive (1040)
Top Cover (1060)
Keyboard Unit (1070)
LCD Assembly (1100)
Front IR and Rear IR (1110)
Video Card (1120)
DC/DC Card (1130)
Note : When replacing the DSP card or the audio (ESS) card, make sure that the connector on the DSP card/audio (ESS) card is not loose. If the connector does not connect properly, no sound will be produced.
Models 760C/760L/760E/760EL
Models 760CD/760LD/760ED/760ELD
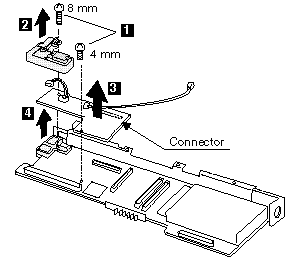
1150 CPU Card
Diskette Drive/CD-ROM Drive (1020)
Battery Pack (1030)
Hard Disk Drive (1040)
Top Cover (1060)
Keyboard Unit (1070)
LCD Assembly (1100)
Front IR and Rear IR (1110)
Video Card (1120)
DC/DC Card (1130)
DSP Card / Audio (ESS) Card (1140)
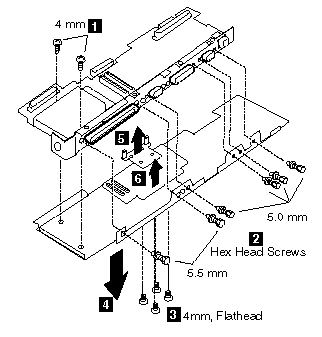
Be Careful
Connect the CPU card exactly using the procedures shown in the figures and make sure that the two CPU card connectors are connected properly. If these connectors are not connected, you cannot power on the computer.
Do not apply any extra force to the shaded area of the CPU card when connecting.

|
Search Keywords |
| |
|
Hint Category |
Hardware Maintenance Information | |
|
Date Created |
31-07-96 | |
|
Last Updated |
19-08-98 | |
|
Revision Date |
18-08-99 | |
|
Brand |
IBM ThinkPad | |
|
Product Family |
ThinkPad 760C, ThinkPad 760E, ThinkPad 760CD, ThinkPad 760L/LD, ThinkPad 760ED, ThinkPad 760EL/ELD | |
|
Machine Type |
9546, 9547 | |
|
Model |
Various | |
|
TypeModel |
| |
|
Retain Tip (if applicable) |
| |
|
Reverse Doclinks |