
|
59.646 bytes |
Service Hints & Tips |
Document ID: MNOK-3PZLH6 |
Aptiva - How to attach speaker cables
Applicable to: World-Wide
This procedure will address the attaching of speaker cables to 2144, 2168, 2134, 2176, 2159, 2161, 2162, 2136, & 2137 machines. Where an Aptiva machine type may have multiple hardware configurations, such as the Cxx and Sxx series, the different configurations will be shown.
2144 & 2168 Series
1. The Mxx series contains a multi-purpose Mwave card which handles all communications and multimedia responsibilities. To check the cables, first power down the machine in order to ensure safety. After powering down the system, remove the power cable.
2. On the back of the Mwave is a plug socket called labelled 'out,' which is the audio output line. This goes to the speakers or other output device. This connection is the first connector next to the game or MIDI port plug which is the 15 pin connector on the Mwave card.
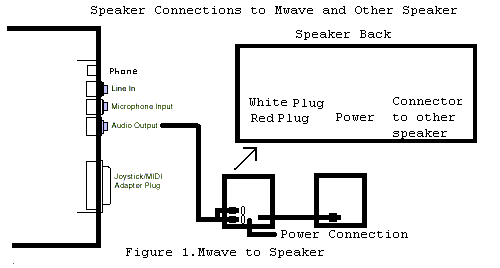
3. As shown on figure 1 below; the Mwave audio output is plugged into the speaker connection which ends in a red and white plug. This connection connects to the speaker with the white connector on the top and the red connector on the bottom. This speaker has two connectors and has a connector build into the speaker which connects to the other speaker. There is also power connector. This shown on the diagram in Figure 1.

Figure 1. Speaker to Mwave connector
2134, 2176, 2161, 2136, 2137, and 2138 Series:
1. The 2134/2176 series has two different series of speakers connected to the system unit. The 2134/2176 series also has a series with a Mwave card and another series with a separate sound card.
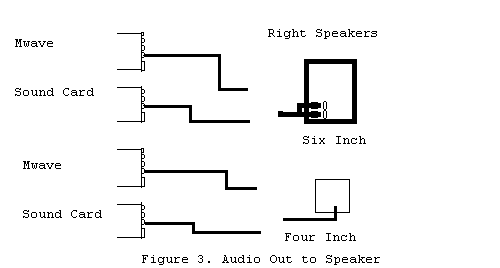
2. The speakers can look like a tall tower speaker approximately 6 inches tall or a shorter speaker about four inches tall. Diagrams for the small speakers are shown below in figure 2. Figure 2 shows the Mwave connection and the Sound Card. The speakers are shown with the front and back views of the cables. The diagram for the larger speakers are shown below in figure 3 with Mwave connections and Sound Card connections. On the large speakers, the cables are color coded with the purple connection for Audio Output, the blue connection for speaker connections, and the tan connection for the power. The speaker may have an additional connection for the Subwoofer as shown in the diagram below.

Figure 2. Speaker Connections on Large and Smaller Speakers

Figure 3. Mwave and Sound Card to Speakers
2159 & 2162 Series:
1. The Sxx series generally comes with a multimedia monitor that has integrated speakers. The speakers are connected through the cable going from the media console (CD-ROM and floppy disk drive unit) to the tower with a purple and orange connectors. The purple connection is the audio output line to the speakers. If the system was purchased without the multimedia monitor, the optional speakers would be connected to the same output on the audio device. In this case, the documentation for the speakers should be examined to correctly connect the speakers.
2. At the end of the cable, the purple connector plugs into the sound card's purple output jack next to the game port connector. The purple jack is also on the Mwave card in the same location. See figure 4 below. If optional speakers are used instead of a multimedia monitor, the speakers should have a jack to plug into the purple jack on the sound card or Mwave card.

Figure 4. Mwave and Sound card connections to Media Console
|
Search Keywords |
| |
|
Hint Category |
Audio, Hardware Installation/Configuration | |
|
Date Created |
22-12-97 | |
|
Last Updated |
10-12-98 | |
|
Revision Date |
10-12-99 | |
|
Brand |
IBM Aptiva | |
|
Product Family |
Aptiva | |
|
Machine Type |
2134, 2136, 2137, 2138, 2144, 2159, 2161, 2162, 2168, 2176 | |
|
Model |
All | |
|
TypeModel |
| |
|
Retain Tip (if applicable) |
| |
|
Reverse Doclinks |