
|
46.247 bytes |
Service Hints & Tips |
Document ID: MNOK-3ZXRXY |
Aptiva - 2136 Removals and replacements - Riser Card
Applicable to: World-Wide
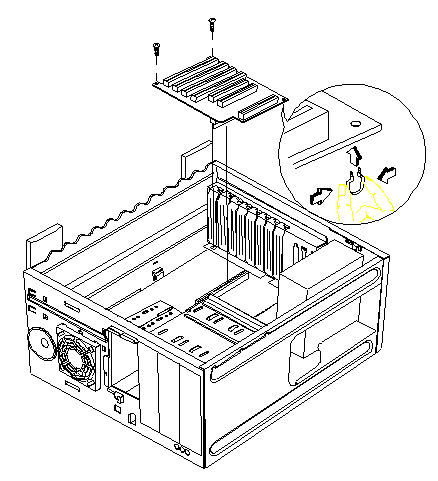
You need to remove the riser card to access the system board components or to service the main system board. To remove the riser card, you must first remove all the adapter cards from the riser card. If any of your cards have cable connections to the system board or one of your drives, disconnect the cables. Take note of all the cable connections before disconnecting them so that you can reconnect without error.
- Remove all adapter cards, noting the locations of the cable connectors from which you remove the cables.
- Use a Philips screwdriver to remove the screw that secures the riser card.
- Gently remove the riser card from the connector on the system board.

Figure 4- 18 Remove Riser Card
Note:
1.1. When replacing the old riser card with a new one, make sure that you remove the GND stitch from the old one and reinsert it to the new one. Please refer to figure 4-18(encircle illustration) on how to reinsert the GND stitch.
2.2. To reinstall the riser card, reverse the removal procedure. Reconnect any adapter card cables that you disconnected when you remove the adapter cards from the riser card.
|
Search Keywords |
| |
|
Hint Category |
Hardware Installation/Configuration, Riser Cards | |
|
Date Created |
05-11-98 | |
|
Last Updated |
08-01-99 | |
|
Revision Date |
08-01-2000 | |
|
Brand |
IBM Aptiva | |
|
Product Family |
Aptiva | |
|
Machine Type |
2136 | |
|
Model |
All | |
|
TypeModel |
| |
|
Retain Tip (if applicable) |
| |
|
Reverse Doclinks |