
|
186.726 bytes |
Service Hints & Tips |
Document ID: PMYS-3JSMCG |
Aptiva - 2144/2168 FDISK, Format, and reload instructions for systems with Windows 95 Preload
Applicable to: AP-S, Canada, United States
WARNING! ALL data on the hard drive will be removed by this procedure, therefore, all data MUST be backed up prior to proceeding or it will be lost! In addition, the Product ID # from the certificate of authenticity is needed to restore the product preload to a working state. Do not proceed unless the user has this number. One blank floppy disk will be needed to create a recovery diskette. Any added hardware should be removed before proceeding.
Creating a Recovery Diskette:
If Windows 95 is running:
1. Click on the "Start" button. This should bring up the menu.
2. Click "Programs", "Accessories", "System Tools", "Recovery Diskette". This will bring up a DOS Window box like the figure below:

Figure 1: Recovery Procedure with DOS Warning Box
3. Follow the screen prompts. The process will ask for a diskette, and then install the recovery software upon that diskette. After it finishes copying the necessary files, close the Recovery Diskette window. You know have your Aptiva Recovery diskette.
If Windows 95 is not running:
1. Turn the system on. When you see a prompt that reads "Starting Windows 95...", press the "F8" key.
2. The Windows 95 Startup Options menu will appear. Choose option 6, which will be listed as "Command prompt only."
3. The system will process the DOS startup files and boot to a C:\> prompt. Load the CD-ROM driver by typing "c:\windows\command\mscdex /d:ibmcd001" at the prompt, and then pressing ENTER.
4. The CD-ROM driver will be loaded, and the C:\> prompt will reappear. At this prompt, type "D:" or the appropriate letter of the CD-ROM drive and press the ENTER key.
5. At the command prompt (probably D:\>), type in "CD recovery" to change to the recovery directory. If there is an error message, make sure there is a space between the CD and recovery.
6. At the D:\Recovery:\> command prompt, type in "recovery" and press the ENTER key. The Screen should appear below:
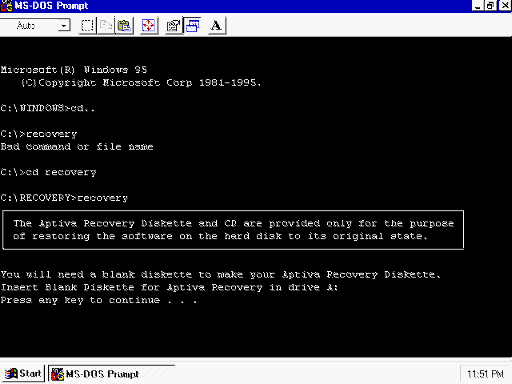
Figure: 1-0. Recovery disk procedure
7. Follow the screen prompts. You will see a warning about overwriting the disk. Press the "Y" key to allow the disk to be overwritten. This will create the recovery diskette.
Note: If the Hard drive being reloaded is larger that 2Gb, You will need to download W95us1q1.exe then run it from your harddrive to create a recovery diskette.
Recovery Procedure:
1. Start the system with the recovery diskette in the floppy diskette drive, and the Aptiva Recovery CD in the CD-ROM drive.
2. When the machine restarts, it will display the following prompt: "Starting Windows 95" and then display this message on the screen: " Do you wish to update the Aptiva Software on your hard disk (Y/N)?" Press the "N" key to go to an A:\> command prompt.
3. At the "A:\>" prompt type in "FDISK". FDISK will start with the main menu in Figure 1-1.
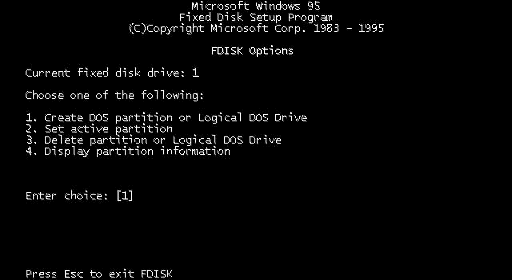
Figure 1-1 : FDISK - FDISK Options
4) Press '4' on the keyboard to display partition information (Figure 1-2).
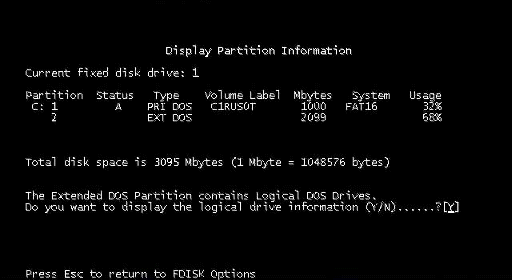
Figure 1-2: FDISK - Display Partition Information
5. Record the partition information that is displayed. By default, your Aptiva has only one hard drive partition, but the information on deleting and recreating multiple partitions is included for users who have repartitioned their hard disks. The example above shows multiple partitions. If the user has multiple partitions, press 'Y' on the keyboard to see the sizes of the Logical DOS Drives (Figure 1-3). Record this information as well.
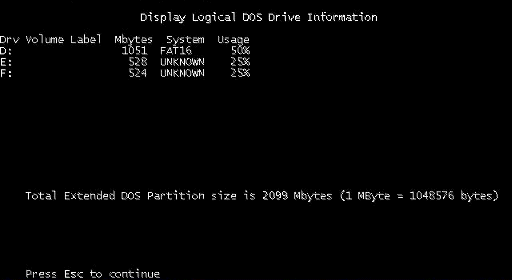
Figure 1-3: FDISK - Display Logical DOS Drive Information
6. Press the "ESC" key on the keyboard until you are back at the main menu (Figure 1-1). Press '3' on the keyboard to select Delete Partition or Logical DOS Drive and Figure 1-4 should be displayed.

Figure 1-4: FDISK - Delete DOS Partition or Logical DOS Drive
7. Press "3" on the keyboard to Delete Logical DOS Drives in the Extended DOS Partition and Figure 1-5 should be displayed. Type in the drive letter of the partition to be deleted. Type in the Volume Label of the partition to be deleted. Press 'Y' when asked "Are you sure (Y/N)?" (Volume label entered must be exact, including any punctuation or capitalization).

Figure 1-5: FDISK - Delete Logical DOS Drive(s) in the Extended DOS Partition
8. Repeat step 7 until all logical drives have been deleted. Press the "ESC" key until returned to the main menu (Figure 1-1).
9. Press "3" to delete partition or logical DOS drive. Figure 1-4 will appear. Press "2" to delete extended DOS partition. Press the "ESC" key until returned to the main menu (Figure 1-1).
10. Press "3" to delete partition or logical DOS drive. Figure 1-4 will appear. Press "1" to delete primary DOS partition. Press "1" when asked "What primary partition do you want to delete?" Type in the Volume Label of the primary partition to be deleted. Press the "ESC" key until returned to the main menu (Figure 1-1).
11. Press '4' to display partition information and ensure that no partitions are defined. The "no partitions defined" message will appear. Press the "ESC" key until returned to the main menu (Figure 1-1). If partitions remain defined, then go back to the beginning and ensure they are deleted.
12. Press "1" to create DOS partition or logical DOS drive. Figure 1-6 should appear.
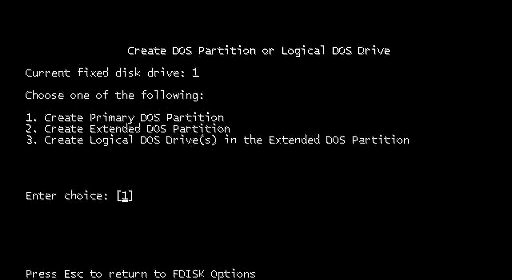
Figure 1-6: FDISK - Create DOS Partition or Logical DOS Drive
13. Press "1" to create primary DOS partition. If there was only one partition, press "Y" to create just one partition. If there was more that one, press 'N' when prompted to use the maximum available size. The system will ask what size or percentage you wish to make the drive. Type in the size you recorded in step 4. Press the "ESC" key until returned to the main menu (Figure 1-1).
WARNING! Do not enter a size greater than 1900MB under any circumstance, a drive size greater than 2GB is not supported through the help center. (DOS limitation)
14. At the main menu, a warning appears that no partition is active. Press ' 2' to set active partition. Press "1" to make the C: as the active partition. Press the "ESC" until returned to the main menu (Figure 1-1).
15. Press '1' to create DOS partition or logical DOS drive. Figure 1-6 should appear. Press '2' to create extended DOS partition. Use the entire remaining amount for the partition. After creating the extended DOS partition, the user will be prompted to create a logical DOS drive. Press 'Y', then enter the size in MB. Use the original size, or choose about one half of the available drive space.
16. Repeat step 15 until the extended DOS partition is filled with logical DOS drives. Press "ESC" until a DOS prompt appears. A message will indicate that changes have occurred to the hard drive and the system will need to reboot to have the system changes take effect.
17. Restart the system with the floppy diskette in the floppy diskette drive and the recovery CD in the CD-ROM drive.
18. At the message below:
"Do you wish to update the Aptiva Software on your hard drive (Y/N)? Type in "N".
19. At the "A:\>" prompt, type "format c: /u". Press the ENTER key on the keyboard when prompted for Volume Label.
20. If there are multiple hard drive partitions defined as drive letters, repeat step 19 for all drive letters.
21. After the hard drive partitions have all been formatted, restart the system with the Recovery Diskette in the floppy drive, and the Product Recovery CD in the CD-ROM drive.
22. When asked about updating the Aptiva Software, press 'Y' to begin the recovery process. This will occur three times. When the format is completed, press ENTER if prompted for a Volume Label.
23. When "Making Windows 95 System Directories" appears onscreen, the system has started restoring the original preloaded software to the hard disk. From this point, the process becomes automated. Many file names will start scrolling rapidly with "Exploding, Extracting, and Inflating" along beside them. The file copy stage of the recovery procedure will take around 20 minutes.
24. At the end of this period, the computer will prompt you to remove the floppy disk and restart the machine. Take out the diskette and the CD-ROM, and restart the computer. It should say Starting Windows 95, and then say starting Windows 95 for the first time. At this time, the user will be prompted to start entering information and setting up Windows 95. This will take another 15-20 minutes. It is recommended that no additional software be added to the system until the problem that resulted in the FFR has been isolated.
|
Search Keywords |
| |
|
Hint Category |
Software Installation/Configuration | |
|
Date Created |
08-07-97 | |
|
Last Updated |
12-03-99 | |
|
Revision Date |
12-03-2000 | |
|
Brand |
IBM Aptiva | |
|
Product Family |
Aptiva | |
|
Machine Type |
2144, 2168 | |
|
Model |
3R4; 3R6; 4R1; 4R9; M31; M51; M52; M63; 2R9; 3R1; 3R3; 3R5; 3R7; 3R9; 4R0; 4R2; 4R3; M41; M53; M55; M56; M57; M61; M62; M71; M72; 5R5; M91; 5R1; 6R3; A10; A12; A14; 5R2; 5R3; 5R6; 5R8; 5R9; 6R0; 6R4; 6R5; A15; A40; A44; A45; A50; A51; A52; A90; A92; A94; X17; X27; X37; X47; Z17; Z27; Z37; Z47; Y17; Y27; Y37; Y47; X10; X20; X30; X40; Z10; Z20; Z30; Z40; Y10; Y20; Y30; Y40 | |
|
TypeModel |
| |
|
Retain Tip (if applicable) |
| |
|
Reverse Doclinks |