
|
79.231 bytes |
Service Hints & Tips |
Document ID: PMYS-3LLJK9 |
Aptiva - 2137 Removals and replacements - Cover
Applicable to: World-Wide
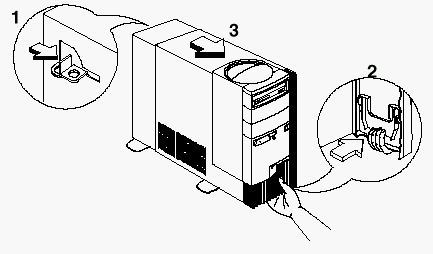
1. Disconnect the system unit power cord.
2. Release the lock that secures the cover at the back of the unit by pressing it toward the unlocked icon.
3. Slip your hand into the underside of the front panel and pull the release handle forward to release the cover.
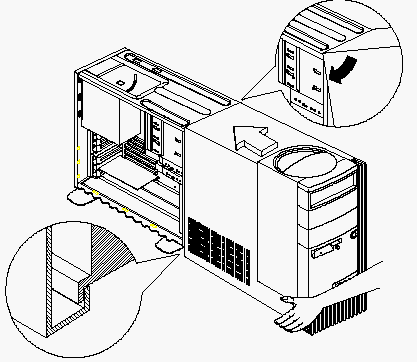
4. The cover slides along grooves that run on the sides of the unit. While still holding the handle, slide the cover forward to remove it completely.
5. Touch the bare metal frame of the system to dissipate any static electricity from your body (do not touch any of the components inside the frame until you have done this). Do not touch any component(s) with a voltage warning label.
NOTE: Replacing the Cover
1. Align the end corners of the cover with the front corners of the chassis. Ensure that the rails of the cover slides along the grooves on the sides of the chassis.
2. Slide back the cover until it fits in place. If the cover does not slide all the way to the rear, hold the upper rear corners of the cover and slightly press it inward while pushing it toward the rear end of the unit.
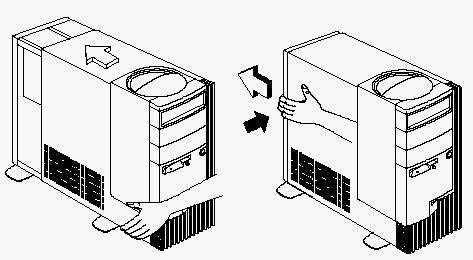
3. Slide the lock on the back of the unit to the locked icon to secure the cover to the chassis.
|
Search Keywords |
| |
|
Hint Category |
Hardware Installation/Configuration, Covers/Bezels | |
|
Date Created |
04-09-97 | |
|
Last Updated |
18-02-99 | |
|
Revision Date |
18-02-2000 | |
|
Brand |
IBM Aptiva | |
|
Product Family |
Aptiva | |
|
Machine Type |
2137 | |
|
Model |
All | |
|
TypeModel |
| |
|
Retain Tip (if applicable) |
| |
|
Reverse Doclinks |