
|
66.681 bytes |
Service Hints & Tips |
Document ID: MNOK-3T5N7S |
Aptiva - How to format a floppy diskette using Windows 95 or 98
Applicable to: World-Wide
1. Insert the diskette that you want to format into its drive.
2. From your Desktop double-click the My Computer icon.
3. Click the icon for the diskette you want to format.
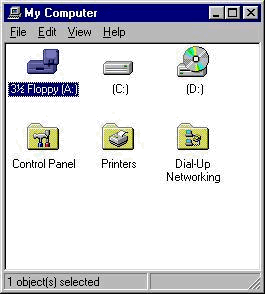
4. Be sure not to double-click the diskette icon, because you can't format a diskette if it is open in My Computer or Windows Explorer.
5. On the File menu, click Format.
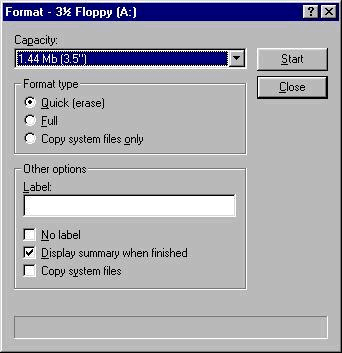
6. You can leave the capacity of the drive set to 1.44 MB (3.5") unless there is a specific need to have the size set to 720 KB (3.5"). If you need to change the capacity of the diskette to 720 KB, click once on the down arrow and choose 720 KB (3.5").
7. Choose the Format Type. The default option will be Quick Erase.
8. Enter the Label for the diskette.
9. If you do not wish for the diskette to have a label you can place a check in the box beside the No label option.
10. By default the Display summary when finished option will be checked.
11. If you wish to make the diskette bootable place a check in the box beside the Copy system files option.
Note: Formatting a diskette removes all information from the diskette. You cannot format a diskette if there are files open on that diskette.
|
Search Keywords |
| |
|
Hint Category |
Windows 95 | |
|
Date Created |
01-04-98 | |
|
Last Updated |
30-12-98 | |
|
Revision Date |
30-12-99 | |
|
Brand |
IBM Aptiva | |
|
Product Family |
Aptiva | |
|
Machine Type |
2134, 2136, 2137, 2138, 2139, 2140, 2142, 2144, 2153, 2156, 2158, 2159, 2161, 2162, 2163, 2164, 2168, 2176 | |
|
Model |
all | |
|
TypeModel |
| |
|
Retain Tip (if applicable) |
| |
|
Reverse Doclinks |