
|
33.630 bytes |
Service Hints & Tips |
Document ID: GSMH-3E8GGQ |
PC Server 330 - Starting the ServeRAID Configuration Program
Applicable to: World-Wide
Starting the ServeRAID Configuration Program:
To start the ServeRAID configuration program from the configuration program, insert the diskette into the primary diskette drive and power-on the system. If the system is already powered on, press Ctrl+ Alt+ Del.
During the power-on self test (POST), the RAID adapter checks the configuration information on the adapter and on the hard disk drives connected to it.
- If POST does not detect problems or changes, the Main Menu appears. See 'The ServeRAID Adapter Main Menu—.
- If POST detects any change in the adapter configuration, a configuration error message is displayed. See 'ServeRAID Adapter POST and Setup Messages—.
- If POST detects an adapter hardware problem, an error message is displayed. See 'ServeRAID Adapter Status and Error Messages—.
The ServeRAID Adapter Main Menu:
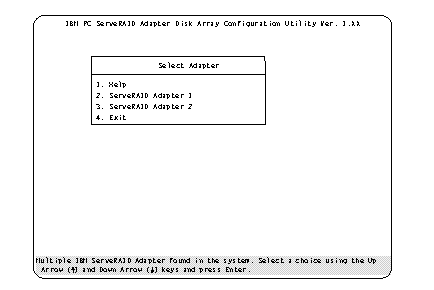
If more than one RAID adapter is installed in the server, you will get an adapter selection screen similar to the following before the Main Menu appears.
|
Note: |
Menu Navigation Keys:
|
Note: |
|
key / key |
To select a menu item, use these keys to highlight the item or press the number of the item then Enter. |
|
Esc key |
Returns you to the previous screen or to the previous work area of a screen. |
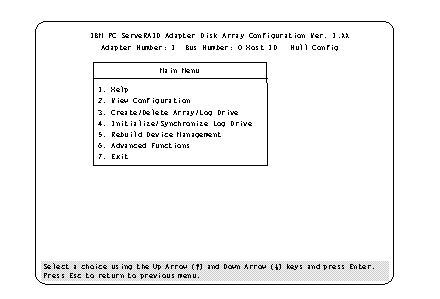
The Main Menu contains the following choices:
|
Help: |
Provides additional information. |
|
View Configuration: |
Displays the existing disk array configuration. |
|
Create/Delete Array/Log Drive: |
Allows you to select the drives to create an array, or to delete an existing array. It also allows you to define and delete a logical drive. |
|
Initialize/Synchronize Log Drive: |
Select this choice after creating an array: |
|
Rebuild/Device Management: |
Select to rebuild logical drives. The rebuild operation is supported only for RAID levels 1 and 5. |
|
Advanced Functions: |
Select this choice to change the write policy (the way data is written to the drive), to save the configuration |
|
Exit: |
Select this choice to leave the Main Menu. |
|
Search Keywords |
| |
|
Hint Category |
RAID, Hardware Maintenance Information | |
|
Date Created |
12-02-97 | |
|
Last Updated |
11-02-99 | |
|
Revision Date |
11-02-2000 | |
|
Brand |
IBM PC Server | |
|
Product Family |
PC Server 330, ServeRAID | |
|
Machine Type |
8640, Various | |
|
Model |
| |
|
TypeModel |
| |
|
Retain Tip (if applicable) |
N/A | |
|
Reverse Doclinks |