
|
69.041 bytes |
Service Hints & Tips |
Document ID: PMYS-3HSL59 |
Aptiva - How to re-install the Crystal audio drivers
Applicable to: World-Wide
1. Right-click on "My Computer". A menu will appear, left-click on"Properties" and a window with the heading of "System Properties" will appear. If it does not, then repeat the previous steps (Or an alternate path is to double-click with the left mouse button on "My Computer", double-click on "Control Panel", double-click "System").
2. Once you have the "System Properties" window open, left-click on the "Device Manager" tab. Double-click on the "Sound, Video and Game Controllers" heading. A window looking like Figure 1 should be on your screen, if it is not, then repeat the above steps.
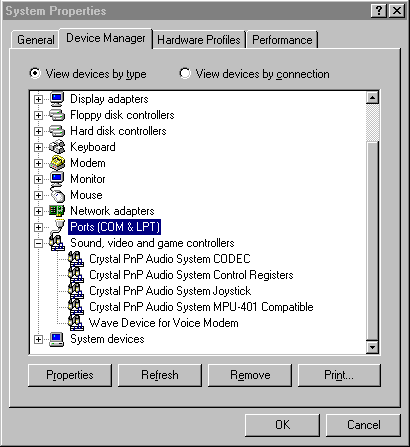
Figure 1 : Device Manager
3. Highlight any entry in the "Sound, Video and Game Controllers" category with one left-click, then click on "Remove" at the bottom of the window. A warning will come that states "You are about to remove this device from your system", click on "OK". This will bring you back to the "Device Manager" box. Once again double-click on "Sound, Video and Game Controllers", this time highlight another one of the entries underneath and follow the above steps to remove (it does not matter which one as we want to remove them all). Once it is gone repeat these steps until all the entries have been removed and the heading "Sound, Video and Game Controllers" is no longer present in "Device Manager". After all are gone, click "Close" at the bottom of "Device Manager". Then shut the system down by clicking "Start", go to "Shutdown", and click on "Yes" to shut the system down. Once the system is shut down, (this means all lights off and no noise coming from the system) simply power it back on with the plastic power button.
4. As your Aptiva powers up, a window appears stating that "Windows 95 has found new hardware and it is installing the software for it". After this process has completed a box will pop up and ask if you want to restart the computer to finish setting up your hardware, click "OK" to restart the computer. As the computer comes up, several boxes will appear, one after another, with information about which aspect of the audio drivers that Windows 95 is installing. Do nothing at this time as this is the "Plug-N-Play" feature at work. Once it has finished, the normal Desktop will come up and the Crystal Drivers will have been installed successfully.
5. Sometimes, however, the Crystal Audio Drivers on the computer are corrupt for one reason or another, and need to be installed from another device. If this is the case a box will come up that states:
"The disk labeled 'Crystal Audio Drivers Disk' is now required. The disk is provided by your computer manufacturer. Click 'OK' to continue."
Click "OK" at this point.
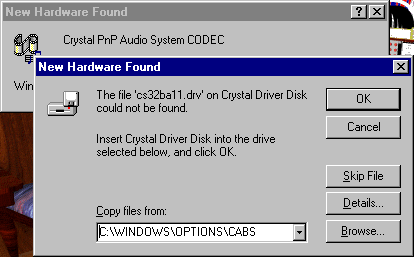
Figure 2 : New Hardware Found
6. Refer to figure above for this step if needed. Next a window or box will appear stating "The file 'cs32balla.drv' on Crystal Driver Disk could not be found. Insert Crystal Driver disk into the drive selected below and click 'OK'". (DO NOT CLICK "OK "AT THIS POINT) In this window there is a space provided that you can type into. If there is anything in that space, we need to take it out, as we need to put our own words (or path) in this box (To erase anything in the space provided simply click the mouse in the space and use the "Delete" or "Backspace" key on your keyboard to remove the letters). Type in 'g:\disk\crystal\install' (Do not type in the quotation marks, also this wording must be exact).
7. Insert the Diagnostics and Utilities CD that came with your Aptiva into the CDROM drive. Now, click the "OK" button on the box. The computer will copy the files it needs from the CD. The computer may ask you to click "OK" to reboot, if it does, take the CD out of the CDROM drive and then reboot. As the software is being installed, several windows will pop up stating that Windows 95 has found new hardware and is installing the required software. As in step #4, do nothing at this time. The Windows 95 desktop will come up shortly with the Crystal Audio drivers installed.
|
Search Keywords |
| |
|
Hint Category |
Audio, Windows 95 | |
|
Date Created |
06-06-97 | |
|
Last Updated |
09-03-99 | |
|
Revision Date |
09-03-2000 | |
|
Brand |
IBM Aptiva | |
|
Product Family |
Aptiva | |
|
Machine Type |
2136, 2137, 2138, 2139, 2140, 2142, 2153, 2159, 2161, 2162 | |
|
Model |
E10; E11; E12; E13; E14; E15; E16; E20; E21; E22; E23; E24; E25; E26; E27; E30; E31; E32; E33; E34; E35; E36; E40; E42; E44; E45; E46; E54; E55; E56; E64; E65; E66; E26; E46; E56; E76; E2C; E4C; E5C; E7C; E84; E8F; E86; E8C; E2H; ED1; ED2; ED3; EL1; EK1; EL2; EK2; E51; E52; E53; E60; E61; E63; E71; E73; E74; E75; E80; E81; E82; E8S; E83; E1A; E2A; E4A; E48; E57; E58; EQ1; EQ2; EQ3; EQ4; EV1; EG1; EV3; EG3; EV5; EG6; E03; E05; E06; E07; E08; E15; E1F; E25; E2F; E35; E3F; E45; E4F; E14; E16; E24; E34; E02; E04; E10; E11; E12; E13; E18; E19; E20; E21; E22; E23; E28; E30; E31; E32; E33; E41; E50; E17; E27; E37; E47; E26; E27; E36; E38; E39; EG7; EV7; E5N; E5D; EP4; EJ1; EJ2; EJ3; EJ4; EJ5; EJ6; EJ7; EJ8; EJ9; EL3; EL4; EL5; EL6; EL7; EL8; EL9; EM1; EM2; EM3; EM4; EM5; EM6; EM7; EM8; EN1; EN2; EN3; E5U; SE7; E6U; E5F; E5V; E6V; E55; E57; E48; E49; E40; E56; E69; E5Z; E6Z; E68; EPL; EPK; E6K; E6L; E51; E6J; E5A; EPA; E7A; E6A; E5P; E5T; E5H; SEE; SEZ; S8A; E69; E6Q; S4H; S4T; S4P; S6E; S49; S7M; L31; L35; L3F; L44; L46; L45; L51; L5H; L61; L6D; L71; L7M; LD2; LG2; LQ1; LQ2; LQ3; LQ4; LQ5; LQ6; LQ7; LV2; LG2; LG3; LG4; LV4; LG5; LV5; L66; L67; L87; 4Y1; 4Y2; 4Y3; 4Y4; 4Y6; S34; S35; S36; S44; S45; S46; S57; S61; S62; S67; S6F; S6H; S6S; SG1; SG2; SQ1; SQ2; SV1; SV2; 4Y1; 4Y2; 4Y3; 4Y4; E2N; E3N; E2F; E3F; E1U; E1V; E2V; E3V; E25; E35; E37; E45; E47; E3Z; E28; E29; E18; E44; E46; E58; E59; E21; E31; E2J; E3J; E1B; E1K; E1L; E3K; E3L; E4L; E4K; E4B; E1A; E2A; E3A; E4A; E3B; E1H; E3H; E3T; E3P; E1P; E3Q; E2C; 18R; 19R; S80; S90; 21R; 22R; 24R; 25R; 38R; 460; 461; 462; 471; C3D; C3E; C85; C8E; C8F; C8H; C8M; C8X; C9E; C9F; C9S; C9X; D34; D64; D84; E34 E64; E84; F34; F64; F84; G66; G76; H66; H76; J66; J76; L81; L91; M81; M91; N63; N64; N74; N81; N91; T71; T81; T84; T85; T8B; T8C; T8E; T8F; T94; T95; T9D; T9E; TAE; TAF; 28R; 29R; 30R; 31R; 33R; 35R; 37R; 41R; 54S; 56S; 57S; 58S; B86; B87; B97; D81; D91; E81; E91; G86; G96; G97; H86; H96; P81; P91; Q3C; Q81; Q91; S35; S3C; S8C; S8H; S9C; S9H; S9M; SIB; U81; U91; V86; V96; X8C; X9D | |
|
TypeModel |
| |
|
Retain Tip (if applicable) |
| |
|
Reverse Doclinks |