
|
46.418 bytes |
Service Hints & Tips |
Document ID: MCGN-3QZQSS |
PC Server 325 - Configuration
Applicable to: World-Wide
Configuration
The process of allocating server resources to organize and interconnect hardware devices and software programs is referred to as configuration. The steps required to configure the server depend on the number and types of devices and programs installed.
The server supports the following type of adapters.
Peripheral Component Interconnect (PCI)
Industry Standard Architecture (ISA)
Small Computer System Interface (SCSI)
In general, the greater the number and variety of hardware devices and software programs installed in the server, the more you will have to interact with the server and the devices to correctly configure the system.
The server comes with the following hardware configuration utility programs:
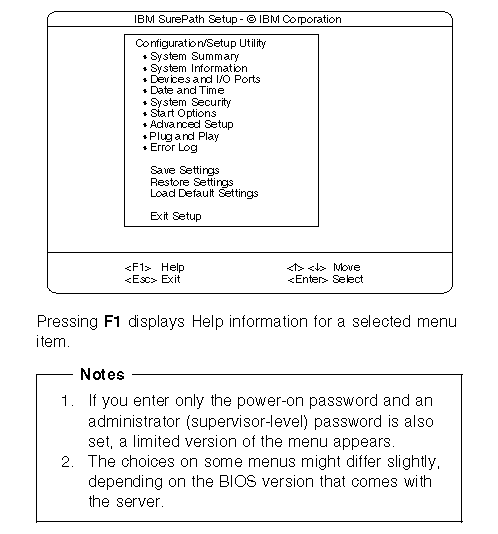
The built-in Configuration/Setup utility program configures system board functions, such as serial and parallel port assignments, change interrupt requests settings, and the startup sequence for drives installed in the system. You can also use this utility program to set passwords for starting up the server and accessing the Configuration/Setup utility program. The SCSISelect utility program can be used to configure the SCSI devices, changes default values, resolve configuration conflicts, and perform a low-level format on a SCSI hard disk drive.
The following actions are typically, but not always, required to configure the server.
1. Run the Configuration/Setup utility program and record the current configuration settings.
2. Set jumpers or switches on the server's system board. See "Jumpers" on page 122.
3. Set jumpers or switches on the device. Refer to the device installation instructions.
4. Install the device in the server.
If you install an ISA adapter that is not a Plug and Play device, use the Plug and Play choice on the Configuration/Setup utility programs main menu to set the ISA legacy resources. These include memory, I/O ports, direct memory access (DMA), and interrupt request levels (IRQs). See Plug and Play on page 73 for more information.
5. Install software programs. Refer to the installation instructions that come with the software.
6. Resolve configuration conflicts. See "Resolving Configuration Conflicts" on page 67.
Configuration/Setup Utility: For most configurations, the server will operate using the default system settings. You need to change the settings only to resolve configuration conflicts or to enable or change device functions
After you run and exit the Configuration/Setup utility program, configuration information is stored in nonvolatile
RAM (NVRAM). The configuration information remains available for the next system startup while the server is powered off.
Always run the Configuration/Setup utility program if you added or removed any hardware option or receive an error message instructing you to do so.
Starting the Configuration/Setup Utility Program: To start the Configuration/Setup utility program:
1. Power-on the server and watch the screen.
2. When the message "Press F1 to enter Configuration/Setup" appears, press F1.
The Diagnostic/Setup Utility menu appears.
|
Note |

To change configuration settings:
1. Use the Up Arrow or Down Arrow keys to select the menu item for the configuration setting you want to change. Selected items are highlighted. Then press Enter.
2. Select the configuration setting you want to change. Use the Page Up (PgUp) and Page Down (PgDn) keys to scroll through the menu, if needed.
3. Use the Right Arrow or Left Arrow keys to select the appropriate setting for the selected item.
4. Repeat Steps 1 through 3 for each setting you want to change. Press Esc to return to the Configuration/Setup Main Menu.
5. After making changes, you can select
- Save Settings to save the selected changes.
- Restore Settings to delete the changes and restore the previous settings.
- Load Default Settings to cancel the changes and restore the factory settings.
6. To exit from the Main Menu, select Exit Setup. The system prompts you to confirm your choice. You can return to the Main Menu, or save your changes and exit, or exit without saving your changes; the Diagnostic/Setup utility menu displays.
|
Note |
7. Press Esc to exit from the Diagnostic/Setup utility menu and restart the server.
|
Search Keywords |
| |
|
Hint Category |
Configuration, Hardware Maintenance Information | |
|
Date Created |
23-01-98 | |
|
Last Updated |
07-08-98 | |
|
Revision Date |
06-08-99 | |
|
Brand |
IBM PC Server | |
|
Product Family |
PC Server 325 | |
|
Machine Type |
8639 | |
|
Model |
PB0; PT0; PTW; RB0; AAB; 1RY; 2RY; CM0; ZB0; ZBW; ZM0; ZMW; ZS0; ZSW; ZT0; ZTW; ZBR | |
|
TypeModel |
| |
|
Retain Tip (if applicable) |
| |
|
Reverse Doclinks |