
|
118.429 bytes |
Service Hints & Tips |
Document ID: PMYS-3K4HNP |
Aptiva - Default settings for the Aptiva Communication Center
Applicable to: United States
For Windows 95 Systems:
1. Click on "Start", click on "Programs", click on "Aptiva Productivity", click on "Aptiva Communication Center", and click on "Operator". Refer to Fig. #1 for what should be on your screen at this time. If this is the first time opening this program a registration form will come up. You can fill it out now or at a later time. Proceed to step 2.
For Windows 3.1 Systems:
1. At "Program Manager", double-click the "Aptiva Productivity" icon. Double-click "Aptiva Communication Center". Refer to Fig. #1 for what should be on your screen at this time. If this is the first time opening this program a registration form will come up. You can fill it out now or at a later time. Proceed to step 2.
For OS/2 Systems:
1. At the OS/2 Desktop, double-click the "Aptiva Productivity" icon. Double-click "Communication Center". Refer to Fig. #1 for what should be on your screen at this time. If this is the first time opening this program a registration form will come up. You can fill it out now or at a later time. Proceed to step 2.

Figure 1
2. To verify that you have the default settings, click on "Settings", then click on "Telephone", refer to Figure #2 for the appropriate settings.
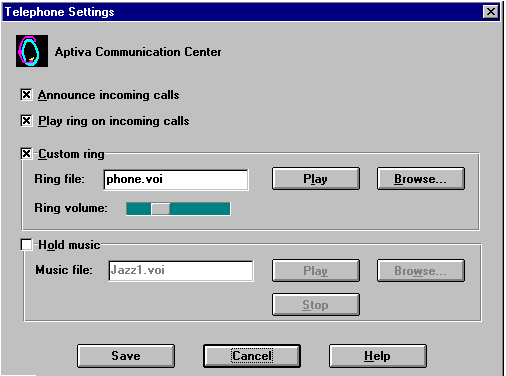
Figure 2
Click "Cancel" to get back to the previous screen or "Save" if you wish to save changes.
3. Next click on "Answering Machine". Refer to Figure #3 for the default settings.
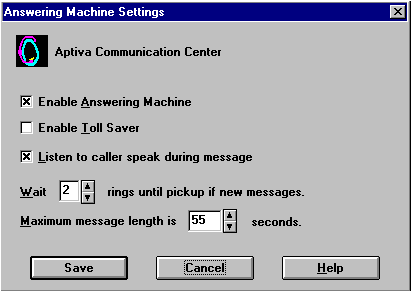
Figure 3
Click "Cancel" to return to the previous screen or "Save" if you wish to save changes.
4. The next button is "Fax". Click on this. All of the spaces should be blank. Click "Cancel" to get back to the previous screen or "Save" if you wish to save changes.
5. The next button is "Modem". This setting determines the path for the default communications program to be used by the modem. The default program in Windows 95 is HyperTerminal. The default path is:
C:\PROGRA~1\ACCESS~1\HYPERT~1\HYPERTRM.EXE. Refer to Figure #4 for illustration of the screen.
The default program in Windows 3.11 and OS/2 is Delrina Wincomm. The default path is : C:\WINCOMM\WINCOMM.EXE.
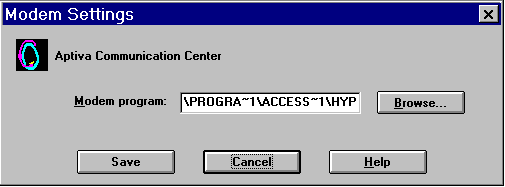
Figure 4
6. Next, click on the "Dialer" button. Under "Default Dial Type" the "Tone" radio button should be filled and under "Blind dialing Section" the "Wait for dialtone" radio button should be filled. Next to "Use Calling Card" it should say "None". Click "Cancel" to exit or 'Save' if you wish to save changes. Refer to Figure #5 for the default settings. In most cases, a user would insert "1" in the
space indicated for "Dial 'blank" for log distance calls.
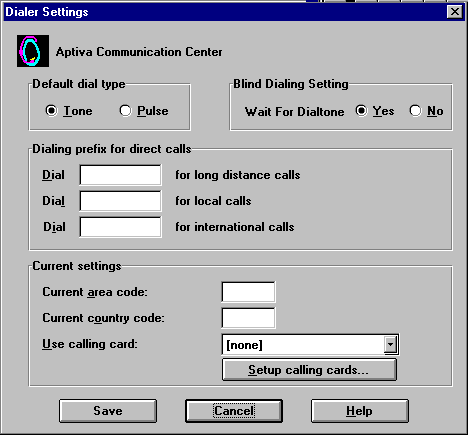
Figure 5
7. Next, click on "Mailbox". In the white box underneath "Mailbox", it should say "0:General". Click "Close" to return to previous screen. Refer to Figure #6 for the default settings.
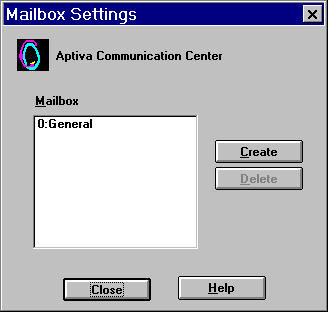
Figure 6
8. At this point we are through with this section, click on "Close" for the "Settings" box to return to the opening "Operator" screen.
9. We now are going to check the other settings. The "Modem" button will open the HyperTerminal application, for connection to online bulletin boards and does not concern us here. The "Address Book" is for storage and retrieval of telephone numbers and related information. This allows for rapid selection of telephone numbers for FAXing and voice calling. The "Fax" button is used to send faxes and does not concern us at this point either.
10. Click on "Telephone". Make sure the "DND" light is not on. (DND stands for "Do not disturb". This will allow you to receive voice telephone messages and faxes, but not be notified when they are coming in) Under 'Mailboxes' in the white box should be: "0 for General"
11. This concludes configuring the basic settings. Once this is accomplished, simply open up "Communications Center" and you are able to send and receive both faxes and voice mail.
Note: There are updated Aptiva Communication Center files available on the IBM BBS at (919) 517-0001, and on the IBM Aptiva Support Web page. Use the ACCOS2 1 through 4 files for systems preloaded with OS/2-Win 3.1 and the ACCWIN1 through 4 files for Windows 95 systems. Important: Be sure to read the README.TXT files on disks, as most of the time it is essential to also upgrade the modem files BEFORE upgrading the Communication Center files.
|
Search Keywords |
| |
|
Hint Category |
Communications Software, Software Installation/Configuration | |
|
Date Created |
18-07-97 | |
|
Last Updated |
08-12-98 | |
|
Revision Date |
08-12-99 | |
|
Brand |
IBM Aptiva | |
|
Product Family |
Aptiva | |
|
Machine Type |
2134, 2144, 2168, 2176 | |
|
Model |
9W2; 932; 132; 142; 154; 162; 163; 172; 182; 152; LL1; L10; K10; LL3; L30; K30; LL5; L50; K50; LL2; L20; K20; KU6; LL4; L40; K40; KU4; LL6; L60; K60; L15; L16; K25; K26; L43; K43; L45; K45; KU5; L55; K55; L65; K65; L66; K66; U15; U16; L33; K33; L35; K35; U33; U35; W37; W47; N30; N40; N50; N60; N41; N51; N61; N71; S20; S55; S65; S64; S74; S75; S50; X10; Y10; Z10; X20; Y20; Z20; X30; Y30; Z30; X40; Y40; Z40; X37; X47; Y37; Y47; Z37; Z47; X17; X27; Y17; Y27; Z17; Z27; 352; 354; 355; 357; 364; 362; 363; 372; 374; 381; 442; 447; 451; 454; 382; 384; 392; L01; K01; P01; L21; K21; P21; L22; K22; P22; L23; L31; L32; L52; L6T; P23; P31; P32; P52; K23; K31; K32; K52; L53; L62; P53; P62; K53; J62; K74; Y04; X01; Y01; Z01; X31; Y31; Z31; X03; Y03; Z03; X34; Y34; Z34; X63; Y63; Z63; X35; Y35; Z35; X61; Y61; Z61; X33; Y33; Z33; X65; Y65; Z65; X71; Y71; Z71; W33; W55; W65; V34; T34; V65; T65; V71; T71; T63; H54; H56; H55; H5E; H5F; H64; H65; J31; J33; J35; JDA; JCL; J3K; J3L; J3A; JSN; J3C; J3E; J3X; J3Y; J3Z; J3V; J3W; J51; J52; H6D; H6E; H6F; H7E; H7F; H7G; T71; T65; T62; T33; T01; T34; T63; C23; C31; C32; C33; C35; C3X; C53; C55; C5X; C65; C66; C67; C6B; C6D; C6E; C6X; C6Y; C73; C77; C7X; 6R8; 6R9; 7R0; 7R1; 7R2; 7R3; 7R6; 7R7; 7R9; 8R1; 8R6; 8R8; 9R3; 9R4; 9R5; 9R6; F23; F31; F32; F33; F35; F67; F6B; M40; M41; M53; M54; M55; M56; M57; M58; M60; M61; M62; M70; M71; M72; M91; A40; A44; A45; A50; A51; A52; A90; A92; A94; 2R6; 3R5; 4R2; 4R7; 2R9; 3R3; 3R1; 4R8; 3R0; 3R7; 4R0; 4R9; 3R8; 3R9; 4R3; 5R5; C40; C41; C45; C53; C61; C21; 6R6; M30; M31; M35; M50; M51; M52; M63; A10; A12; A14; 2R0; 2R3; 2R0; 2R3; 2R5; 2R7; 2R8; 3R4; 3R6; 4R1; 5R1; 6R3; C30; C31; C51 | |
|
TypeModel |
| |
|
Retain Tip (if applicable) |
| |
|
Reverse Doclinks |