
|
22.076 bytes |
Service Hints & Tips |
Document ID: RJJR-3QJKF5 |
TP 770/E/ED - Hard Disk Drive Upgrade option installation instructions
Applicable to: World-Wide
The following instructions describe how to replace the original hard disk drive in the HDD bay with the ThinkPad 770 Hard Disk Drive Upgrade option. To install this option as a second hard disk drive into the UltraBay II, you need the 2nd HDD Adapter option. You can purchase this option through your IBM authorized reseller or IBM marketing representative. To install this option into the UltraBay II, refer to the booklet of the 2nd HDD Adapter option.
Installation Instructions
Before you begin the installation, check that you have the following items in the Hard Disk Drive Upgrade option kit.
Hard Disk Drive This booklet

System Program Service (BIOS)
Diskette

Your system needs to have a diskette drive to install the BIOS upgrade on the diskette included with this option. Make sure there is a diskette drive installed in your system before installing this option.
Installing the BIOS (This step is not necessary on the ThinkPad 770E and ED)
Prior to installing this upgrade, you must install the required System Program Service (BIOS) Diskette included in this package. The required BIOS version must be dated 11/21/97 or later.
Check the level of the System BIOS currently in your ThinkPad 770:
1. Turn off the computer, and remove any diskette from the diskette drive.
2. Press and hold F1; then turn on the computer. Hold F1 until the Easy-Setup menu appears.
The BIOS date is shown on the Easy-Setup main screen.
If the BIOS date is 11/21/97 or later, you do NOT need to install the update to your BIOS.
To install the System Program BIOS :
You need an AC adapter and a charged battery pack. If your computer is attached to a docking station or port replicator, turn off the computer and detach it before updating the system BIOS.
1. Firmly connect the AC adapter to the computer.
2. Insert the System Program Service Diskette into the diskette drive and turn on the computer.
3. A simple menu will appear. The first option on the menu will say Read this first. Choose that option, read through the instructions, then go back to the menu and choose the second option, Update system program.
Attention
Do not turn off or suspend the computer until the update has been completed. IF YOU TURN OFF OR SUSPEND THE COMPUTER WHILE THE UPDATE IS STILL IN PROGRESS, THE SYSTEM BOARD MIGHT HAVE TO BE REPLACED.
Replacing Procedures
The following instructions describe how to replace the original hard disk drive in the HDD bay with the ThinkPad 770 Hard Disk Drive Upgrade option. If you want to install this option into UltraBay II, refer to the booklet for the 2nd HDD Adapter option.
Attention
Handle the hard disk drive carefully. You might damage the hard disk drive if you drop it.
1. Before removing the original hard disk drive, make a backup copy of all necessary data files which are on the hard disk.
2. Turn off the computer. Then disconnect the AC adapter and all cables from the computer.
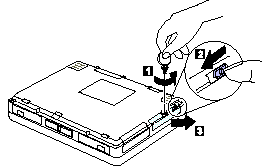
3. Turn the computer upside down, and remove the screw holding the HDD bay cover 1 . Next, slide the latch to the left 2 and remove the HDD bay cover 3 .

4. Pull the original hard disk drive out of the HDD bay.
5. Insert the ThinkPad 770 Hard Disk Drive Upgrade into the HDD bay.
6. Reinstall the HDD bay cover, slide the latch to the right, and reinstall the screw on the HDD bay cover.
7. Return the computer to the upright position. Connect the AC adapter and cables to the computer.
8. Press and hold F1 and turn on the computer. The Easy-Setup menu appears.
9. Select Test.
10. Select HDD and then Start.
11. Make sure the test ends without any errors. If the test ends with an error, make sure that all parts are firmly connected and the hard disk drive is correctly installed. Run the test again. If the test still ends with an error, call your IBM authorized reseller or IBM marketing representative.
12. Install the operating system, application programs, and all of your backup data files onto the new hard disk drive.
|
Attention Depending on the operating system you are | |
|
Operating System |
Limitations |
|
Windows 95 and Windows NT:
DOS 3 |
There are no limitations when you use these systems. DOS 3 DOS is only able to recognize up to 7.9 GB of hard disk drive storage capacity. |
|
Search Keywords |
| |
|
Hint Category |
Hard Drives | |
|
Date Created |
08-01-98 | |
|
Last Updated |
25-11-98 | |
|
Revision Date |
10-11-99 | |
|
Brand |
IBM ThinkPad | |
|
Product Family |
ThinkPad 770, ThinkPad 770E/ED | |
|
Machine Type |
9548, 9549 | |
|
Model |
various | |
|
TypeModel |
| |
|
Retain Tip (if applicable) |
| |
|
Reverse Doclinks |