
|
50.877 bytes |
Service Hints & Tips |
Document ID: GSMH-3CFFBG |
|
This document is provided to IBM and our Business Partners to help sell and/or service IBM products. It is not to be distributed beyond that audience or used for any other purpose. |
IBM ValuePoint - Diagnostics and test information (6384 P60/D)
Applicable to: World-Wide
Diagnostics and Test Information (6384 P60/D):
This section describes how to run the 6384 P60/D diagnostics tests.
To start the diagnostics tests:
1. Power-off the computer.
2. Insert the Diagnostics Diskette Type 4 into the primary 3.5-inch diskette drive.
3. Power-on the display and all external devices.
4. Power-on the computer. (An IBM PS/ValuePoint logo screen appears once or twice during POST.)
5. When the IBM PS/ValuePoint System Diagnostics logo screen appears, press Enter.
6. Select Test the system from the Main Menu, then press Enter. The following System Diagnostics screen appears.
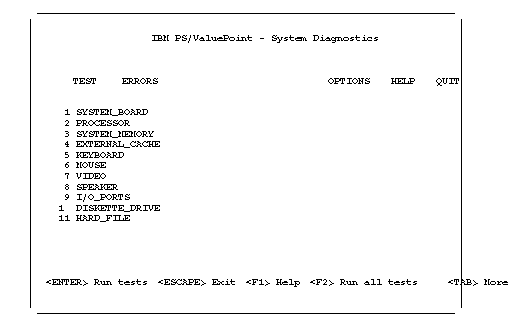
Figure 1. System Diagnostics Screen
The System Diagnostics screen contains a menu bar near the top of the screen, and instructions at the bottom of the screen. Use the left and right arrow keys on the keyboard to select a menu item. For some items, when you make a selection, another menu appears. Use the up and down arrow keys to make selections on that menu, then press Enter. If the IBM PS/ValuePoint System Diagnostics logo screen, Main Menu, or IBM PS/ValuePoint System Diagnostics screens do not appear go to -- 'Symptom to FRU Index' --.
To run all the component tests, go to the next section, żRunning All Tests—.
To run tests on selected components, go to żRunning Selected Tests'.
Running All Tests:
Note:
If the computer hangs during testing, replace the last FRU being tested. If that does not solve the problem, go to -- 'Undetermined Problem' --.
To test all the FRUs in the computer:
1. Select Test from the menu bar.
2. Press Alt+ F4 , then answer the questions that appear on the screen. Press Enter after answering each question. After the last question, the following message appears.
Enable tests: complete. (press any key ...)
3. Press Alt+ F2. The following message appears.
Run all tests: how many times?( <cr> = no limit~:)
4. Enter the number of times for the tests to run, then press Enter.
Note:
If you press Enter without specifying a number, the tests run continuously until you press Ctrl+C or Ctrl+ Break.
If a test is successful, a message appears indicating the test completed successfully. When all the tests have completed, the following message appears:
Test complete (press any key...)
Press any key to return to the Test menu.
If a test is not successful, an error message indicates the failure. (The error message is placed in an error log for later review.) Also, the Errors text in the menu bar blinks and the following message appears:
Test complete (press any key...)
Press any key to return to the Test menu. To end testing at any time, press Ctrl+C or Ctrl+ Break.
Running Selected Tests:
To test selected FRUs in the computer:
1. Select Test from the menu bar.
2. Press Alt+ F3 to disable all FRU tests, then press any key.
3. Use the up and down arrow keys to select the FRU(s) you want to test.
4. Press F4 to enable the FRU test.
5. If any questions appear, pressY orN , then press Enter.
6. Press any key to enable the test.
7. Press Enter , enter the number of times to run the test, then press Enter to start the test.
Note:
If a sub-menu appears, press F4 to enable any test in the sub-menu, then press Enter to start that test.( F3 disables any of the enabled tests.)
Diagnostics Screen Function Keys:
This section contains information about the function keys used in the 6384 P60/D Diagnostics tests.
|
Key |
Description |
|
F1 |
Help. Displays general help information at any time for a highlighted item. |
|
F2 |
Run selected tests. The following message appears. |
|
F3 |
Disable selected tests. The following message appears (in this case, for the microprocessor): |
|
F4 |
Enable selected tests. For interactive, destructive, or external hardware tests, questions must be answered before they can be run, then the following message appears. Enable tests: complete, not all tests enabled. (press any key ...) |
|
F7 |
View error messages in the error message file. |
|
Alt+F2 |
Run all enabled tests sequentially. The following message appears. |
|
Alt+F3 |
Disable all tests. The following message appears. All tests disabled (press any key...) |
|
Alt+F4 |
Enable all tests. For interactive, destructive, or external hardware tests, questions must be answered before they can be run, then the following message appears. |
Diagnostics Screen Menus:
This section contains descriptions of the menus at the top of the System Diagnostics screen.
Test Menu:
When you select a Test menu item, the screen displays the test name and asks how many times to run the test. For example, if you select the system board test (SYSTEM_BOARD), the following message appears.
Run SYSTEM_BOARD: how many times?Ð <cr> = no limit~
Note:
If you press Enter without specifying a number, the tests run continuously until you press Ctrl+C or Ctrl+ Break.
The screen displays more selections for some tests. For each item, Press Y , then press Enter. For example, if you select the mouse test (MOUSE), the screen displays two additional test selections: PORT and MOUSE. (A disabled test appears in subdued color in the menu. To enable a test, highlight it, then press either the Spacebar or F4.
Do one of the following:
To run the highlighted test, press Enter.
To run all the tests associated with the highlighted test, press F2.
During the tests, a window continuously displays the test results. Some tests use the entire screen, others use a window on the screen.
To end a test at any time, press Ctrl+C or Ctrl+ Break.
If a test is successful, a message appears indicating the test has passed. When tests have been completed, the following message appears. Test complete (press any key...)
When you press any key, the program returns to the Test menu.
If a test fails:
1. An error message is displayed, followed by a message that the test failed.
2. The error message is added to an error log.
3. The Errors text in the menu bar blinks.
4. The following message appears.
Test complete (press any key...)
Pressing any key returns you to the Test menu.
Errors Menu:
From the Errors menu, you can view, clear or save error messages. The following are the Errors menu items. Item Description View errors The screen displays an error code and a brief explanation for each error found during the diagnostics tests.
The following are two examples of error messages:
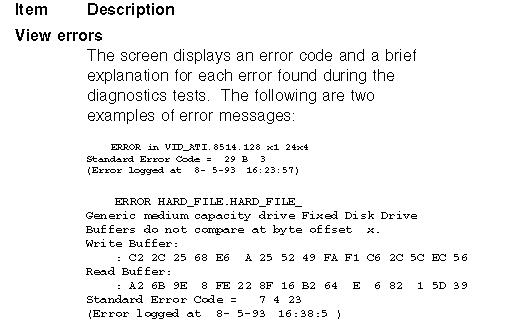
The error messages are placed in a temporary file named TEST.OUT. The information in this file is lost if not saved in a permanent file before the computer is powered off or restarted. Select Save errors from this menu to save the error messages.
Clear errors:
The following message appears.
Clear? (y(n))
To erase all error messages, pressy , then press Enter. To keep the error messages, press n , then press Enter.
Save errors:
The following message appears.
Enter filename ( test.out):
To save the error messages to a file, type a path and file name or use the default file name, TEST.OUT, then press Enter.
Press Esc to return to the Errors menu without saving the error messages.
Options Menu:
The following are the Options menu items.
Line Printer:
When you select this option, the following message appears. Line printer: Enable? (y/(n))
Press y , then press Enter to enable the printer.
If you do not want to enable a printer, pressn , then press Enter or Esc.
Enabling a printer redirects the test results to the printer instead of a file.
Halt on error:
When you select this option, the following message appears.
Halt on error: Enable? (y/(n))
To halt program operation when an error is detected, press y , then press Enter.
If you do not want to halt program operation when an error is detected, pressn , then Enter or Esc.
Prompt on error:
When you select this option, the following message appears.
Prompt on error: Enable? (y/(n))
To receive a prompt when an error is detected, press y , then press Enter.
If you do not want to receive a prompt when an error is detected, pressn , then press Enter or Esc.
Continue after prompt:
When you select this option, the following message appears.
Enter number of seconds to wait (no limit):
Enter the number of seconds for an interactive test to wait for a keyboard response before it continues. If no keyboard response is received in the specified time, the test continues or the next test begins. If you do not enter a value, the program waits for a response indefinitely.
Redirect to file:
Sends the results of your testing to a file. When you select this option, the following message appears. Enter filename (test.out):
Type a path and file name or use the default file name, TEST.OUT; then press Enter.
Run all tests:
Allows you to run all enabled diagnostics tests sequentially. To disable any tests, highlight the test; then press F3. The disabled test changes to a subdued color on the Test menu. To enable a test, press F4 , answer any questions, then press Enter after each question. An enabled test changes to normal color on the Test menu. When you select Run all tests, the following message appears.
Run tests how many times?(<cr> = no limit)
Enter the number of times for the tests to run, then press Enter.
Note:
If you press Enter without specifying a number, the tests run continuously until you press Ctrl+C or Ctrl+ Break.
Help Menu:
The Help menu selections contain detailed information on menus, function keys, windows, starting and stopping tests, and test parameters.
Quit:
To end the diagnostics tests, select żQuit.— To return to the main menu, press Enter , then pressY. Follow the directions at the bottom of the Main Menu screen to exit or to restart your computer. If testing does not find a problem, but you still have one, go to -- 'Symptom - to - FRU - Index' --, and look for the problem symptom.
|
Search Keywords |
| |
|
Hint Category |
Hardware Maintenance Information | |
|
Date Created |
17-12-96 | |
|
Last Updated |
08-05-98 | |
|
Revision Date |
29-04-99 | |
|
Brand |
IBM PC | |
|
Product Family |
ValuePoint | |
|
Machine Type |
6384 | |
|
Model |
various | |
|
TypeModel |
| |
|
Retain Tip (if applicable) |
| |
|
Reverse Doclinks |