
|
23.249 bytes |
Service Hints & Tips |
Document ID: GSMH-3E8JYG |
PCServer330 - Advanced Systems Management Adapter
Applicable to: World-Wide
PC Server Advanced Systems Management Adapter
|
Note: |
Installation Requirements:
The Adapter can be installed only in ISA or EISA systems. The Adapter is supported by TME 10 NetFinity Version 4.1.
|
Note: |
Resetting the Adapter and Clearing the Configuration:
If you removed an adapter from one system and are reinstalling it in a different system, you must reset the adapter (clear the configuration) before you reinstall it to avoid possible configuration conflicts.
With the adapter removed from the system:
1. Remove the battery from the adapter and set it aside.
2. With a metal paper clip or small metal screwdriver, short the battery-socket contacts on the adapter together. This resets the adapter and clears the configuration.
3. Reinstall the battery on the adapter.
System and Adapter Configuration:
The IBM PC Server Advanced Systems Management Adapter must be configured after installation.
Configuration Considerations:
The adapter uses only adapter COM B for external communication, therefore a modem or null-modem cable must be connected to adapter COM B.
To share adapter COM B with the system, adapter COM B must be assigned one of the following I/O addresses:
3F8 (COM 1)
2F8 (COM 2)
3E8 (COM 3)
2E8 (COM 4)
To dedicate the adapter COM B to the adapter only, adapter COM B must be disabled with the adapter configuration program to prevent the system from accessing it. The adapter COM A is not used by the adapter. For the system to use adapter COM A, it must be configured with the adapter configuration program.
Each port I/O address covers eight contiguous address.
Make sure there are no conflicts between the adapter port I/O addresses and interrupts you configure, and previously assigned system I/O addresses and interrupts.
The adapter can be configured to the following I/O address ranges and interrupts:
|
I/O Address Ranges (hex) |
Interrupts |
|
100-107 |
3 |
|
120-127 |
4 |
|
140-147 |
5 |
|
168-16F |
9 |
|
188-18F |
10 |
|
200-207 |
11 |
|
220-227 |
14 |
|
240-247 |
15 |
|
268-26F |
N/A |
|
300-307 |
N/A |
|
Note: |
If you have an EISA Configuration Utility program (called System Configuration Utility on some systems) go to 'EISA Configuration Utility—. If you do not have an EISA Configuration Utility program, and the system's Configuration/Setup Utility has the ISA Legacy Resources option go to 'Configuration/Setup Utility ISA Legacy Resources:—.
If you do not have an EISA Configuration Utility program or the Configuration/Setup Utility ISA Legacy Resources option go to 'Manual I/O Address and Interrupt Assignment'.
EISA Configuration Utility:
1. Load the EISA Configuration Utility program.
2. Select Step 2 from the main menu to add the adapter and create the CFG file.
3. Display the available I/O addresses and assign I/O addresses for the adapter ports.
4. Display the available interrupts.
5. Assign interrupts for the adapter ports.
6. Enter the assigned I/O addresses and interrupts on the Configuration Data Worksheet.
7. Follow the on-screen prompts to exit the utility program.
Go to 'Adapter Configuration:—.
Configuration/Setup Utility ISA Legacy Resources:
1. Restart the system and run the Configuration/Setup Utility.
2. Select the ISA Legacy Resources option.
3. Select I/O Port Resources.
4. Reserve I/O addresses for the adapter ports.
5. Enter the reserved I/O addresses on the Configuration Data Worksheet.
6. Select Interrupt Resources.
7. Reserve interrupts for the adapter service processor port and the two adapter COM ports.
8. Enter the reserved interrupts on the Configuration Data Worksheet.
9. Follow the on-screen prompts to exit the Configuration/Setup Utility.
Go to 'Adapter Configuration:—
Manual I/O Address and Interrupt Assignment:
If you do not have the EISA Configuration Utility program or the Configuration/Setup Utility ISA Legacy Resources option, follow this procedure.
1. Select available I/O addresses and interrupts for the adapter ports.
2. Enter these I/O addresses and interrupts on the Configuration Data Worksheet below.
Configuration Data Worksheet
|
I/O |
Address Interrupt | |
|
Service Processor Port | ||
|
Adapter COM A | ||
|
Adapter COM B |
Continue with 'Adapter Configuration:—.
Adapter Configuration:
1. Power-off the system.
2. Make sure the adapter configuration diskette is not write protected.
3. Insert the adapter configuration diskette into the diskette drive.
4. Press Ctrl+ Alt+ Del to restart the system.
The adapter configuration Flash Utility menu is displayed:
Flash Utility
Select one:
Configure Service Processor
View Service Processor Configuration
Update Service Processor Set Up COM Ports
Configure OS Watchdog Timer
Exit
Enter F1=Help F3=Exit
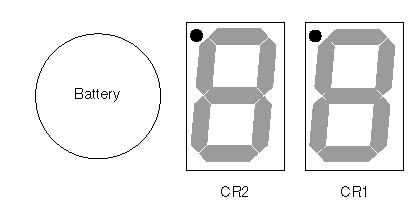
5. Look at the two LED displays on the adapter and check the dot on each LED for the indications listed in the table.

|
CR1 Dot On |
CR1 Dot Off: |
|
Problem indication. |
Normal. Check CR2 Dot. |
|
CR2 Dot Blinking |
CR2 Dot Off |
|
Normal; microcode is loaded. Go to step 6. |
Microcode is not loaded. Select Update Service Processor on the Flash Utility menu and follow the prompts. Then return to step 5. If CR2 continues to be off, replace the adapter battery. (See 'Battery Notice—) |
|
Note: |
Go to 'Device Driver Installation— for device driver installation instructions.
|
Search Keywords |
| |
|
Hint Category |
Advanced Systems Management, Hardware Maintenance Information | |
|
Date Created |
12-02-97 | |
|
Last Updated |
30-04-98 | |
|
Revision Date |
28-04-99 | |
|
Brand |
IBM PC Server | |
|
Product Family |
PC Server 330 | |
|
Machine Type |
8640 | |
|
Model |
| |
|
TypeModel |
| |
|
Retain Tip (if applicable) |
N/A | |
|
Reverse Doclinks |