
|
46.123 bytes |
Service Hints & Tips |
Document ID: GSMH-3CAD2S |
|
This document is provided to IBM and our Business Partners to help sell and/or service IBM products. It is not to be distributed beyond that audience or used for any other purpose. |
TP General - N45SL Related Service Procedure
Applicable to: World-Wide
Related Service Procedures:
This section provides related service information on the following:
¨Power-on Password´
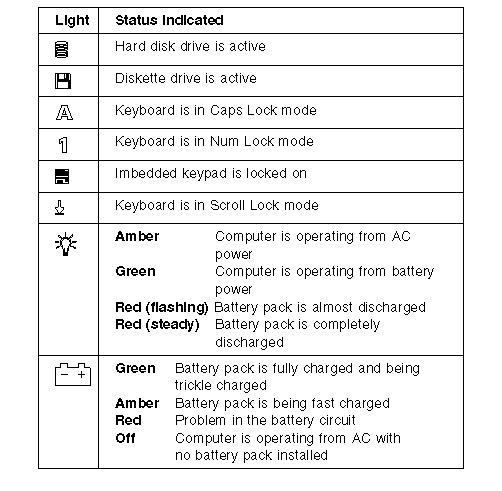
¨Status Indicators´
¨How to Run Advanced Diagnostics´
¨Running PREP´
¨Updating Flash Memory´
Power-on Password:
To service a computer with an active, unknown, power-on password, do the following.
1. Power-off the computer and unplug the power cord.
2. Remove the battery pack.
3. Remove the math coprocessor access panel.
4. Locate the two override pins on opposite sides of the socket.
5. Install a jumper wire between the pins.
6. Install the battery pack.
7. Power-on the computer and leave it on until the LEDs blink and the computer locks up.
8. Remove the jumper wire.
9. Press and hold the lid switch, then power-on the computer.
Status Indicators:

How to Run Advanced Diagnostics:
1. Power-off the computer.
2. Insert the Advanced Diagnostics Diskette into the diskette drive.
3. Power-on the computer.
4. Press Ctrl+ Alt+ Ins to start the Monitor program.
5. In the Monitor program, type BF and press Enter to boot from the diskette drive.
6. Follow the Advanced Diagnostics menus to test the computer. (Press F1 for help.)
Running PREP:
The PREP utility initializes and prepares the hard disk surface for storage of data. It performs a low level format then checks for bad sectors. If any bad sectors are found, they are marked in a way that prevents data from being stored in them.
There are two situations when PREP is used:
1. To prepare the hard disk surface for formatting when installing a new hard disk drive.
2. To exclude sectors of the hard disk that have become unusable, indicated by intermittent or continuous hard disk drive read failures.
Warning:
PREP erases all data on the hard disk. If possible, back up the data on the hard disk to diskettes before running PREP.
To run PREP:
1. Boot the Advanced Diagnostics diskette.
2. Press the right arrow key to select the ¨Run Tests´ menu.
3. Press the down arrow key to select ¨Advanced Utilities´ from the menu and press Enter.
4. Select ¨PREP´ and press Enter.
PREP displays its version number, a list of informational messages, and then asks if you want to proceed.
Do you want to proceed with PREP (Y/N)?
PressN if you want to cancel PREP and return to the DOS command line. PressY to continue with PREP.
PREP asks for the hard disk drive unit number (drive C = 0 and D = 1).
Hard disk drive unit number (0 - 7):
Enter the drive number. You will then be offered one more chance to cancel PREP. PREP will prompt you to pressP to continue.
Pressing any other key will cancel PREP and return you to the DOS prompt.
PREP first scans the hard disk for bad sectors that have previously been marked. It displays the message:
Scanning for previous bad sectors...
PREP then performs a low level format of the hard disk surface. It display the message:
Initializing the disk...
PREP will then write data to each sector of the hard disk and read this data back to verify each sector. This is repeated four times.
PREP displays the message:
Verify: pass n, Cylinder xxx
Where n is the number of the current pass (1-4) and xxx is the current cylinder under test.
If any bad sectors are found, PREP marks them to prevent them from being used when the hard disk is formatted.
After the hard disk is verified, PREP displays the message:
Operation complete, press any key to exit to monitor
The hard disk is now ready to be formatted and have an operating system loaded onto it.
Updating Flash Memory:
Note on Updating Flash Memory:
Perform this NEWBIOS function only while operating on AC power.
Reprogramming Flash BIOS:
To reprogram the Flash ROM, do the following.
1. Access the Monitor program with the Ctrl+Alt+Ins key combination.
2. Insert the Advanced Diagnostics diskette in the diskette drive.
3. Type NEWBIOS, then press Enter.
The NEWBIOS function tests the size of the file, the computer type, and the checksum of the file. After the tests complete
successfully, the Flash ROM is reprogrammed.
The following prompt appears:
Programming success. Press Enter to reboot system...
In order for the computer to read the new code, the computer must be rebooted. Press Enter to reboot the computer.
If the NEWBIOS function fails and displays any error messages, power-off computer, wait 15 seconds, then power-on computer. If the Flash ROM is corrupt, the computer will initiate the NEWBIOS function automatically.
|
Search Keywords |
| |
|
Hint Category |
Hardware Maintenance Information | |
|
Date Created |
12-12-96 | |
|
Last Updated |
01-05-98 | |
|
Revision Date |
28-04-99 | |
|
Brand |
IBM ThinkPad | |
|
Product Family |
Notebook N45 | |
|
Machine Type |
2614 | |
|
Model |
| |
|
TypeModel |
| |
|
Retain Tip (if applicable) |
| |
|
Reverse Doclinks |