
|
365.764 bytes |
Service Hints & Tips |
Document ID: MNOK-3T7MWJ |
Aptiva - How to perform a "Dead System" Test
Applicable to: World-Wide
If your system is not giving a POST beep, a hardware error is likely. Cabling must be tested and each component removed, one at a time, to determine which component is failing. Nearly any component experiencing a hardware failure can cause the system to abort the boot process or even to power off.
First, check the cabling:
The power cable should be connected directly to the wall and not to any surge suppressor. Surge suppressors have a fuse which, if blown or damaged, can cause voltage fluctuations or a lack of power. The system will power off if voltage fluctuations are detected.
Try a different power cable - the power cable from the monitor is the same as the power cable for the computer. Swap them.
Test the power outlet. Make sure that another electrical device connected to this outlet will work. A lamp is very useful for this.
If the machine still fails to stay powered on, or fails to complete the POST test by giving a beep, the external components should be removed next, one by one.
External Components:
Power the system on after each one of these components is removed to test the system. Wait at least 20 - 30 seconds after powering on to see if the machine beeps. If the machine powers itself off, go ahead and move on to the next component.
Remove the components in the following order:
- Any External component that did not come with the system such as: Printers, external drives, scanners, external modem, etc.
- Keyboard
- Mouse
- Speakers
- Microphone
- Joystick
- Monitor (remember - to test you are listening for a beep)
- Anything connected to the back of the system unit other than the Power Cord and Media Console Cable (if the system is an Aptiva S-Series).
Internal Components:
Internal Components are removed next. If the system is in the first year of warranty, you may wish to take the machine to a servicer instead of opening it up. Please remember that past the first year labor charges are the your responsibility.
For Desktop Designs (2134/2144)
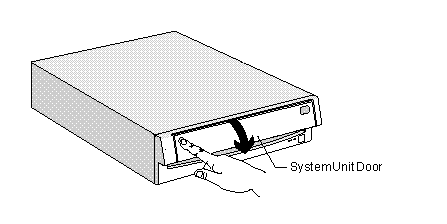
Remove the cover by opening the "push-out" door that covers the floppy and cd-rom drives.
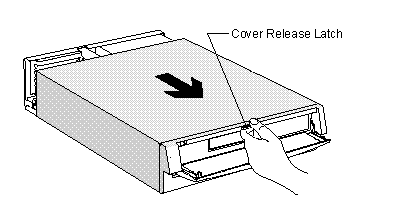
Grasp the Cover Release Latch that is at the top, in the center and squeeze it to the top of the cover.
Pull forward. The cover should slide off.
Power the system on after each one of these components is removed to test the system. Wait at least 20 - 30 seconds after powering on to see if the machine beeps. If the machine powers itself off, go ahead and move on to the next component.
Remove the components in the following order:
- Any added hardware. This includes any hardware that was not installed in the computer by IBM: any extra drives, cache, video memory, RAM; any adapter cards such as extra modems, scsi cards, scanner cards, game cards, etc.
- Modem/Mwave card - There is one screw on the side of the card holding it in place. Remove this screw and pull the card straight out.
- Sound card, if present.
- Removed in the same way as the modem card above.
Disconnect the Power and Data cables from the:
- Floppy Drive
- CD-ROM Drive
- Hard Drive
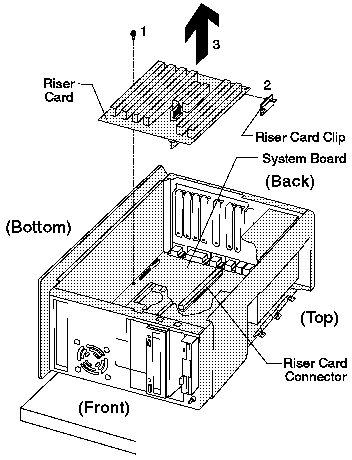
Remove the Riser card.
Reseat the memory.
Reseat the power cables that connect the Power Supply to the system board. They are labeled P1 and P2. They will connect to the system board very near the Power Supply.
For Minitower designs (2137/2138/2140/2161/2168/2176)
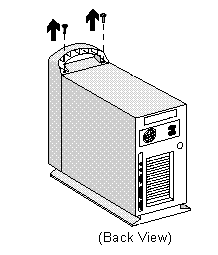
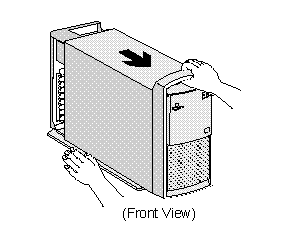
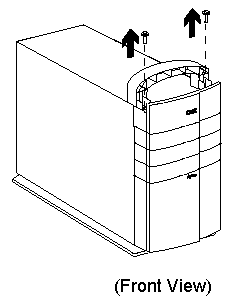
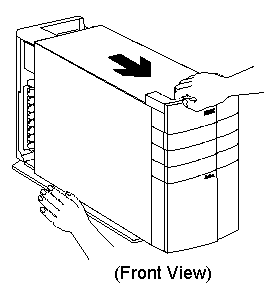
Remove the cover by first removing the two screws that are on top of the machine, just behind the handle. Pull the handle towards the front of the machine and the cover should slide off.
2137/2138 Machines are different. To remove the cover, first unlock the latch on the back. The latch is place designed for pad-locks; it is L shaped and has a hole for the pad-lock to fit into. Slide the latch so that it is open. Underneath the front of the machine is a handle. Squeeze the handle towards the front of the machine and pull forward.
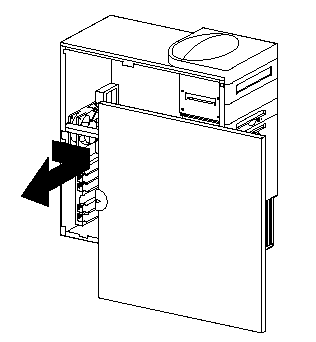
2140 Machines have a side access panel. On the rear left side is a "finger-tab." Slide the side panel towards the front until it stops, then pull off.
Power the system on after each one of these components is removed to test the system. Wait at least 20 - 30 seconds after powering on to see if the machine beeps. If the machine powers itself off, go ahead and move on to the next component.
Remove the components in the following order:
- Any added hardware. This includes any hardware that was not installed in the computer by IBM: any extra drives, cache, video memory, RAM; any adapter cards such as extra modems, scsi cards, scanner cards, game cards, etc.
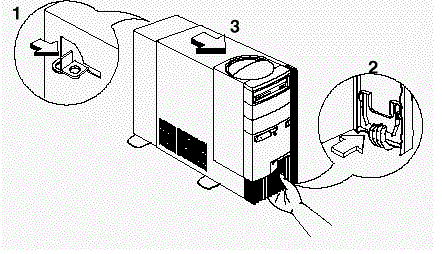
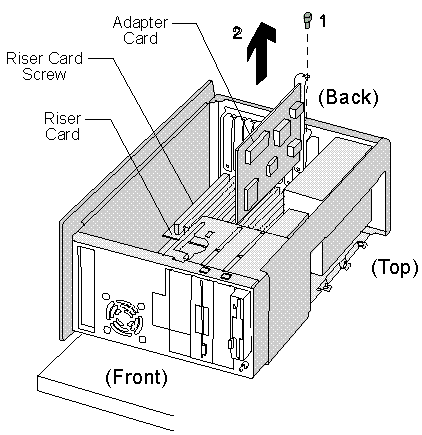
- Modem/Mwave card - There is one screw on the side of the card holding it in place. Remove this screw and pull the card straight out. The following diagram illustrates how to remove an Mwave or any adapter card.

Sound card, if present - Removed in the same way as the modem card above.
Disconnect the Power and Data cables from the:
- Floppy Drive
- CD-ROM Drive
- Hard Drive
Remove the Riser card. (Note: There is no Riser card in 2137/2138/2140 machines).

Reseat the memory.
Reseat the power cables that connect the Power Supply to the system board. They are labeled P1 and P2. They will connect to the system board very near the Power Supply.
For Split-System designs (2142/2159/2162)
Power the system on after each one of these components is removed to test the system. Wait at least 20 - 30 seconds after powering on to see if the machine beeps. If the machine powers itself off, go ahead and move on to the next component.
Remove the components in the following order:
- Disconnect the Media Console Cable. The machine will need to be powered on via the power button on the Host Card inside the machine. After removing the cover, test the system to see if the Media Console is causing the problem using this button. The power button is a small black square; on 2159 and 2142 machines, it is on the front of the card near the left edge. On 2162 machines, it is nearer the center of the card on the right edge.
Removing the cover.
2159 and 2162 Machines. On the top of the tower, raise the handle. Remove the two screws from the top. Pull the handle forward, towards the front of the machine. The cover should slide off.
2142 Machines. These machines use a side access panel. Located at the left rear of the machine is a small handle, or "finger tab." Use this tab to pull the side panel towards the front of the machine until it stops, then remove the panel.

Any added hardware. This includes any hardware that was not installed in the computer by IBM: any extra drives, cache, video memory, RAM; any adapter cards such as extra modems, scsi cards, scanner cards, game cards, etc.
Modem/Mwave card - There is one screw on the side of the card holding it in place. Remove this screw and pull the card straight out. The following diagram illustrates how to remove an Mwave or any adapter card.
Sound card, if present - Removed in the same way as the modem card above.
Disconnect the Power and Data cables from the Hard Drive.
Remove the Host Adapter card and reseat the riser. Then reseat the Host Adapter card. It is necessary for this card to be connected to power the machine on. (Note: There is no Riser card in 2142 machines).
Reseat the memory.
Reseat the power cables that connect the Power Supply to the system board. They are labeled P1 and P2. They will connect to the system board very near the Power Supply
|
Search Keywords |
| |
|
Document Category |
Diagnostics | |
|
Date Created |
03-04-98 | |
|
Last Updated |
04-12-98 | |
|
Revision Date |
28-05-99 | |
|
Brand |
IBM Aptiva | |
|
Product Family |
Aptiva | |
|
Machine Type |
2134, 2136, 2137, 2138, 2139, 2140, 2142, 2144, 2153, 2156, 2158, 2159, 2161, 2162, 2163, 2168, 2176 | |
|
Model |
All | |
|
TypeModel |
| |
|
Retain Tip (if applicable) |
| |
|
Reverse Doclinks |