
|
532.825 bytes |
Preloaded Software Information |
Document ID: DDSE-3TQLQS |
Servers - Installing StandbyServer for OS/2
Applicable to: World-Wide
Installation Overview:
This section summarizes the process for installing StandbyServer for OS/2 Warp with a LAN Server Advanced network, detailed instructions follow. For detailed information on installing OS/2, LAN Server Advanced, and NetFinity, see the appropriate IBM documentation.
Important! Each of the installation steps listed below must be completed on each machine, unless specifically instructed otherwise:
1. Install StandbyServer Hardware Create the Vinca link between the primary and the standby machines that will carry all mirroring traffic.
2. Install or Modify OS/2 Ensure that OS/2 is set up on both the primary and standby machines to recognize the disk device configuration required for StandbyServer.
3. Install LAN Server Advanced on the primary and standby machines with the User Accounts, Domains, Replication services, and machine names as required.
4. Install StandbyServer software on both the primary and standby machines.
5. Set which drives will not be exported from the standby machine.
6. Install NetFinity Manager on the standby machine and NetFinity Services on the primary machine to enable automatic switching of the server function between the primary and the standby machines.
7. Install mirroring and edit CONFIG.SYS on the primary machine.
8. Modify failover command files as needed to ensure proper switch.
9. Test the system, under controlled conditions, to ensure that it functions properly and that data is accessible after a system failure.
Step 1: Install StandbyServer Hardware:
In this procedure the high-speed communication cards that will be used for the Vinca link are installed; these cards can be IBM s PRO/100 fast Ethernet cards or Vinca's proprietary cards. Be aware of the following for Vinca's proprietary cards:
- The port and interrupt are set manually with ISA cards, or through software with EISA and MCA cards, and the interrupts are not sharable.
- The link speed jumper is for a single link in a bi-directional pair and there are four pairs of links on StandbyServer cards.
- Processor speed settings on the StandbyServer cards are based on the co-processor installed on the card, not the speed of the processor in the machine in which the card is being installed.
IBM PRO/100 Cards:
The IBM PRO/100 PCI fast Ethernet card provides a 100 Mbps Vinca link using industry-standard 100 BaseT Ethernet cables. This link must be a dedicated network, isolated from all other Ethernet networks.
Note: Do not install the LAN driver that came with the card.
StandbyServer for OS/2 Warp uses a specialized driver that is installed automatically during the software installation.
1. Turn the machine's power off.
2. Install the adapter card into a free PCI busmaster slot. Not all PCI slots will be busmaster slots. Please consult the computer manufacturer s documentation to identify which slot to install this card in.
3. When cards have been installed in both machines, connect the two using a Category 5 twisted-pair cable. Do not install the software driver supplied with the card; StandbyServer installs a custom driver for this card. When each machine is rebooted it will automatically recognize and configure the PCI card.
ISA 16-bit Vinca Cards:
Vinca's 16-bit ISA link cards provide 80Mbps communication between the primary and the standby machines to maintain the mirror. These cards can be used in any ISA or EISA bus machine, though they cannot take advantage of EISA s 32-bit wide data path.
These cards require that the IRQ (interrupt) and port addresses be set manually using jumpers. This section describes how to install the card and set the jumpers.
To install the ISA Vinca link cards do the following:
4. Orient the card so the edge connectors are down, the jumpers are at the top left, and the card is facing with the chip side toward you.
The card looks like the following.
5. Set the IRQ using jumper block J18 at the top left corner of the card. Valid settings are 5, 11, 12, 14, and 15; the default value is IRQ 12. Make sure this interrupt does not conflict with any other installed cards.
To set a jumper, turn the jumper plug vertically and push it down over a column of two pins as shown above. This example shows it set to IRQ 12.
6. Ensure that jumper block J1 is properly jumpered for the Symmetric Mirrored Server Link Application setting. The first four columns of pins should be jumpered.

If the pins are not jumpered as shown above, do so now.
7. Ensure that the processor speed is set to 25 Mhz and that the link speed is set to 20 Mbps using jumper block J16.
The first pair of pins should be jumpered.

If the pins are not jumpered as shown above, do so now.
8. Set the I/O address, also called the port address, using the last two jumpers in J16. Valid settings are the hexadecimal values 150, 300, 320, and 340; the default value is 340. Make sure this setting does not conflict with any other
installed cards.

To set a jumper, turn the jumper plug vertically and push it down over a pair of pins as shown above. This example shows the port address set to 340 hex. There is one more jumper block labelled J14, but this group is not used for this installation. Those pins should all be unjumpered.
Note: Write down the IRQ and port address values set here for each card.
Primary Standby
IRQ: _________________ IRQ: _________________
Port: _________________ Port: _________________
9. Insert the properly configured Vinca link card into an appropriate open slot in the file server. Seat the card firmly in the expansion slot and secure it. Repeat this procedure on each machine.
10. When these steps are completed for both machines, connect the two machines using the green high-speed serial communications cable supplied with the cards. Firmly connect the cable to the Vinca link card and secure it using the connector screws. Be careful not to bend any of the cable's pins when attaching the cable.
Note: The Vinca link cable can be a maximum of 50 feet long. The standard cable is 25 feet long; if a 50 foot cable is needed, contact Vinca at (801) 223-3100 or contact an authorized Vinca reseller.
The cards and cable are now properly installed.
EISA 32-bit Vinca Card:
Vinca s 32-bit EISA link cards provide 160Mbps communication between the primary and the standby machines to maintain the mirror. These cards can be used in any EISA bus machine and use EISA software configuration.
To install the EISA Vinca link cards do the following.
1. Verify that J1 has no jumpers installed.
2. Turn the machine s power off.
3. Install the adapter card into a free slot.
4. Turn on the machine.
5. Run the EISA configuration for that machine.
6. When prompted insert the Vinca diskette containing the !VNC7261.CFG file.
7. Configure the settings to non-conflicting port and IRQ settings.
8. Verify that the link speed is set at 20 Mbit/sec and the processor speed is set at 25MHz.
9. When these steps are completed on both machines, connect the two machines using the green high-speed serial communications cable supplied with the cards. Firmly connect the cable to the Vinca link card and secure it using the connector screws. Be careful not to bend any of the cable's pins when
attaching the cable.
Note: The Vinca link cable can be a maximum of 50 feet long. The standard cable is 25 feet long; if a 50 foot cable is needed, contact Vinca at (801) 223-3100 or contact an authorized Vinca reseller.
The cards and cable are now properly installed.
MCA 32-bit Vinca Card:
Vinca s 32-bit MCA link cards provide 160Mbps communication between the primary and the standby machines to maintain the mirror. These cards can be used in any MCA bus machine and use software configuration.
Warning: The current version of this card does not support shared interrupt request levels. Select a unique interrupt request level for this adapter so no other adapters share it. Allowed interrupt levels are IRQs 5, 11, 12, and 15. IRQ levels can be viewed and/or set with the MCA Reference utility.
To install the MCA Vinca link cards do the following.
1. Verify that J1 has no jumpers installed.
2. Turn the machine s power off.
3. Install the adapter card into a free slot.
4. Insert the reference diskette into the floppy disk drive.
5. Turn the machine's power on.
6. Follow the prompts as they appear on the screen.
7. When prompted, insert the Vinca diskette (which contains the @5131.ADF file).
8. Configure the settings to non-conflicting port and IRQ settings.
9. Follow the screen prompts until system resources are configured.
10. When these steps are completed on both machines, connect the two machines using the green high-speed serial communications cable supplied with the cards. Firmly connect the cable to the Vinca card and secure it with the connector screws. Do not bend any of the cable s pins when attaching the cable.
Note: The Vinca link cable can be a maximum of 50 feet long. The standard cable is 25 feet long; if a 50 foot cable is needed, contact Vinca at (801) 223-3100 or contact an authorized Vinca reseller.
The cards and cable are now properly installed.
Step 2: Install or Modify Disk Configuration:
This section helps ensure that both the primary and standby machines have the disk device configuration required for StandbyServer for OS/2 Warp. The OS/2 installation documentation and software are needed to complete this procedure.
Be familiar with the following:
- Drive letter assignments for all partitions.
- Drive formats FAT and/or HPFS (verify that all devices are formatted correctly LAN Server Advanced can only mirror HPFS partitions).
- The drive letter where OS/2 will be installed in each of the two machines.
- Drive letter of the primary partition on the first disk device in each of the two machines. Sufficient free space must be available on the target disk devices (the devices in the primary machine). Fault Tolerance Setup in the mirroring installation process automatically partitions the free space as a mirror. If existing data has not been backed up yet, do so now.
What To Do With Existing Data:
If there is existing data, make sure it is on an HPFS partition on a disk device in the standby machine that is not the first disk device. It may be necessary to back up and restore data, or move a disk device from one machine to another to put it in this state, but it must be on a partition that LAN Server Advanced can mirror.
Disk Device Configuration:
If installing on an existing system, the configuration must be changed to make it work with StandbyServer. Use OS/2 s installation procedure, along with the FDISK or FDISKPM utility on each of the machines, to ensure the following:
- At least two disk devices in each machine.
- The first disk device in each machine must have:
1. A primary partition (which may contain Boot Manager).
2. A partition in which OS/2, LAN Server Advanced, StandbyServer software, and NetFinity Manager or NetFinity Services are installed.
3. The same number and type of partitions in both machines.
Note: Partitions on the first disk device are not mirrored.
- Mirrored disk devices in both machines must have the same number of heads and sectors/track. If uncertain about this, run GEO.EXE (on the StandbyServer floppy disk).
Note: The term mirrored disk device encompasses all of the disk devices installed on either machine that will function as part of a mirrored pair.
- Each mirrored disk device in the standby machine is treated as if it physically resides in the primary machine. During normal operation, this is the primary disk device despite its location in the standby machine.
- Mirrored disk devices in the primary machine are the secondary drives of the mirrored pair.
- Vinca recommends that mirroring be started from the largest disk device to the smallest disk device. This helps to prevent disk fragmentation and maintain the required contiguous free space for the mirrored partitions.
Example: D: 800MB, E: 500MB, F: 450MB.
Step 3: Install or Modify LAN Server Advanced:
Installation Instructions
Complete the following instructions to install or modify LAN Server Advanced before installing StandbyServer. The instructions below are an example only, the actual system components may automatically detect a different sequence of screen selections.
LAN Server Advanced must be installed on both machines. The order in which they are installed is not important.
1. At one machine, insert the LAN Server Advanced installation diskette or CD and start the installation process as described in the IBM LAN Server Advanced documentation.
2. Install LAN Server Advanced according to the instructions in the IBM documentation, keeping in mind the following:
If the primary machine is installed as a domain controller then the standby machine also must be installed as a domain controller. The Fault Tolerance component must be installed on the primary machine but not on the standby. The server name must be the same on both machines. The domain name must be the same on both machines. Set Start the server automatically to Yes for the primary machine, No for the standby machine.
Important! Do not select Start the server automatically on the standby machine.
3. After the installation program is complete, reboot the machine. Repeat steps 1 and 2 for the other machine.
Step 4: Install StandbyServer Software:
This procedure is used to install StandbyServer software on each machine.
1. Insert the StandbyServer installation disk in the floppy drive of the primary machine.
2. Open an OS/2 command prompt.
3. At the OS/2 prompt, type a:install and press <Enter>.
4. Click Continue.
The Install dialog box appears.
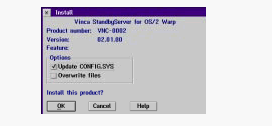
5. Leave Update CONFIG.SYS checked. If you previously installed StandbyServer for OS/2 Warp on this machine, check Overwrite files.
6. Click OK.
The Install-directories dialog box appears.

7. Make sure the information is correct and click Install.
The Vinca directory is the directory where Vinca software will be installed. You can use the "Disk space" button to view disk usage on local disks. After you click Install, a progress bar appears as files are copied to their proper locations. When this portion of the installation has finished, the Registration dialog box appears.
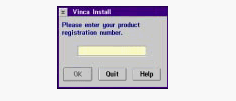
8. Enter the registration number from your Vinca registration card and click OK.
The bus-and-driver information dialog box appears. A sample is shown; yours may vary with the bus type(s) and link card in your machine. If you have only one bus, and Vinca supports only one card for that bus, the Vinca Driver section will not be present.

9. Choose the server role (Primary or Standby) for this machine. If you click Standby Server for the role, the Add VNCSBSPM to Startup folder checkbox becomes active.
10. If this is to be the standby machine, check or clear the Add VNCSBSPM to Startup folder checkbox as you wish.
If VNCSBSPM is in the Startup folder, the Vinca software will start up automatically; otherwise, you must start the program yourself after a reboot to ensure fault tolerance. However, in some configurations automatic startup can lead to problems for example, if the primary machine does not boot quickly enough the standby will attempt to switch over. In addition, VNCSBSPM.EXE must not be running if CHKDSK is going to be run on the standby machine.
11. Choose the correct driver for the bus type and card you are using.
12. Click OK to continue with the installation. The installation program checks the installed Vinca link card.
If you are using PRO/100 cards for the Vinca link a settings screen appears where you can set parameters. The Direct connection between Vinca servers checkbox should be marked. The Ethernet address of the card is taken from the card itself and should be correct. Press OK to continue.
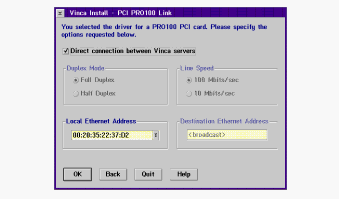
A confirmation dialog appears reviewing the card settings. Press OK to continue with the installation.
13. If a settings dialog box appears, click OK to continue. A progress bar appears, and then the installation complete screen.

14. Click Yes or No as appropriate. A dialog box informing you of changes to CONFIG.SYS appears (this will not take place until after you read the READ.ME file if you click Yes).
15. Click OK. The installation program returns to the main installation screen.
16. Choose Exit from the File menu.
17. Eject the StandbyServer installation disk from the floppy drive. If you are using a Vinca ISA card and the port and interrupt settings were changed from the default values, the CONFIG.SYS file must be updated to reflect the altered setting. Edit the CONFIG.SYS file and find the line that begins as follows:
BASEDEV=VNCIL01.SYS /I:12 /P:340 /O:2
Replace the number in the /I:12 switch to reflect the new IRQ setting, and change value on the /P:340 switch to reflect the correct port address.
18. Properly shut down the machine.
19. Repeat Steps 1 through 17 for the other machine. When installation is complete, both machines will be shut down.
Copying FTMONIT.EXE (LAN Server Advanced 3.0 only):
Mirroring with Vinca software and hardware requires the LAN Server Advanced 4.0 or higher version of FTMONIT.EXE. If you use LAN Server Advanced 3.0, do the following on the primary machine (only).
1. Insert the StandbyServer for OS/2 Warp installation disk into drive A of the primary machine.
2. Copy the file FTMONIT.EXE from the installation disk to the directory where you installed LAN Server Advanced, overwriting the installed version of FTMONIT.EXE.
Step 5: Set Local Disks for the Standby Machine
StandbyServer automatically exports all drives from the standby machine except those specifically excluded from the StandbyServer application. When these devices are exported they will appear to the primary machine as local disks. They will be locked and inaccessible to the standby machine until a failover occurs, then the mirrored data on them will be accessible.
Use the Disk Export utility to determine which disks will not be exported to the primary machine; all disks are automatically exported except those excluded using this utility.
There are several rules to keep in mind when exporting disks:
- Local devices must start with and include PhysicalDisk0.
- Local devices must be selected in sequence.
- At least one device must be made available for export.
- Partitions must be created on the primary server that reflect local usage on the standby machine to ensure drive lettering is consistent when switchover takes place. For example, if there is two physical disk devices in the primary server, and three in the standby machine, the first physical disk device in the primary server must be assigned two drive letters (i.e., C and D), so that drive E in both machines would be available for the mirrored set (i.e., E and E ).
Do the following to determine which disks are exported:
1. Start the StandbyServer application (VNCSBSPM) on the standby machine.
2. Choose Drives... from the Export menu. The Set Local Drives dialog appears. Physical disk devices are listed in the order reported to the operating system.

3. Mark the drives that will not be exported to the primary machine. Click on a disk or highlight it and press [Space] to keep it from being exported.
4. When all local disks are marked choose the Save button. StandbyServer checks to make sure you have met the conditions listed earlier. If your selections violate these criteria an error message appears. Press <Enter> to clear the error, alter your selections to meet the criteria listed at the beginning of this section, and choose Save again. If all conditions are met, a message appears saying that you must restart StandbyServer for your selections to be enabled.
5. Exit and restart StandbyServer. Choose Exit from the File menu to exit StandbyServer.
Step 6: Install and Configure NetFinity:
In this procedure, the switching process between the primary and standby machine will be automated for unattended switchover in the event of a system failure.
The installation of NetFinity is optional. However, if it is not installed, then the roles of the primary and the standby machines must be manually switched in the event of a system failure. The network users must wait until that manual switching takes place to continue working. Automatic switching requires the installation of NetFinity.
Before NetFinity can be installed, the LAN Server requestor must be installed on the standby machine, if required, the requester can be started with a computer override name. For example,
NET START REQ /CO:STDBY
Installation Instructions:
Complete the following instructions to install NetFinity Services on the primary machine and NetFinity Manager on the standby machine:
Some of the following instructions refer to the NetFinity documentation (NetFinity Services and NetFinity Manager manuals). Refer to these manuals as needed for more information about NetFinity.
Note: NetFinity includes two programs; NetFinity Services and NetFinity Manager. Each must be installed on the correct machine to function
properly, as listed below.
- NetFinity Services is installed and runs on the primary machine.
- NetFinity Manager is installed and runs on the standby machine.
Installing NetFinity Services on the Primary Machine:
1. Insert the NetFinity Services for OS/2, Services Diskette #1 in the floppy drive in the primary machine (or, if you are installing from CD-ROM, insert the NetFinity CD-ROM into the CD-ROM drive).
2. Open an OS/2 command prompt.
3. Run the NetFinity installation program. The NetFinity Installation dialog box appears.
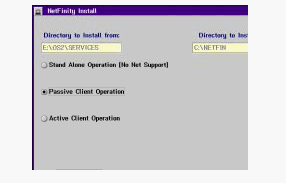
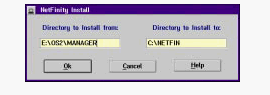
4. In the Directory to Install from field, type the drive letter of the floppy drive or CD-ROM drive.
5. In the Directory to Install to field, type the drive letter and path in the primary machine where NetFinity is to be installed. See the figure above for an example.
6. Select "Passive Client Operation".
7. Click Install. The Network Driver Configuration window appears.
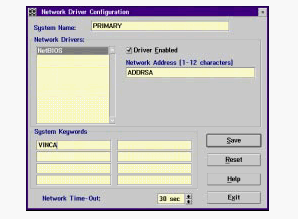
8. In the System Name field, type the System Name selected for the primary machine.
Warning: Both the primary and standby machines must have unique names. The name assigned in this window may be the same name assigned the primary machine during LAN Server Advanced installation, but must not be the same name that will be assigned to the standby machine during the installation of NetFinity Manager.
9. Select a Network Driver from those displayed. When making a selection, the Network Driver assigns a network address to the system. If NetBIOS is selected, a network address will be selected and displayed in the Network Address field. The default name may be displaced by entering any 1-12 character name.
10. Check the Driver Enabled checkbox to activate the driver on start-up.
Note: Refer to the IBM NetFinity manual for additional information about System Keywords, Network Time-Out, and support of multiple network interfaces.
11. Enter one or more keywords into the System Keywords fields. Later, when NetFinity is configured on the standby machine, at least one keyword must match between the two systems.
12. Select Save to save the configuration on the primary machine.
13. Select Exit. NetFinity displays a list of commands that must be added to the CONFIG.SYS file.
Note: To change the saved Network Driver Configuration after finishing the installation, select the Network Driver Configuration object from the NetFinity folder.
14. Choose Yes. If No is chosen, the commands will be saved as CONFIG.NEW in the destination directory and will have to be manually added later.
15. Remove the installation diskette.
Installing NetFinity Manager on the Standby Machine:
The installation of NetFinity Manager on the standby machine is very similar to the installation of NetFinity Services on the primary machine. Before installing NetFinity Manager on the standby machine, refer to instructions in the IBM NetFinity Manager manual.
1. Insert the NetFinity Manager for OS/2, Manager Diskette #1 in the floppy drive in the standby machine (or if installing from CD-ROM, insert the NetFinity CD-ROM into the CD-ROM drive).
2. Open an OS/2 command prompt.
3. Run the NetFinity installation program. The NetFinity Install directory selection window appears.
4. Confirm that the dialog box shows the correct directories (modify if necessary) and click OK to go on.
The main NetFinity Install window appears.
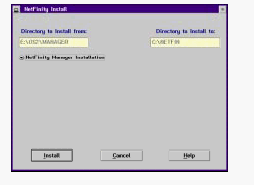
5. Select NetFinity Manager.
6. Click Install. The Network Driver Configuration window appears.
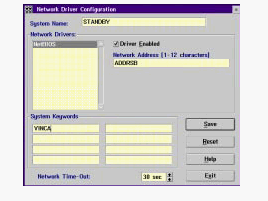
7. In the System Name field, type the System Name selected for the standby machine.
Warning: Both the primary and standby machines must have unique names. The name must not be the same name assigned the primary machine during the installation of NetFinity Services.
8. Select a Network Driver from those displayed. When making a selection, the Network Driver assigns a network address to the system. If NetBIOS is selected, a network address will be selected and displayed in the Network Address field. The default name may be displaced by entering any 1-12 character name.
9. Mark the Driver Enabled box to activate the driver on start-up.
Note: Refer to the IBM NetFinity manual for additional information about System Keywords, Network Time-Out, and support of multiple network interfaces.
10. Enter one or more keywords into the System Keywords fields. Make sure that at least one is the same as a keyword defined for the primary machine. At least one keyword must match between the two systems.
11. Select Save to save the configuration on the standby machine.
12. Select Exit. NetFinity displays a list of commands that must be added to the CONFIG.SYS file.
Note: To change the saved Network Driver Configuration after finishing the installation, select the Network Driver Configuration object from the NetFinity folder.
13. Choose Yes. If No is chosen, the commands will be saved as CONFIG.NEW in the destination directory and will have to be added manually later.
14. Remove the installation diskette or CD-ROM.
15. Reboot the machines in the correct order, as follows:
a. Shut down the primary machine completely.
b. After the primary is shut down, shut down the standby machine.
c. Reboot the standby machine.
d. Start the StandbyServer application, VNCSBSPM.EXE.
e. After the StandbyServer window appears restart the primary machine.
f. Verify that the StandbyServer window shows the word CONNECTED.
Starting NetFinity on the Standby Machine:
The following instructions start the operation of NetFinity. Refer to the NetFinity Services manual for information about starting NetFinity on the primary machine. Refer to the NetFinity Manager manual for information about starting NetFinity on the standby machine.
Important! This procedure will start NetFinity and configure the automatic switching capability of StandbyServer. These instructions must be performed on the standby machine, not on the primary machine.
1. Open the NetFinity folder.
2. Open the NetFinity Service Manager icon.
3. From the NetFinity Service Manager folder, open Alert Manager.
The Alert Log dialog box appears.
4. From the Alert Log dialog box, select Actions.
The Alert Actions dialog box appears.

5. From the Alert Actions dialog box, select New.
The Action Editor dialog box appears.
Important! The Action Editor dialog box contains vital information and must be completed exactly as in the following step.
6. Fill in the fields in the Action Editor dialog box as follows:
If the indicated selection is not available in the list box, type it into the corresponding text entry window and then press [Enter].
a. From the Alert Type list box, select System Information.
b. From the Severity list box, select 0 (zero).
c. From the Application ID list box, select NetMgr.
d. From the Application Alert Type list box, select or type b.
e. Check the Any Sender checkbox in the Sender ID field.
f. From the Action field within Action Definition, select the following:
Execute command '<P1>'
g. In the P1: Command Line field, type the following:
[drive]:\vinca\restart.cmd
Before exiting the Action Editor dialog box, verify that the P1: Command Line field includes the name of the installed switchover command file.
7. Exit and save out to the NetFinity Service Manager window.
8. Open Remote System Manager. The System Group Management window appears.
9. Choose Add Group from the Group menu. The Add System Group dialog box appears.

10. In the Group Name field, type an appropriate name.
11. Click Systems with any of the keywords under System Discovery Conditions.
12. Enter one or more appropriate keywords into the Keywords fields. At least one keyword must be the same as the matching keyword that was configured in the NetFinity Driver Configuration dialog box when NetFinity was installed on each machine. In other words, each machine must have at least one keyword that is also configured on the other machine, and that keyword must be entered here.
13. Click Add. The Add System Group dialog box closes, and the group now appears in the System Group Management window.
14. Double-click on the group just created to open it.
15. From the System menu, choose Discover Systems. The primary and standby machines will be discovered (assuming the shared keyword was entered in Step 12).
The following illustration is an example of such a group.
16. In the Group window, click mouse button 2 (usually the RIGHT mouse button) on the icon which represents the primary machine.
A popup menu of options appears, as shown in the next illustration.
17. From the menu, select System Notifications.
The Set System Notifications dialog box appears.
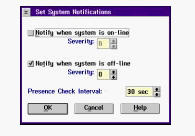
18. In the Set System Notifications dialog box, select Notify when system is off-line.
Note: When this option is enabled, switch over is automatic when the primary server fails. If this option is disabled, the standby machine will not switch over unless the process is done manually.
19. In the Set System Notifications dialog box, set Presence Check Interval to 30 seconds.
20. After System Notifications are set, select OK. NetFinity is now installed and the standby machine is ready to take over for the primary in the event of a primary machine failure.
Step 7: Install Mirroring and Edit CONFIG.SYS
Install Mirroring
The following steps are a guide to the mirroring installation procedure. If there is existing data, it must be placed on the HPFS formatted drives in the standby machine before beginning this procedure. The procedure assumes that the machines are currently shut down.
1. Reboot the machines in the correct order, as follows:
a. Boot the standby machine.
b. Start the StandbyServer application, VNCSBSPM.EXE.
c. After the Vinca StandbyServer window appears on the standby machine, boot the primary machine.
d. Verify that the Link Statistics window of the StandbyServer application shows the word CONNECTED. To activate the Link Statistics window, choose Link from the View menu.

2. On the primary machine, run Fault Tolerance Setup (in the IBM LAN Services folder).
The Fault Tolerance Setup window appears.
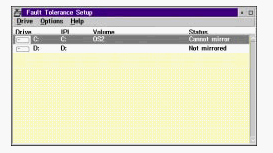
3. In the Fault Tolerance Setup window, highlight the disk device to be mirrored. The disk device to be mirrored is in the standby machine.
Note: The partition in the primary machine must have enough free space to be mirrored from the partition in the standby machine. If there is
sufficient free space, the Fault Tolerance Setup program creates the partition on the primary machine s disk device.
Important! When creating multiple partitions of different sizes, always start by mirroring the largest partition first. Then mirror the next largest partition and proceed in descending order, mirroring the smallest partition last.
4. From the Drive menu, select Mirror. The Status column changes to Pending mirror while the partition is being mirrored.
5. Repeat Steps 3 and 4 for each partition to be mirrored.
6. After the last partition has been mirrored, exit the Fault Tolerance Setup window. The Partition Changes dialog box appears, confirming the changes.
7. Click Save to save the partition changes.
8. Wait until the data is copied between the drives in the two machines. The length of time it takes depends on the size of partitions created, the amount of data, and the speed of the system. The Copying Data window displays the drive letter and the percent complete while the system is copying the data within the partitions.
9. Reboot the primary machine. Make sure the standby machine is running and the Vinca software is running on the standby machine before rebooting the primary.
Edit CONFIG.SYS on Primary Machine:
This procedure changes the primary machine s CONFIG.SYS file to keep CHKDSK from running on the mirrored disk devices at boot time, while still allowing CHKDSK to run on disk devices that are not mirrored.
Important! During recovery, it is important that CHKDSK is not run on the mirrored disk devices when the primary machine is booted. These instructions must be completed to give the system administrator control over the direction of the re-mirroring process after a failure of the primary machine. This is absolutely essential to the correct functioning of StandbyServer and the protection of the data on the system.
1. Find the following line in CONFIG.SYS on the primary machine:
IFS=(Path)\HPFS386.IFS
Example: IFS=D:\IBM386FS\HPFS386.IFS /A:*
2. Change the asterisk (*) in the line shown above to a list of the unmirrored disk devices.
Example: If C: and D: were the unmirrored devices on the primary machine, edit the line to read as follows:
IFS=D:\IBM386FS\HPFS386.IFS /A:CD
3. Find the following line in the CONFIG.SYS file:
RUN=(Fully Qualified Path)FTMONIT.EXE
4. Add VERIFY:NO to the statement.
RUN=(Fully Qualified Path)FTMONIT.EXE /VERIFY:NO
5. Verify that VNCSBS.ADD is the last *.ADD line in CONFIG.SYS.
Warning: The VNCSBS.ADD line MUST be the last *.ADD line in the CONFIG.SYS file. Move all Vinca entries to the end.
6. Reboot the primary machine. Make sure the standby machine is running and the Vinca software is running on the standby machine before rebooting the primary.
Step 8: Modify Switchover and Recovery Command Files:
The RESTART.CMD command file is called in the event NetFinity detects a failure on the primary machine. You can modify RESTART.CMD to call SWITCH.CMD or just exit out under specified failure conditions; SWITCH.CMD controls the actual switchover process. VNCRCVR.CMD is used during recovery to return the standby machine to the standby state before booting the repaired primary machine. These files can contain any valid OS/2 .CMD file commands. For example, if a LAN Server Advanced file server is also a Notes server, have the SWITCH.CMD file start both LAN Server Advanced and Notes after switchover.
The files as installed by Vinca are samples. Modify them to fit system needs, according to the suggestions contained in comments in the files. For VNCRCVR.CMD, ensure that the following things happen when it is run:
1. LAN Server Advanced is stopped on the standby machine.
2. CHKDSK /F is run on each mirrored disk device to update the superblock on the HPFS partition, causing it to differ from its mirror secondary on the primary machine and guaranteeing that the Fault Tolerance system detects that the partitions are not synchronized. To avoid possible errors, run CHKDSK on each disk device by changing the default drive letter and then running CHKDSK /F instead of running CHKDSK with a drive letter option. For example, enter:
E: CHKDSK /F then G: CHKDSK /F
rather than
CHKDSK E: /F
CHKDSK G: /F
3. On the standby machine, any network services required by the configuration (such as Requester and Replicator for a Domain Controller) are started up.
4. Any other services or applications that need to be started before LAN Server Advanced are started up.
5. LAN Server Advanced is started on the standby machine.
6. Any other services or applications that need to be started up after LAN Server Advanced.
Software Product:
Version:
Vendor:
EDOC Number:
Announce Date:
GA Date:
Service End Date:
Program Services:
|
Search Keywords |
| |
|
Document Category |
OS/2 | |
|
Date Created |
20-04-98 | |
|
Last Updated |
22-09-98 | |
|
Revision Date |
21-09-99 | |
|
Brand |
IBM PC Server | |
|
Product Family |
Clustering | |
|
Machine Type |
Various | |
|
Model |
Various | |
|
TypeModel |
| |
|
Retain Tip (if applicable) |
| |
|
Reverse Doclinks |