
|
233.304 bytes |
Service Hints & Tips |
Document ID: GSMH-3BUEW7 |
TP 340 - FRU Removals And Replacements
Applicable to: World-Wide
FRU Removals and Replacements:
This section contains information about removals and replacements. An electrostatic discharge (ESD) strap must be used to establish personal grounding. The system board is sensitive to, and can be damaged by, electrostatic discharge. Establish personal grounding by touching a ground point with one hand before touching these units. Do not damage any part. Only certificated and trained personnel should service the computer.
The arrows in the ¨Removals and Replacements´ section show the direction of movement to remove a FRU, or to turn a screw to release the FRU. The step number with the arrow shows the correct sequence of removal. The circled numbers are sub-steps of the main step. When other FRUs must be removed before removing the failing FRU, they are listed at the top of the page. To replace a FRU, reverse the removal procedure and follow any notes that pertain to replacement. See ¨Locations´ for internal cable connections and arrangement information. When replacing a FRU, use the correct screw size as shown in the table of each section.
Safety Notice 8:
Before removing any FRU, power-off the computer, unplug all power cords from electrical outlets, remove the battery pack, and then disconnect any interconnecting cables.
Safety Notice 3:
The battery pack contains Cadmium. Do not disassemble it, throw it into fire or water, or short-circuit it. Dispose of the battery pack as required by local ordinances or regulations.
Safety Notice 1:
Before the computer is powered-on after FRU replacement, make sure all screws, springs, or other small parts, are in place and are not left loose inside the computer. Verify this by shaking the computer and listening for rattling sounds. Metallic parts or metal flakes can cause electrical shorts.
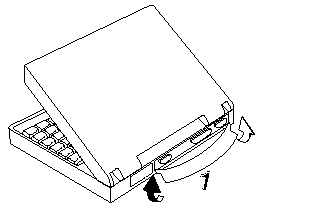
1010 Rear Connector Door:
Remove the rear connector door by flexing it.
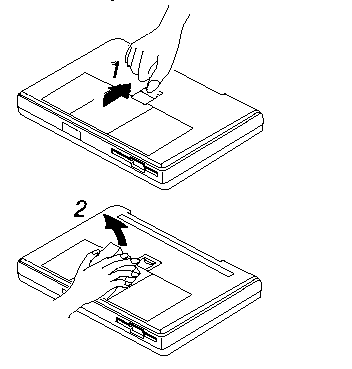
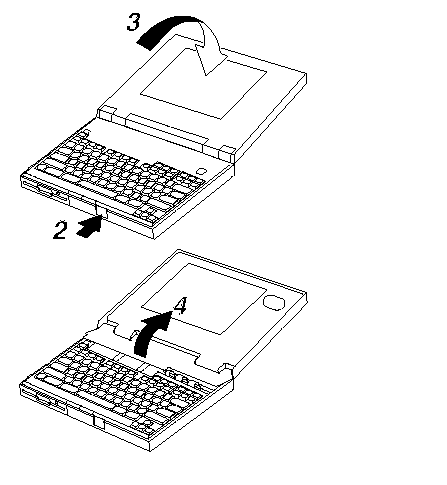
1020 Battery Pack:
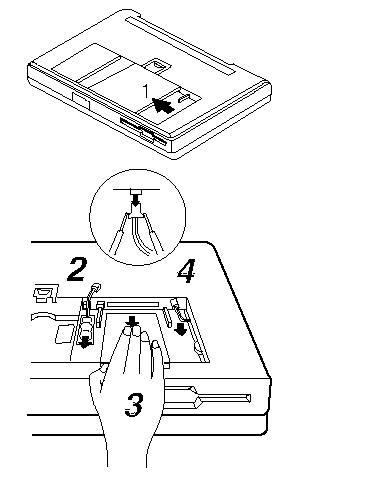
1030 Backup Battery:
1040 IC DRAM Card:
1050 Standby Battery:
- Battery Pack (1020)
Step 2: Standby Battery
Step 3: IC DRAM Card
Step 4: Backup Battery
Note:
The IC DRAM card is sensitive to physical shock. Incorrect handling of the card can damage it.
Note:
When removing the backup battery or standby battery, use the connector extractor (P/N 39G9977).
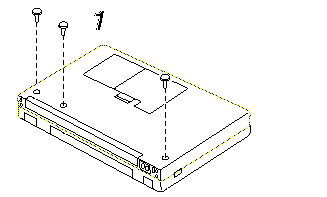
1060 Top Cover:
- Battery Pack (1020)
|
Step |
Location (Quantity) |
Length |
|
1 |
Base cover (3) |
12 mm |
Note:
Make sure you use the correct screw.
1070 Indicator Card:
- Battery Pack (1020)
- Top Cover (1060)
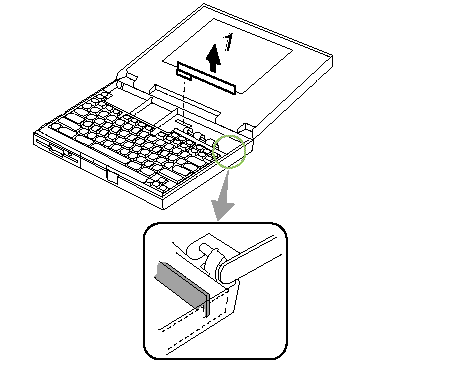
When Replacing:
Be careful to not break the pins of the indicator card connector.
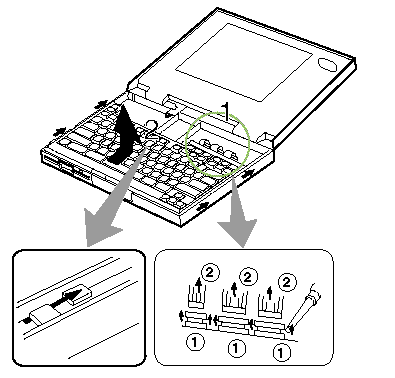
1080 Keyboard Unit:
- Battery Pack (1020)
- Top Cover (1060)
Notes:
1. There are two keyboard latches on each side of the computer frame. Slide the keyboard as shown in step 2 to release the keyboard from those latches; them remove the keyboard. (Small arrows on the both sides of the keyboard show the locations of the latches.)
2. The keyboard has three cables; be careful not to damage the cables when you open the keyboard and to remove them.
When Replacing:
Check that the three keyboard cables are clean, and inserted straight and fully into the connectors. Slide both ends of each connector latch at the same time to make sure that each cable is correctly inserted. Go to ¨Keyboard/Auxiliary Input Device Checkout´ and test all keys before returning the computer to the customer.
1090 LCD Assembly:
- Battery Pack (1020)
- Top Cover (1060)
Safety Notice 5:
If the LCD breaks and the fluid from inside the LCD gets into your eyes or on your hands, immediately wash the affected areas with water for at least 15 minutes. Seek medical care if any symptoms from the fluid are present after washing.
Caring for the LCD:
When cleaning of the LCD becomes necessary, gently wipe the LCD with a dry, soft cloth. Do not use alcohol or detergent to clean the LCD. To avoid damage to the LCD, do not scratch or apply any force to its surface. Do not put anything on the surface of the LCD. Do not pull the LCD cable. The cable can be damaged if it is disconnected without releasing the latch.
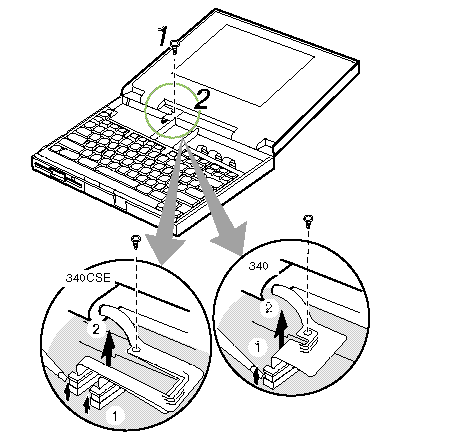
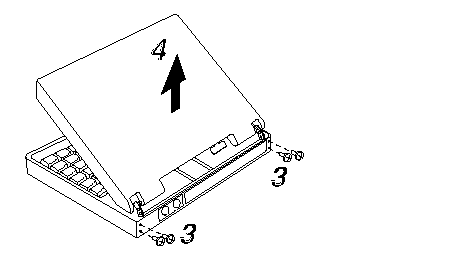
Use the following table for reference when replacing parts.
|
Step |
Location (Quantity) |
Length |
|
1 |
LCD cable (1) |
6 mm |
|
3 |
LCD hinge (4) |
8 mm |
Note:
Make sure you use the correct screw.
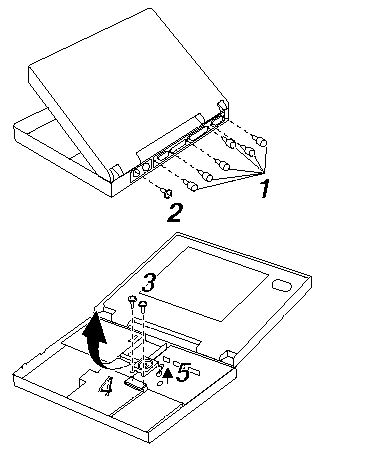
1100 Diskette Drive:
1110 Hard Disk Drive:
- Battery Pack (1020)
- Top Cover (1060)
- Keyboard Unit (1080)
Steps 1, 2, 3, 4: Diskette Drive
Steps 5, 6: Hard Disk Drive
When Replacing:
Before removing the hard disk drive, have the user make a backup copy of all information on the hard disk Never remove the hard disk drive while the system is operating or is in suspend mode. Do not pull the hard disk cable. The cable can be damaged if it is disconnected without releasing the latch. Do not drop or apply any shock or extra force to the hard disk drive or
diskette drive. They are sensitive to physical shock.

Use the following table for reference when replacing parts.
|
Step |
Location (Quantity) |
Length |
|
1 |
Diskette Drive (2) |
8 mmq |
|
5 |
Hard Disk Drive (2) |
6 mm |
Note:
Make sure you use the correct screw.
1120 System Board/Speaker:
- Rear Connector Door (1010)
- Battery Pack (1020)
- Backup Battery (1030)
- IC DRAM Card (1040)
- Standby Battery (1050)
- Top Cover (1060)
- Indicator Card (1070)
- Keyboard Unit (1080)
- Diskette Drive (1100)
- Hard Disk Drive (1110)
Step 1, 2, 3, 4: System Board
Step 4, 5: Speaker
|
Step |
Location (Quantity) |
Length |
|
1 |
I/O connector (6) |
Hex-head screws |
|
2 |
Base cover (1) |
8 mm |
|
3 |
Base cover (2) |
12 mm |
Note:
Make sure you use the correct screws.
|
Search Keywords |
| |
|
Hint Category |
Hardware Maintenance Information | |
|
Date Created |
28-11-96 | |
|
Last Updated |
06-04-98 | |
|
Revision Date |
03-04-99 | |
|
Brand |
IBM ThinkPad | |
|
Product Family |
ThinkPad 340 | |
|
Machine Type |
2610 | |
|
Model |
Various | |
|
TypeModel |
| |
|
Retain Tip (if applicable) |
N/A | |
|
Reverse Doclinks |