
|
109.647 bytes |
Service Hints & Tips |
Document ID: JBAR-3CFST3 |
IBM PC - Installing / Troubleshooting a modem
Applicable to: World-Wide
Modem Installation and Troubleshooting
Modem Installation in your IBM PC
Your first step in getting your modem up and running is to obtain and read the modem installation guide and other documents provided by the modem manufacturer. Reviewing these documents prior to installation is strongly recommended. Identifying the general type of modem you have is required to navigate this article to completion. You should know at this time which of the following modem type you are trying to install.
External Modem
Internal Plug and Play Adapter
Internal Legacy adapter
Internal PCMCIA Modem
The following information is generally relevant regardless of the modem type or operating system you are working with.
Avoiding IRQ and COM Port Conflicts
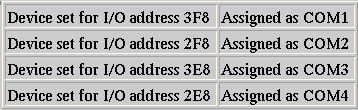
A modem (or serial port for an external modem) requires its own unique system resources to function properly. One of these resources is the COM port number that is assigned to each active serial port or internal modem adapter, by the operating system on boot-up according to their base I/O address setting. Windows 95 will assign COM port 1-4 as shown in the table below. Other operating systems, such as OS/2, will assign only COM1 and COM2 by default.
This is where problems might arise. You should know what settings are being used by your system's built in serial ports (including infared devices) in the system setup, to avoid conflicts between system settings the new device. It is easier to check this first than to guess wrong and subsequently "unravel" the problem. You will check for this in the next section,"System Set-Up". Before proceeding, you should review the following illustration of a typical action one would take to plan ahead for a new device.
|
Device |
I/O Address |
COM Port |
Usage |
Action |
Reason |
|
Serial Port |
3F8 |
COM1 |
Serial Printer |
Leave Eabled |
Serial Port will be used by a Serial Printer |
|
Infared Port |
2F8 |
COM2 |
Unused |
Disable |
Will allow new internal modem to use I/O address 2F8 and COM2 |
In this example, the ACTION column shows disabling an unused serial device so that your new internal modem won't conflict with the unused infared device. The following steps will let you view and disable (as required) an unused system serial device to make way for your new modem.
System Set-Up
Perform the following steps to check what serial devices are enabled in your computer.
1.Power on the computer.
2.When a white square "book" appears in the upper right corner of the screen, press the F1 on your keyboard.
3.Use the DOWN ARROW and ENTER key on your keyboard to select The "System Summary" and "Devices and I/O Ports" sections.
1.Disable any serial device you are not using.
2.Use the ESCAPE key to back out of a menu panel.
3.Select "Save Settings" from the main system setup menu, then select EXIT.
Your system will now restart.
Standard Modem Settings
You should plan to have your modem use one of the standard settings listed below for the best software compatability even though your modem may support IRQ 2, 3, 4, 5 or 7. It important to make sure that no other device is configured to use the same IRQ and I/O address as your modem.
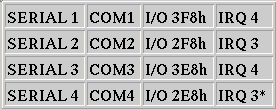
*Avoid COM4 if possible as many video graphics systems share COM4's memory address.
COM1 and COM3 share IRQ 4.
COM2 and COM4 share IRQ 3.
IRQ "sharing" often leads to difficulty and is not recommended.
For example; using a serial printer assigned to COM1 and a modem set for COM3 would each expect to have IRQ 4 for its own exclusive use. Attempting to use both devices concurrently would result in a system error.
Other common sources of conflict include sound cards and network cards.
You may have to "shuffle" the IRQ of an adapter card to make room for your new modem.
The default IRQ/Assignment table below illustrates which resources may be available should you need to change
an adapter's IRQ resource.
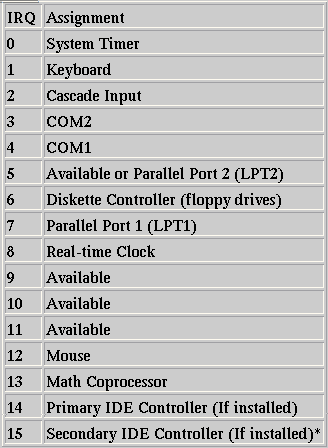
* IBM PC 100 and 340 reserves IRQ 15 as a system resource and is not available for other devices.
Configure your Modem for your Operating System
You should now check your modem documentation to reference the task of installing your modem for your specific operating system. Proceed with the step that corresponds to your operating system.
Install an Internal Modem in DOS
You will need the following resources to use an internal modem.
a residential telephone jack
a phone cable (included with modem)
You should have already verified as available, or made available, one of the COM port, I/O address and IRQ combinations. Follow these steps to install your internal modem.
1. Set the modem jumpers to the appropriate COM port, I/O address and IRQ setting you selected in the earlier step. NOTE: ignore this step if your modem is a Plug and Play type, or is set only through a supplied setup program, ignore this step and proceed to the next.
2. Remove the cover from the IBM PC, using the instructions in your "Installing Options in Your Personal Computer" manual and follow the instructions in the "Installing and Removing Adapters" section of your manual to insert the modem into an available adapter slot.
3. Plug the phone cable into the residential telephone jack, then plug the other end into a telephone to listen for a dial tone. If there is a dial tone, unplug the cord from the phone and into the phone jack marked "line in" on the rear of the modem adapter. If there is no dial tone, you should check your telephone, telephone cable, telephone jack and building telephone wiring out to the telephone company's junction box. Call your local phone service provider for assistance if needed.
1. Replace the cover of your computer.
2. Restart your computer.
3. If the system gives a 162 POST error, check your serial port settings for conflicts.
4. Your modem should now be installed and connected to the phone line.
If your modem requires a software setup program to configure it to the appropriate COM port, I/O address and IRQ setting you should do so now. If your modem is a Plug and Play type it must be set through a supplied setup program or set as a legacy adapter as DOS does not recognize Plug and Play devices. If you do change your adapter setting at this point, you must restart your computer. If your system displays error 162, go back to the preceeding step pertaining to that error and proceed through again.
You may now verify the presence of your COM ports by using the DEBUG utility.
You may now wish to verify the operation of your modem with the ECHO command.
You are now ready to install a DOS communication program. Be sure to configure your software to point to the correct COM port.
Install an External Modem in DOS
Follow these steps to install your external modem.
You will need the following resources to use an external modem.
an AC electrical outlet
a residential telephone jack
an RS232 communication cable for
a phone cable and power cord (included with modem)
Follow these steps along with any additional your modem documentation requires.
1. Attach the power cord to the back of the modem then plug the AC plug into the AC outlet.
2. Switch the modem on to see if it operates, if the modem lights do not glow, contact the modem dealer or manufacturer for assistance.
1. Attach the communication cable to the rear of the modem then the other cable end to the serial port in the rear of your system.
1. Plug the phone cable into the residential telephone jack, then plug the other end into a telephone to listen for a dial tone. If there is a dial tone, unplug the cord from the phone and into the rear of the modem marked "line in". If there is no dial tone, you should check your telephone, telephone cable, telephone jack and building telephone wiring out to the telephone company's junction box. Call your local phone service provider for assistance if needed.
You may now verify the presence of your COM ports by using the DEBUG utility, click here to proceed to "Use Debug to Verify Serial Port or Internal Modem Settings".
You may now wish to verify the operation of your modem with the ECHO command. Click here to proceed to "Testing Your Modem with the ECHO Command".
You are now ready to install a DOS communication program. Be sure to configure your software to point to the correct COM port.
Installing Your Modem in Windows 3.1
Install an Internal Modem in Windows 3.1
You will need the following resources to use an internal modem.
a residential telephone jack
a phone cable (included with modem)
You should have already verified as available, or made available, one of the COM port, I/O address and IRQ combinations. Follow these steps to install your internal modem.
1. Set the modem jumpers to the appropriate COM port, I/O address and IRQ setting you selected in the earlier step. NOTE: ignore this step if your modem is a Plug and Play type, or is set only through a supplied setup program, ignore this step and proceed to the next.
2. Remove the cover from the IBM PC, using the instructions in your "Installing Options in Your Personal Computer" manual and follow the instructions in the "Installing and Removing Adapters" section of your manual to insert the modem into an available adapter slot.
1. Plug the phone cable into the residential telephone jack, then plug the other end into a telephone to listen for a dial tone. If there is a dial tone, unplug the cord from the phone and into the phone jack marked "line in" on the rear of the modem adapter. If there is no dial tone, you should check your telephone, telephone cable, telephone jack and building telephone wiring out to the telephone company's junction box. Call your local phone service provider for assistance if needed.
1. Replace the cover of your computer.
2. Restart your computer.
3. If the system gives a 162 POST error, check your serial port settings for conflicts.
4. Your modem should now be installed and connected to the phone line.
If your modem requires a software setup program to configure it to the appropriate COM port, I/O address and IRQ setting you should do so now. If your modem is a Plug and Play type it must be set through a supplied setup program or set as a legacy adapter as Windows 3.1 does not recognize Plug and Play devices. If you do change your adapter setting at this point, you must restart your computer. If your system displays error 162, go back to the preceeding step pertaining to that error and proceed through again.
You may now verify the presence of your COM ports by using the DEBUG utility.
You may now wish to verify the operation of your modem with the ECHO command.
You are now ready to install a Windows communication program or the Terminal program in the Accessories group. Be sure to configure your software to point to the correct COM port.
Install an External Modem in Windows 3.1
Follow these steps to install your external modem.
You will need the following resources to use an external modem.
an AC electrical outlet
a residential telephone jack
an RS232 communication cable for
a phone cable and power cord (included with modem)
Follow these steps along with any additional your modem documentation requires.
1. Attach the power cord to the back of the modem then plug the AC plug into the AC outlet.
2. Switch the modem on to see if it operates, if the modem lights do not glow, contact the modem dealer or manufacturer for assistance.
3. Attach the communication cable to the rear of the modem then the other cable end to the serial port in the rear of your system.
4. Plug the phone cable into the residential telephone jack, then plug the other end into a telephone to listen for a dial tone. If there is a dial tone, unplug the cord from the phone and into the rear of the modem marked "line in". If there is no dial tone, you should check your telephone, telephone cable, telephone jack and building telephone wiring out to the telephone company's junction box. Call your local phone service provider for assistance if needed.
At this point your modem should be powered on and connected to both the computer and the phone line and you're are now ready to configure Windows.
If you have setup a new COM port in Windows you will need to specify the settings for the new COM port you added as they are not always detected by Windows. The Ports option in Control Panel provide the means to accomplish this.
1. In the Control Panel-Ports window, click the Advanced button.
2. Type in or select the new I/O address and IRQ value for your new COM port.
3. Close your Windows session, when you restart a Windows session, you will find Windows recognizes the new ports.
You may now verify the presence of your COM ports by using the DEBUG utility.
You may also wish to verify the operation of your modem with the ECHO command.
You are now ready to install Windows communication program or use Windows Terminal in the Accessories Group. Be sure to configure your software to point to the correct COM port.
Installing Your Modem in Windows 95
Install an Internal Modem in Windows 95
You will need the following resources to use an internal modem.
a residential telephone jack
a phone cable (included with modem)
You should have already verified as available, or made available, one of the COM port, I/O address and IRQ combinations. Follow these steps to install your internal modem.
1. Set the modem jumpers to the appropriate COM port, I/O address and IRQ setting you selected in the earlier step. NOTE: ignore this step if your modem is a Plug and Play type, or is set only through a supplied setup program, ignore this step and proceed to the next.
2. Remove the cover from the IBM PC, using the instructions in your "Installing Options in Your Personal Computer" manual and follow the instructions in the "Installing and Removing Adapters" section of your manual to insert the modem into an available adapter slot.
3. Plug the phone cable into the residential telephone jack, then plug the other end into a telephone to listen for a dial tone. If there is a dial tone, unplug the cord from the phone and into the phone jack marked "line in" on the rear of the modem adapter. If there is no dial tone, you should check your telephone, telephone cable, telephone jack and building telephone wiring out to the telephone company's junction box. Call your local phone service provider for assistance if needed.
4. Replace the cover of your computer.
5. Restart your computer.
6. If the system gives a 162 POST error, check your serial port settings for conflicts.
7. Your modem should now be installed and connected to the phone line.
You are now ready to setup your modem in Windows 95.
A variety of factors will affect what Windows 95 does after it boots up the first time with a new modem installed. The following section lists some possible behaviour. Now is a good time to review your modem documentation for Windows 95 installation now. If the modem manufacturer provided driver diskettes for Windows 95, keep them at hand.
Modem is detected automatically on startup, correct drivers are installed automatically.
You may skip to the bottom paragraph if this is the case.
Modem is detected, but you are prompted to select which driver you want to install.
Use a driver disk supplied by the manufacturer.
Many modem manufacturers have updated drivers specific for Windows 95 and are available through their BBS services.
Select from list of Windows 95 alternate drivers.
If the manufacturer does not have a Windows 95 driver, ask what other modem that is in the Windows 95 driver list will work with your modem. Reinstall the modem with the identified driver.
Do not install a driver at this time.
Modem is detected on startup, incorrect drivers are installed.
Go to My Computer-Control Panel-Modems. Delete incorrect modem (if present). Click the add button to start the wizard, uncheck the "don't detect my modem" check box, click Next. Find your modem's manufacturer then click it to display the available models to select. Select your modem and follow the remaining instructions. If your modem is not on the list you have a few alternatives:
1. Use the Windows 95 modem driver disk supplied by the manufacturer.
2. Contact the manufacturer and ask for a driver disk. Reinstall the modem with the new driver.
3. Contact the manufacturer and ask what other modem that is in the Windows 95 driver list will work with your modem. Reinstall the modem with the identified driver.
Do not install a driver at this time.
Modem is not detected when Windows 95 starts.
Possible causes for this include:
1. Your modem won't be detected if it already appears in the My Computer-Control Panel-Modems list.
2. Your modem cable (external) is not attached to the modem or computer, check connection and turn off and on again.
3. Your internal modem is not configured properly, check the My Computer-Control Panel-System-Ports to see if it appears.
4. A software program is trying to access the modem or COM port. Disable or uninstall any offending program, per the program manufacturer, to proceed with installation.
Windows 95 should at this point have the correct (or compatible) modem driver copied to your hard drive or installed. Click "Finish" to complete the driver installation.
1. The next dialog box "Modems Properties" will allow you select "Dialing Properties" that prompts you for your country, area code, telephone access information, etc.. You to set up a dialing location, you may type in "Home" for example, then click new to create a location for home that retains a profile with information about your home telephone system, "Disable Call Forwarding," etc..
2. You may also click "Properties" for the new modem to verify the port, speed, etc. You should also click "Diagnostics" tab to have Windows 95 check your modem, or you may use the following methods:
You may now confirm the presence of your COM ports by using the DEBUG utility.
You may now wish to verify the operation of your modem with the ECHO command.
You are now ready to install a Windows 95 communication program or use Windows 95 HyperTerminal program in the Accessories folder. Be sure to configure your software to point to the correct COM port.
Install an External Modem in Windows 95
Follow these steps to install your external modem.
You will need the following resources to use an external modem.
an AC electrical outlet
a residential telephone jack
an RS232 communication cable for
a phone cable and power cord (included with modem)
Follow these steps along with any additional your modem documentation requires.
1. Attach the power cord to the back of the modem then plug the AC plug into the AC outlet.
2. Switch the modem on to see if it operates, if the modem lights do not glow, contact the modem dealer or manufacturer for assistance.
3. Attach the communication cable to the rear of the modem then the other cable end to the serial port in the rear of your system.
4. Plug the phone cable into the residential telephone jack, then plug the other end into a telephone to listen for a dial tone. If there is a dial tone, unplug the cord from the phone and into the rear of the modem marked "line in". If there is no dial tone, you should check your telephone, telephone cable, telephone jack and building telephone wiring out to the telephone company's junction box. Call your local phone service provider for assistance if needed.
At this point your modem should be powered on and connected to both the computer and the phone line and you're are now ready to configure Windows.
A variety of factors will effect what Windows 95 does after it boots up the first time with a new modem installed. The following section lists some possible behaviour. Now is a good time to review your modem documentation for Windows 95 installation now. If the modem manufacturer provided driver diskettes for Windows 95, keep them at hand.
Modem is detected automatically on startup, correct drivers are installed automatically.
You may skip to the bottom paragraph if this is the case.
Modem is detected, but you are prompted to select which driver you want to install.
Use a driver disk supplied by the manufacturer. Many modem manufacturers have updated drivers specific for Windows 95 and are available through their BBS services.
Select from list of Windows 95 alternate drivers.
If the manufacturer does not have a Windows 95 driver, ask what other modem that is in the Windows 95 driver list will work with your modem. Reinstall the modem with the identified driver.
Do not install a driver at this time.
Modem is detected on startup, incorrect drivers are installed.
Go to My Computer-Control Panel-Modems. Delete incorrect modem (if present). Click the add button to start the wizard, uncheck the "don't detect my modem" check box, click Next. Find your modem's manufacturer then click it to display the available models to select. Select your modem and follow the remaining instructions. If your modem is not on the list you have a few alternatives:
1. Use the Windows 95 modem driver disk supplied by the manufacturer.
2. Contact the manufacturer and ask for a driver disk. Reinstall the modem with the new driver.
3. Contact the manufacturer and ask what other modem that is in the Windows 95 driver list will work with your modem. Reinstall the modem with the identified driver.
Do not install a driver at this time.
Modem is not detected when Windows 95 starts.
Possible causes for this include:
1. Your modem won't be detected if it already appears in the My Computer-Control Panel-Modems list.
2. Your modem cable (external) is not attached to the modem or computer, check connection and turn off and on again.
3. Your external modem is not configured properly, check the My Computer-Control Panel-System-Ports to see if it appears.
4. A software program is trying to access the modem or COM port. Disable or uninstall any offending program, per the program manufacturer, to proceed with installation.
Windows 95 should at this point have the correct (or compatible) modem driver copied to your hard drive or installed. Click "Finish" to complete the driver installation.
1. The next dialog box "Modems Properties" will allow you select "Dialing Properties" that prompts you for your country, area code, telephone access information, etc.. You to set up a dialing location, you may type in "Home" for example, then click new to create a location for home that retains a profile with information about your home telephone system, "Disable Call Forwarding," etc..
2. You may also click "Properties" for the new modem to verify the port, speed, etc. You should also click "Diagnostics" tab to have Windows 95 check your modem, or you may use the following methods:
You may now confirm the presence of your COM ports by using the DEBUG utility.
You may now wish to verify the operation of your modem with the ECHO command.
C
You are now ready to install a Windows 95 communication program or use Windows 95 HyperTerminal program in the Accessories folder. Be sure to configure your software to point to the correct COM port
Install Your Modem in OS/2
OS/2 Warp and 2.x is set by default to support COM1 and COM2 at the standard settings shown below. If your serial port / external modem or internal modem are set exactly as shown below, you don't need to change anything in OS/2.
COM1: I/OAddress 3F8h, IRQ 4
COM2: I/OAddress 2F8h, IRQ 3
To configure OS/2 to recognize COM3 and COM4, you will need to edit your CONFIG.SYS file as shown below. As always, it is recommended to stick to the standard settings as shown below when you configure your port or modem.
COM3: I/OAddress 3E8h, IRQ 4
COM4: I/OAddress 2E8h, IRQ 3
1. Type EPM in an OS/2 window to start the OS/2 editor.
2. Open the OS/2 CONFIG.SYS file located in the root directory.
3. Modify the line containing DEVICE=C:\OS2\BOOT\COM.SYS by adding new COM port information to the end of the line.
For example, to add COM3 you would change the line from:
DEVICE=C:\OS2\BOOT\COM.SYS
To appear as:
DEVICE=C:\OS2\BOOT\COM.SYS (3,3e8,5)
The values in parenthesis represent the COM port number (3), the I/O address (3e8) and the IRQ (5).
(Additional help is available from an OS/2 command line by typing "HELP COM.SYS)
1. Save CONFIG.SYS in the editor.
2. Shutdown and restart the system, OS/2 will now recognize the COM port you added.
If you plan to use the new COM port in Windows session within OS/2, you will need to specify the settings for the new COM port you added as they are not always detected by Windows. The Ports option in Control Panel provide the means to accomplish this.
1. In the Control Panel-Ports window, click the Advanced button.
2. Type in or select the new I/O address and IRQ value for your new COM port.
3. Close your Windows session, when you restart a Windows session, you will find Windows recognizes the new ports.
You may now install communication software to use your new COM port.
Installing Your Modem in Windows NT 4.0
Install an Internal Modem in Windows NT4.0
You will need the following resources to use an internal modem.
a residential telephone jack
a phone cable (included with modem)
You should have already verified as available, or made available, one of the COM port, I/O address and IRQ combinations. Follow these steps to install your internal modem.
1. Set the modem jumpers to the appropriate COM port, I/O address and IRQ setting you selected in the earlier step. NOTE: ignore this step if your modem is a Plug and Play type, or is set only through a supplied setup program, ignore this step and proceed to the next.
2. Remove the cover from the IBM PC, using the instructions in your "Installing Options in Your Personal Computer" manual and follow the instructions in the "Installing and Removing Adapters" section of your manual to insert the modem into an available adapter slot.
3. Plug the phone cable into the residential telephone jack, then plug the other end into a telephone to listen for a dial tone. If there is a dial tone, unplug the cord from the phone and into the phone jack marked "line in" on the rear of the modem adapter. If there is no dial tone, you should check your telephone, telephone cable, telephone jack and building telephone wiring out to the telephone company's junction box. Call your local phone service provider for assistance if needed.
1. Replace the cover of your computer.
2. Restart your computer.
3. If the system gives a 162 POST error, check your serial port settings for conflicts.
Your modem should now be installed and connected to the phone line.
If your modem requires a software setup program to configure it to the appropriate COM port, I/O address and IRQ setting you should do so now. If your modem is a Plug and Play type it must be set through a supplied setup program or set as a legacy adapter as NT 4.0 does not recognize Plug and Play devices. If you do change your adapter setting at this point, you must restart your computer. If your system displays error 162, go back to the preceeding step pertaining to that error and proceed through again.
Complete the following steps to setup your modem in NT 4.0.
1. Double click "My Computer", then "Control Panel".
2. Double click "Ports", the "Ports" dialog box will appear.
3. Add new port or configure to appropriate I/O address, exit from dialog box.
4. Double click "Modems", the "Install New Modem" dialog box will appear.
If your modem is on the NT Hardware Compatability List, leave "Do not detect" unchecked.
If your modem is not on the Compatability List, or you have an updated modem driver diskette, skip the next step and proceed. You will be given the option to install a driver from diskette or to select an alternate driver from the list. You should check with your modem manufacturer for compatable modems supported by NT 4.0.
1. Click "Next", NT 4.0 will attempt to detect your modem type.
2. Verify that your modem is the correct type then click "Next".
3. The next dialog box will prompt you for your country, area code, maximum port speed (this may be set to the highest value), telephone access information, etc..
4. Click Next, the Dialing properties dialog box will prompt you to set up a dialing location, you may type in "Home" for example, then click new to create a location for home that retains a profile with information about your home telephone system, "Disable Call Forwarding", etc..
5. Your modem is now configured for NT 4.0 and ready to be checked out.
You may now verify the presence of your COM ports by using the DEBUG utility.
You may now wish to verify the operation of your modem with the ECHO command.
You are now ready to install a Windows NT communication program or use HyperTerminal in the Accessories folder. Be sure to configure your software to point to the correct COM port.
Install an External Modem in Windows NT4.0
Follow these steps to install your external modem.
You will need the following resources to use an external modem.
an AC electrical outlet
a residential telephone jack
an RS232 communication cable for
a phone cable and power cord (included with modem)
Follow these steps along with any additional your modem documentation requires.
1. Attach the power cord to the back of the modem then plug the AC plug into the AC outlet.
2. Switch the modem on to see if it operates, if the modem lights do not glow, contact the modem dealer or manufacturer for assistance.
3. Attach the communication cable to the rear of the modem then the other cable end to the serial port in the rear of your system.
4. Plug the phone cable into the residential telephone jack, then plug the other end into a telephone to listen for a dial tone. If there is a dial tone, unplug the cord from the phone and into the rear of the modem marked "line in". If there is no dial tone, you should check your telephone, telephone cable, telephone jack and building telephone wiring out to the telephone company's junction box. Call your local phone service provider for assistance if needed.
At this point your modem should be powered on and connected to both the computer and the phone line and you are now ready to configure Windows.
Complete the following steps to setup your modem in NT 4.0.
1. Double click "My Computer", then "Control Panel".
2. Double click "Ports", the "Ports" dialog box will appear.
3. Add new port or configure to appropriate I/O address, exit from dialog box.
4. Double click "Modems", the "Install New Modem" dialog box will appear.
If your modem is on the NT Hardware Compatability List, leave "Do not detect" unchecked.
If your modem is not on the Compatability List, or you have an updated modem driver diskette, skip the next step and proceed. You will be given the option to install a driver from diskette or to select an alternate driver from the list. You should check with your modem manufacturer for compatable modems supported by NT 4.0.
1. Click "Next", NT 4.0 will attempt to detect your modem type.
2. Verify that your modem is the correct type then click "Next".
3. The next dialog box will prompt you for your country, area code, maximum port speed (this may be set to the highest value), telephone access information, etc..
4. Click Next, the Dialing properties dialog box will prompt you to set up a dialing location, you may type in "Home" for example, then click new to create a location for home that retains a profile with information about your home telephone system, "Disable Call Forwarding", etc..
5. Your modem is now configured for NT 4.0 and ready to be checked out.
You may now verify the presence of your COM ports by using the DEBUG utility.
You may now wish to verify the operation of your modem with the ECHO command.
You are now ready to install a Windows NT communication program or use HyperTerminal in the Accessories folder. Be sure to configure your software to point to the correct COM port.
Preparing Your IBM PC Plug and Play BIOS for Windows 95
If you have a system with a Plug and Play BIOS and Windows 95, and you need to disable your system serial port(s), you should follow the steps outlined below. This procedure is intended to prevent Windows 95 from assigning system resources (IRQs, I/O addresses) to a serial port even though the user has "disabled" the port in the system setup. This may cause a resource conflict with the new device you are installing and prevent it from functioning properly.
1. Power on the computer.
2. When a white square "book" appears in the upper right corner of the screen, press the F1 on your keyboard to access the system configuration menu.
3. From the main menu select Devices and I/O Ports.
4. Select the device that was assigned the IRQ that the ISA Legacy device requires and disable it.
5. Hit the escape key to get back to the main menu.
6. From the main menu select the ISA Legacy Resources option.
A list of IRQ's and their status is displayed.
The options are 'AVAILABLE', NOT AVAILABLE' or 'SYSTEM RESOURCE'.
1. Change the status of the IRQ that the ISA Legacy device requires to 'NOT AVAILABLE'.
2. Hit the escape key to get back to the main menu.
3. Hit escape once more and save the configuration changes.
4. The system will reboot, the ISA Legacy Device will now have the IRQ that was just tagged as 'NOT AVAILABLE' * assigned to it.
* 'NOT AVAILABLE' refers to making the resource not avaiable to Plug and Play but AVAILABLE to Legacy adapters or Plug and Play adapters set to Legacy mode.
Troubleshooting Modem Problems in your IBM PC
Troubleshooting modem problems can be simplified by breaking the problem into managable components.By isolating one component at a time (e.g., modem cable, software driver) a problem can be identified and attributed to a single cause. Often with communication problems, because the high number of dependencies with hardware and software configuration, two or more "causes" may come into play. Using audio clues (e.g., line noise) or visual clues (e.g. modem lights, error codes) may help point to the
cause of a problem. Often the best way to resolve a problem is to walk through the installation instructions, here one may find a clue, or even an essential step completely overlooked.
Modem has never worked since installation.
Review the guidelines from "Modem Installation in your IBM PC". The installation section covers many causes of trouble.
Modem has not worked since installing new software program.
This is especially common with "Remote Control" PC software in the Windows 3.x environment. It also happens with programs for other operating systems. Another cause could be from installing network adapter and subsequently running a configuration program, changing IRQ or I/O address settings which might conflict with your modem's operation.
Frequent disconnections or garbled text during communication session.
Check the following for this symptom:
Voltage spikes from phone system. Dial a voice line, then listen for crackle or pop sounds. Call your local telephone service provider to report this problem if detected.
Some Fax machines poll the line periodically to check for a call. Disconnect the Fax machine and re-dial your number.
Check for bad house telephone wiring. Some newer telephone junction boxes allow for plugging a telephone connector"RJ11 type" directly into it. Try first making a voice call from a connection inside the building then see if the noise disappears when you connect directly to the junction box (if permitted by your telephone service provider). It is also common for the contacts in the junction box
to be corroded and/or loose.
Modem fails to dial or immediately disconnects.
Make sure another communication program has not replaced the default driver.
For 16 bit Windows Communication Applications in Windows 3.x, OS/2 and Windows 95
Verify the files size and date of COMM.DRV and SERIAL.VXD in the SYSTEM directory to the originals obtained from the Windows 3.x floppy diskettes.
Make sure the following lines appear in the SYSTEM.INI:
The [boot] section should contain Comm.drv=Comm.drv.
The [386enh] section should contain device=*vcd.
You can tell if a program has replaced these values by the presence of ";" in front of the previous value (disabling it), with a new entry directly below or at the end of the section, such as Comm.drv=Newcom.drv. and device=c:\windows\system\newcom.386. You could, in this case remove the ";" from the original entry(s), but only after finding and disabling their replacements!
Warning, this will most likely disable the application which put the changes in to begin with.
For 32 bit Windows Applications in Windows 95
You will need to reinstall the default communications drivers for Windows 95.
Select communications port entries in Device Manager.
Run the "Add New Hardware Wizard" in Control Panel to detect and reinstall the default Windows 95 drivers.
Modem Installation in your IBM PC
The IBM PC 700 Series 6875, 6885, 6876, and 6886 may exhibit data transmission failures or mouse failures using Microsoft's Windows 95 Terminal program with either of the following configurations:
A modem configured for COM 4 and running a video mode of 1280 x 1024 x 256 colors may result in Data Transmission Failure.
A modem configured for COM 4 and running a video mode of 640 x 480 (VGA) may cause the mouse pointer to freeze.
Plug and Play
Plug and Play is a technology designed to automate and simplify the setup and configuration of your computer when you install new options. Plug and Play adapter support is built into the system board in your computer. Plug and Play adapters are configured automatically and require no jumpers to be set.</P>
PCI adapters generally are Plug and Play compatible. Some new ISA adapters also support Plug and Play.
A Plug and Play adapter comes with identification and configuration specifications set in memory on the adapter, to provide installation information to the computer during startup. This information is recognized by the input/output (I/O) bus and interpreted by the computer basic input/output system. The BIOS then automatically configures the adapter around the resources already in use by other devices.
Some Plug and Play adapters come with a jumper to disable the Plug and Play feature, at which point it becomes a legacy adapter.
Legacy Adapters
Adapters that are not Plug and Play compatible are known as legacy adapters. Legacy adapters often require the user to move jumpers on the adapter to configure resources.
Prior to installing a legacy adapter into a Plug and Play compatable system the user should use the IBM system Configuration/Setup Utility program to make the desired resource (IRQ, I/O address or memory range) unavailable to Plug and Play. This will prevent conflicts between Plug and Play adapters and the legacy adapter and also inform the user of which system resources are available and which are not.
Modem cable
The connection to an external modem is via the serial port on the PC. This can be a 9 or 25 pin connection but is always a male connector, a parallel port is a female connector. Standard modems are serial devices and should be connected to the serial port. The correct cable for connecting a modem to a PC is a serial or communication cable, not a null modem cable which is used to connect a PC directly to another PC without a modem. Be sure you have the right cable for the right job.
Use Debug to Verify Serial Port or Internal Modem Settings
Debug is a tool that can be used to determine if the operating system sees the modem or serial port, and it is available with DOS, Windows 95, NT and OS/2.
At the DOS prompt type the DEBUG command.
C>DEBUG then press ENTER. (NOTE: If the subdirectory where DEBUG.EXE is located is not in the path, it will return "Bad Command or Filename". Change to the subdirectory that DEBUG.EXE is located (for example: CD C:\DOS). If you don't know what subdirectory debug is in, you can find it by typing from a DOS command prompt: "DIR DEBUG.EXE /S".
At the Debug Hyphen (-) prompt, type in the following command to dump the COM port information for your system.
Type d40:00 and press ENTER
Look for the COM port definitions in the hexadecimal byte dump. The available COM ports will appear in the byte dump with low ordered bytes displayed first. Thus, COM1 with base address of 03F8 will display as F803.
The following dump is from a system with COM1, COM2, COM3 and COM4 defined.
0040:0000 F8 03 F8 02 E8 03 E8 02 BC 03 00 00 00 00 5E 03
The next example is from a system with no COM ports defined.
0040:0000 00 00 00 00 00 00 00 00 00 00 00 00 00 00 00 00
The next example illustrates a system with COM2 in the COM1 position because COM1 is disabled and a modem is at COM2.
0040:0000 F8 02 00 00 00 00 00 00 00 00 00 00 00 00 00 00
Testing Your Modem with the ECHO Command
Even though many communication programs offer a command line for testing purposes, this test may be used prior to installing your communication program to verify your modem's functionality and to make sure it is hooked to the COM port you selected in earlier steps. Perform the following steps at a DOS command prompt. Type only the commands shown within the " ", do not include the quotation marks with the commands. These commands work with most modems, check your modem's manual to verify if your modem supports these commands.
Type: "ECHO AT&F>COMX", then hit the ENTER key (X is the COM port number of the serial port the external modem is connected to (or internal modem is set for)).
This command sets the modem to factory defaults. Your cursor should return to a DOS command prompt. If an error message such as "write fault error" appears, you may have a resource conflict or your modem may be defective.
Type: "ECHO ATA>COMX", then hit the ENTER key.
This command instructs the modem to answer the telephone line. The modem should respond with tones as it attempts to "shake hands" with another modem. This will work even if the modem is not hooked to a phone line. If the modem does not respond with these tones, the modem may be defective.
Type: "ECHO ATH>COMX", then hit the ENTER key.
This tells the modem to hang up and will stop the modem noise.
With the modem connected to the line, type: "ECHO ATDT1915170001>COMX", then hit the ENTER key.
You should hear the modem dialing. If you dialed a second phone line in your office or home, you should hear it ring.
Type: "ECHO ATH>COMX", then hit the ENTER key.
This tells the modem to hang up and will stop the modem noise again.
If the modem worked for these tests it is probably good and configured so that it will work with your communication program.Other utilities useful in checking system resources include MSD.EXE which is included with MS DOS and Windows, the "RWVIEW /irq" command in OS/2 which reports IRQ information. There are other programs and utilities that can assist the user in verifying COM port settings include QAPlus/Win which may have been included with your IBM Personal Computer, QAPlus/PRO as well as a variety of other products available in the marketplace. Contact your dealer for more information.
Modem won't autodetect in Windows 95
You can start Windows 95 modem detection manually with the following steps:
Open the Control Panel
Select Add New Hardware
Select Modems
Pick the model modem you have (or compatable model)
PCMCIA Modem Card
PCMCIA cards, now known as "PC Cards" were once thought of as a simple way to add memory and modest amounts of storage to handheld and laptop computers, today PCMCIA (Personal Computer Memory Card International Standard Association) standard
for plug-in add-on cards are offered by many, if not most, modem manufacturers.
PCMCIA requires software which is included in some, but not all, operating systems. Generally the more recent the operating system version, the more likely PCMCIA support is provided by default, or is included as an option. View the following outline for a summary of what PCMCIA support is required for each operating system:
DOS
Requires "Card and Socket Services" provided by vendors supporting the PCMCIA card to be used. Included in IBM DOS is IBM card and socket services, other support is available from Phoenix, CardSoft and others. Note: these PCMCIA support software products require particular attention to memory management, they may require exclusion statements in the Upper Memory Area (UMA) when EMM386.EXE is loaded in the CONFIG.SYS file.
Windows 3.1
Requires "Card and Socket Services" provided by vendors supporting the PCMCIA card to be used. Included in IBM DOS is IBM card and socket services, other support is available from Phoenix, CardSoft and others. Note: these PCMCIA support software products require particular attention to memory management, they may require exclusion statements in the Upper Memory Area (UMA) when EMM386.EXE is loaded in the CONFIG.SYS file. They may also require exclusions in the [386Enh] section of the SYSTEM.INI file. There is no native Windows 3.1 PCMCIA device support.
Windows 95
Most PCMCIA sockets and many cards are supported by Windows 95 Plug and Play by running the PCMCIA wizard. It will disable the real-mode (DOS) drivers in the AUTOEXEC.BAT and CONFIG.SYS files or, in some cases, disable Plug and Play PCMCIA support if there is a risk of incompatability.
Windows 95 will, in most cases, support your PCMCIA card and socket and configuration will be automatic. PCMCIA real mode card and socket services my often be utilized in cases where your PCMCIA socket (chip) is not supported by native Windows 95 drivers.
OS/2
Most PCMCIA sockets and many cards are supported by OS/2. It will disable the real-mode (DOS) drivers in the AUTOEXEC.BAT and CONFIG.SYS files.OS/2 will, in most cases, support your PCMCIA card and socket and will automatically be installed.
Windows NT 4.0
Most PCMCIA sockets and many cards are supported by Windows NT by clicking on and configuring your new devices in the PCMCIA and Modems icon in the Control Panel. Window NT 4.0 will, in most cases, support your PCMCIA modem card and socket.
|
Search Keywords |
| |
|
Hint Category |
Modems, Hardware Installation/Configuration | |
|
Date Created |
17-12-96 | |
|
Last Updated |
25-02-99 | |
|
Revision Date |
25-02-2000 | |
|
Brand |
IBM PC | |
|
Product Family |
PC 100, PC 140, PC 300GL, PC 300XL, PC 300PL, PC 330, PC 340, PC 350, PC 360, PC 365, PC 730, PC 750, PS/2, ValuePoint | |
|
Machine Type |
Various | |
|
Model |
| |
|
TypeModel |
| |
|
Retain Tip (if applicable) |
| |
|
Reverse Doclinks |