

|
1.282.805 bytes |
Service Hints & Tips |
Document ID: MNOK-3ZFLZC |
Aptiva - 2139/2153 Setting up the IBM 10/100 EtherJet PCI Adapter in Windows 98
Applicable to: United States
1. With the 10/100 EtherJet PCI Adapter installed in your Aptiva, connect a UTP cable to both the adapter and to an Ethernet hub. Power up the system and allow Windows 98 recognized the new hardware . After Windows 98 recognizes the adapter it will load the preinstalled drivers for that adapter.
Note: The drivers provided with the Windows 98 preload for current Aptiva products are dated 5-10-98. Updates for these drivers can be located on the IBM Networking Home Page at http://www.networking.ibm.com/support.
2. After the drivers have been loaded the computer will restart the operating system.
3. After restarting your systems, Select Start, then Settings, then Control Panel. Select System.
4. When System Properties window appears, select Device Manager, then select the Network Adapter icon and expand it to show the IBM 100/10 EtherJet Adapter PCI Adapter that has been installed.
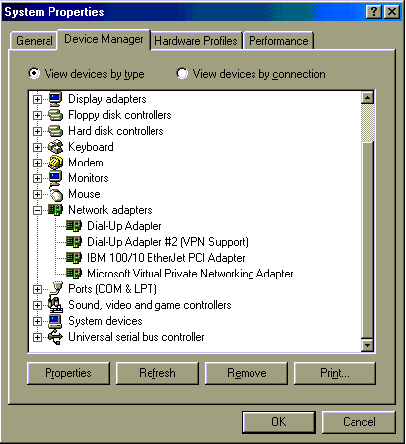
Note: If there is a yellow exclamation mark beside this adapter, the adapter needs to be removed and reinstalled manually.
5. After confirming that the adapter is being seen by the operating system, then click on OK.
6. Select the Network Neighborhood icon. This icon will show the members of your peer-to-peer network.
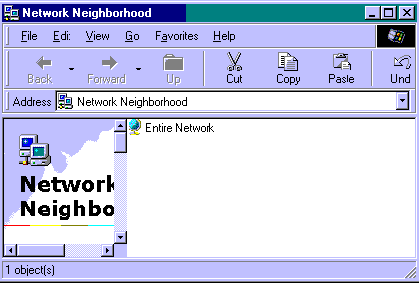
As shown above there are no other members of the Network Neighborhood. You must configure the necessary protocols to activate this function.
Configuration for NetBEUI peer-to-peer networking
Now that the adapter is installed and is being seen by the operating system, we can configure the system to allow for peer-to-peer networking
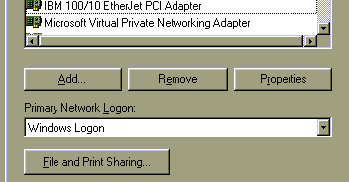
1. Right click on Network Neighborhood and select the Properties option, the windows below will identify what adapters are configured for your system.
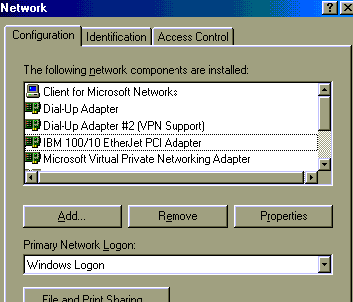
By scrolling down in that window you will also see the protocols that are configured for your system.
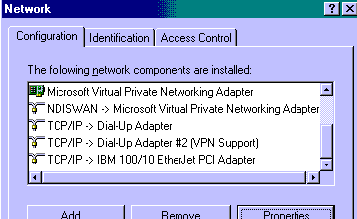
As you can see TCP/IP has already been loaded for the dial-up adapter and has been added to the IBM 100/10 EtherJet PCI Adapter, but further configuration is required to provide TCP/IP functionality .
2. Select File and Print Sharing option from the bottom of this screen.
3. The next window is used to set the type of access that you want to provide to the other members of your group.
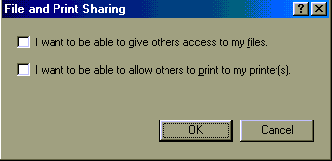
After selecting the level of sharing you wish to provide , click on OK.
4. Next select the Identification tab on this window to identify your system to the rest of the members of your network. Each computer in the network requires a unique name and should be a member of the same workgroup.
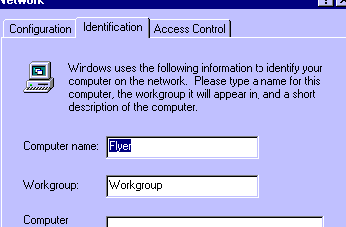
Without clicking on OK button, click on the Configuration tab.
5. Highlight the IBM 100/10 EtherJet PCI Adapter and select ADD, and the following window will popup.
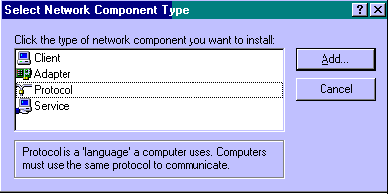
6. Select the Protocol Option and then select the Microsoft option from the Manufacturers menu and select the NetBEUI from the Network Protocols menu.
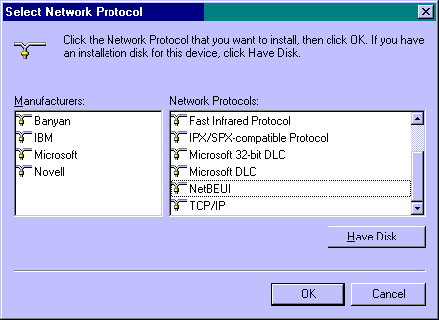
After clicking on OK the system will request a Restart. Restart the system.
7. Next you must setup a shared resource on your system to allow data to be shared across your network. This shared resource is setup by going to My Computer and selecting a file or sub-directory to share. Then right click on the file and select the Sharing... option, after clicking on this option the following window will appear.
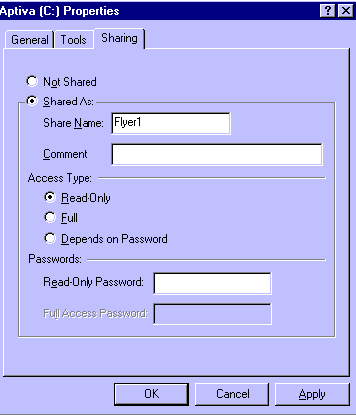
This window will allow you to set the share name and limit user access to read-only or even set a password. After selecting the user access setting, click on OK.
8. Now click on Network Neighborhood and notice the difference.
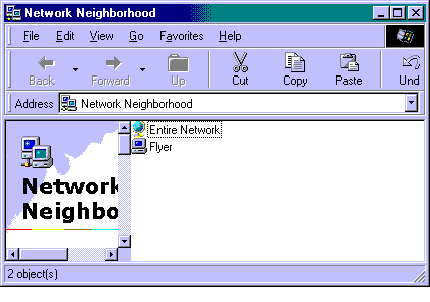
As other members of the group complete this process their icons and share names will appear within the Network Neighborhood after the view is refreshed.
9. To access these members of your Network Neighborhood click on their share name and it will open access to those resources that have been made available by other members of your workgroup.
TCP/IP Client Configuration for Windows 98
The support for TCP/IP with the Aptiva product is limited to configuration of a TCP/IP client on a campus LAN.
1. Right click on the Network Neighborhood Icon and select Properties. Scroll down to the entry that has TCP/IP -> IBM 100/10 EtherJet PCI Adapter and highlight it then and select Properties.
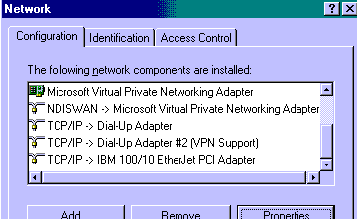
2. The following window will appear.
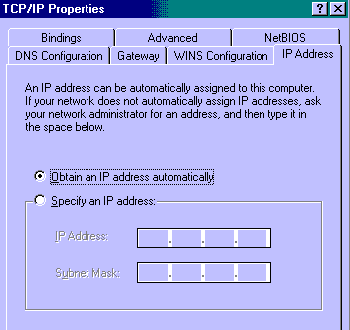
If your network provides TCP/IP addresses dynamically then leave the default setting. If you have been provided a TCP/IP address by your LAN Administrator, you can enter these values by selecting the Specify an IP address:
The IP address is a value that is unique to your machine and identifies your systems from other systems on your network. An error will occur if a identical IP address is assigned to two workstation on the same network.
The Subnet Mask is a device that allows for an IP address range to broken into smaller parts or subnets. This device acts as a filter to keep the members on a segment within a certain area of a larger network.
Note: IBM does not provide any TCP/IP or Sublet Mask support. That information is provided only by the local LAN administrator.
3. To access networks that are outside of the local area network that you are connected to you will also have to configure a Default Gateway. The gateway is a router that allow you access outside of your local network. These setting may be set by selecting the Gateway tab in this configuration window.
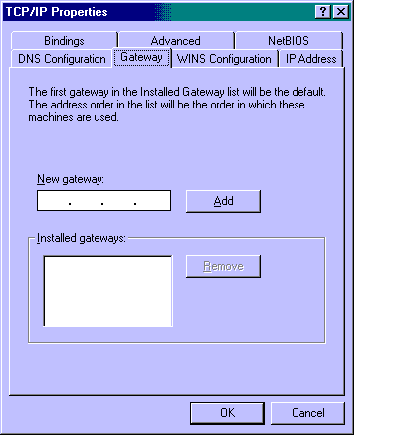
Enter the address for the gateway the New gateway field and then click the Add button. This will move the address in the Installed gateways field.
4. After completing these modification to the TCP/IP properties screen click the OK button and the system will request a restart. Restart the system.
5. This completes the supported configuration of the TCP/IP Client for the Aptiva Product line.
|
Search Keywords |
Ethernet, IBM Adapter Cards | |
|
Hint Category |
Networking, Adapter Cards | |
|
Date Created |
20-10-98 | |
|
Last Updated |
24-11-98 | |
|
Revision Date |
04-11-99 | |
|
Brand |
IBM Aptiva | |
|
Product Family |
Aptiva | |
|
Machine Type |
2139, 2153 | |
|
Model |
All | |
|
TypeModel |
| |
|
Retain Tip (if applicable) |
| |
|
Reverse Doclinks |