
|
52.862 bytes |
Product Information |
Document ID: DDSE-43TRK3 |
Netfinity 3500 - Configuration Overview
Applicable to: World-Wide
Configuration Overview
This allocation process is referred to as configuration. The steps required to configure the server depend on the number and types of devices and programs installed. The server supports adapter types:
Peripheral Component Interconnect (PCI)
Industry Standard Architecture (ISA)
Small Computer System Interface (SCSI)
Jumpers and switches are used to define certain configuration values on the system board, adapters, and other devices. For details about system-board jumper and switch settings, see "System Board" on page 95.. If you need to set jumpers or switches on adapters, drives, or other devices, refer to the documentation that comes with the devices for specific information about the appropriate jumper and switch settings.
The server comes with the following hardware configuration utility programs:
Configuration/Setup Utility program
With the Configuration/Setup Utility program, you can configure system board functions, such as serial and parallel port assignments; change interrupt request settings, and change the startup sequence for drives that you install. You can also use this utility program to set passwords for starting the server and accessing the Configuration/Setup Utility program.
SCSISelect Utility
With the built-in SCSISelect Utility program, you can configure the SCSI devices that you install in the server. You can use SCSISelect to change default values, resolve configuration conflicts, and perform a low-level format on a SCSI hard disk drive.
Before installing a new device or program, read the documentation that comes with it. Reading the instructions helps you to determine the steps required for installation and configuration. The following actions are typically, but not always, required to configure the server.
1. Run the Configuration/Setup Utility program and record the current configuration settings. See "Configuration/Setup Program."
2. Set jumpers or switches on the server's system board. See "System Board" on page 95.
3. Set jumpers or switches on the device. See the device installation instructions.
4. Install the device in the server. Reserve ISA legacy resources for ISA adapters. See "ISA Legacy Resources" on page 27.
5. Resolve configuration conflicts. See "Resolving Configuration Conflicts" on page 41.
6. Install software programs, including device drivers. Refer to the information that comes with the IBM ServerGuide package for more information.
Configuration/Setup Program
For most configurations, the server will operate using the default system settings. You need to change the settings only to resolve configuration conflicts or to enable or change device functions.
When you want or need to change the default settings, the Configuration/Setup Utility program provides a convenient way to display and change the settings.
After you run and exit the Configuration/Setup Utility program, configuration information is stored in electrically erasable programmable read-only memory (EEPROM). While the server is powered off, the configuration information remains available for the next system startup.
Always run the Configuration/Setup Utility program if you receive an error message instructing you to do so. If you installed or removed SCSI devices, run the SCSISelect Utility program (see "SCSISelect Utility" on page 42). Review this chapter and the information that comes with the option before making changes.
To start the Configuration/Setup Utility program:
1. Power-on the server and watch the screen.
If the server is already powered on, power-off the server, wait a few seconds until all in-use lights go off, and then power the server back on. (Do not use Ctrl+Alt+Del to restart the server.)
2. When the message Press F1 to enter Configuration/Setup appears, press F1. The Configuration/Setup Utility program menu appears. For information about the menus, see "Configuration/Setup Utility Program Menus" on
|
Notes |
Configuration/Setup Utility Program
Menus
From the Configuration/Setup Utility program Main Menu, you can select the settings that you want to change.
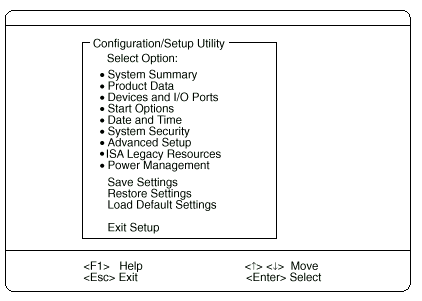
Pressing F1 displays Help information for a selected menu item.
In the Configuration/Setup Utility program menus, you can accept the configuration changes by viewing and saving the changes, or you can make manual changes and then save the settings.
The following is a quick reference for identifying symbols in the Configuration/Setup Utility program.
A bullet ( ) beside a menu item indicates that an additional menu is available.
Information enclosed in brackets ([ ]) can be changed.
You cannot change information that is not surrounded by [ ].
A right arrowhead ( ) beside a menu item indicates that a configuration change occurred in that category.
The might also appear in subsequent menus.
An asterisk ( *) beside a menu item indicates that a resource conflict exists.
To exit from the Configuration/Setup Utility program:
1. From the Configuration/Setup Utility program, select Exit Setup.
2. The Exit Setup menu appears. You can save your changes, exit from the Configuration/Setup Utility program without saving your changes, or return to the Configuration/Setup Utility program menu. Use the arrow keys to select the desired option; then, press Enter.
|
Note |
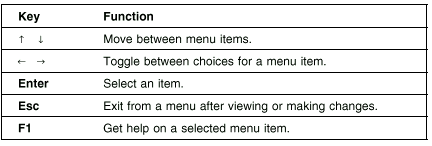
Use the following commands to navigate through the screens and make selections:
System Summary: Select this choice to display configuration information, such as the type and speed of the microprocessor, and the amount of memory.
Changes that you make to configuration settings appear on this summary screen. You cannot edit the fields on this screen. If you need to change the configuration settings, you must make the changes from the applicable menu choices.
Product Data: Select this choice to view the machine type and model, the system serial number, the system board identifier, and the revision level or issue date of the flash EEPROM.
Devices and I/O Ports: Software recognizes ports from their port assignments. Each port must have a unique port assignment. The Configuration/Setup Utility program normally handles this, but you might have special hardware or software that requires you to change these assignments.
Select the Devices and I/O Ports choice to view or change the assignments for devices and input/output ports.
You can add serial ports by installing a serial adapter in an expansion slot. See the documentation that comes with the serial adapter for information about port assignments.
To display or change the port assignments:
1. Select Devices and I/O Ports.
2. Select a device or port. If necessary, press Enter to display an additional menu.
3. Use the Left Arrow or Right Arrow key to advance through the settings.
Start Options: Select this choice to view and change settings for device startup sequence, keyboard speed, virus detection, various power-on options, and other features.
You can control the startup sequence of the drives in the server. Each time that you turn on the server, it checks the drives as it looks for the operating system. The order in which the system checks the drives is the drive-startup sequence.
|
Note |
To set the startup sequence:
1. Select Start Options.
2. Select Startup Sequence.
3. Select the sequence and devices from the choices provided.
4. If Automatic Power On Startup Sequence is Enabled, select the sequence and devices from the choices provided.
Date and Time: Select this choice to set the system date and time.
The system time is in a 24-hour format: hour/minute/second. The system date is in standard format for your country. For example, in the United States, the format is MM/DD/YYYY (Month/Day/Year).
Select Date and Time; then, use the Left Arrow or Right Arrow key to advance through each data field. Type the new information; the system saves the information as you enter it.
System Security: Several security features are available to help you secure the server and the information that you store in it. To control access to the server, you can implement the security features, such as adding passwords, and securing IDE devices and diskette drives.
Using the Power-On Password Menu: The power-on password can deter unauthorized access to the system. When you set the power-on password, you can choose one of three password prompt modes.
On The system prompts the user for the power-on password during startup. If you have a mouse connected to the mouse port, it will remain locked until you enter the power-on password.
|
Notes |
Off The system does not prompt the user to enter the power-on password during startup.
If you have a mouse connected to the mouse port, the password prompt Off mode prevents the system from detecting that a mouse is attached.
|
Notes |
To adjust the server configuration so that the operating system does not display an error or stop operating when the mouse port is disabled:
|
Operating System |
Instructions |
|
OS/2 |
Do one of the following: |
|
Microsoft Windows |
When the mouse port disabled error message appears, enter either the power-on or administrator password to enable the keyboard. Then use the keyboard to put a check mark in the Do not display this message in the future check box. |
If you enter a password, the keyboard will unlock, but the mouse connected to the mouse port will remain disabled.
Password prompt Off mode is useful for network environments that cause the server to operate unattended. If a power failure occurs, when power is restored, the server will automatically restart and resume operating in this mode, without operator intervention.
Dual If you press the power switch to start the server, the server operates in password prompt On mode.
If you start the server by an unattended method, such as remotely over a LAN, the server operates in password prompt Off mode.
To set or change a power-on password:
1. Select Power-On Password.
2. Enter the password and press the Down Arrow key.
You can use any combination of up to seven characters (A-Z, a-z, and 0-9) for this password. Keep a record of the password in a safe place.
3. Enter the password again.
4. At Password Prompt, select Off, On, or Dual. Press the Left Arrow or Right Arrow key to toggle between selections.
5. Select Change Power-On Password, and follow the instructions on the screen.
|
Notes |
To delete a power-on password:
1. Select Power-On Password.
2. Select Delete Power-On Password and follow the instructions on the screen.
Using the Administrator Password Menu: The administrator password (sometimes called a supervisor-level password) controls access to some features of the server, including the Configuration/Setup Utility program.
To set or change an administrator password:
1. Select Administrator Password.
2. Enter the password and press the Down Arrow key. You can use any combination of up to seven characters (A-Z, a-z, and 0-9) for this password. Keep a record of the password in a safe place.
3. Enter the password again.
4. Define the Power-On Password Changeable by User field. Choices are:
Yes The power-on password can be changed without entering the administrator password, if the administrator password is set.
No The power-on password cannot be changed unless the administrator password is entered, if the administrator password is set.
5. Select Change Administrator Password and follow the instructions on the screen.
|
Note |
To delete an administrator password:
1. Select Administrator Password.
2. Select Delete Administrator Password and follow the instructions on the screen.
If both a power-on and administrator password are set, you can enter either password to complete the system startup. However, the administrator password provides access to all menu choices, and provides the ability to change information. If you enter the power-on password, you will be able to view limited information in the Configuration/Setup Utility program, but you will not be able to change any settings.
Using the Enhanced Security Features: With enhanced security, the administrator password and drive-startup sequence are stored in a highly protected, nonvolatile, security EEPROM module. When the administrator password and drive-startup sequence are stored in the security EEPROM, they remain intact even if the battery expires or is removed.
|
Attention |
If enhanced security is enabled and you have set an administrator password, the server will operate as follows:
The security EEPROM is protected from unauthorized access once the startup procedures are complete. With enhanced security disabled, the contents of the EEPROM are write protected.
With enhanced security enabled, the POST/BIOS utility program will not allow updates to the system programs.
If the cover of the server has been removed, a tamper-detection feature will halt system processing and deny access to the keyboard and mouse until the administrator password is entered. This feature will work if the server is powered on or off.
To enable or disable enhanced security:
|
Note |
1. Insert a system programs update diskette in the server. System programs updates are available on the World Wide Web. To obtain up-to-date information about the server model, access the home page for the server at the following address:
http://www.pc.ibm.com/us/server/
2. Turn on the server. If it is already turned on, you must turn it off and back on again.
3. The update begins, and the system prompts you for the administrator password, if you have set an administrator password.
4. When you enter the administrator password, the update diskette will continue to run, and you are given the option of enabling or disabling enhanced security.
To set, change, or delete an administrator password protected by enhanced security:
1. Power-off all attached devices and the server.
2. Remove the server cover.
3. Locate the switch marked as 7 on the rocker switches section of the system board. See "Administrator Password Switch" on page 53 for the location of the switch. Move the switch to the ON position.
4. Move the switch back to the OFF position after you have set, changed, or deleted the password.
5. Replace the cover. Then, power-on the server.
|
Search Keywords |
| |
|
Document Category |
Configuration | |
|
Date Created |
04-01-99 | |
|
Last Updated |
04-01-99 | |
|
Revision Date |
04-01-2000 | |
|
Brand |
IBM PC Server | |
|
Product Family |
Netfinity 3500 | |
|
Machine Type |
8644 | |
|
Model |
ALL | |
|
TypeModel |
| |
|
Retain Tip (if applicable) |
| |
|
Reverse Doclinks |