
|
71.219 bytes |
Parts Information |
Document ID: DDSE-42DVF3 |
Netfinity 3000 - System board Removal, Illustration and Replacement
Applicable to: World-Wide
System Board
|
Attention |
|
Note |
To remove the system board:
1. Remove the server side cover (see "Disconnecting Cables and Removing the Side Cover").
2. Position the server as described in "Accessing the System Board".
3. Remove the bottom cover. (See "Bottom Cover".)
4. Lift the system board latch handle upward to disconnect the plastic tab on the bottom of the handle from the chassis.
5. Grasp and turn the latch clockwise to the extended position. This releases the system board from the riser card.
|
Note |
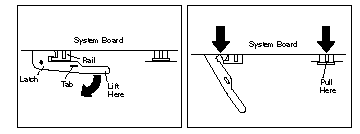
6. Using the tab, slide the system board out and set it aside.
To reinstall the system board:
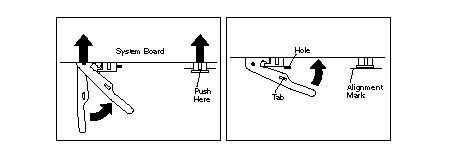
1. Make sure that the system-board latch handle is in the extended position.
2. Align the system-board rails with the tracks on the chassis and slide the board in until it is approximately 6 mm (0.25 in) from the riser-card edge connector.
3. Rotate the latch handle counterclockwise until the system board is properly aligned with the riser-card edge connector.
4. Continue rotating the latch handle counterclockwise while firmly pushing on the system-board rail on the right-hand side of the system board.
|
Note |
Make sure that the system board is fully seated in the riser-card edge connector.
5. Push down on the latch to lock the tab on the underside in the opening (hole) in the chassis. This securely holds the latch in the closed position.
|
Note |
6. If you want to install or remove any other options, do so now. Otherwise, go to "Completing the Installation".
System Board Illustration
The system board, also called the planar or motherboard, is the main circuit board in the server. It provides basic
server functions and supports a variety of devices that are preinstalled or that you can install later.
Some configuration actions are controlled through jumpers on the system board, whereas other actions are controlled through switches. The following sections discuss the jumper and switch settings that you can change.
If you plan to install, remove, or replace hardware in the server, or if you must set jumpers and switches, you will
need to know the layout of the system board. The following illustration shows the layout of the system board in the server. The numbered pointers show the components that are discussed in this book.
|
Notes |
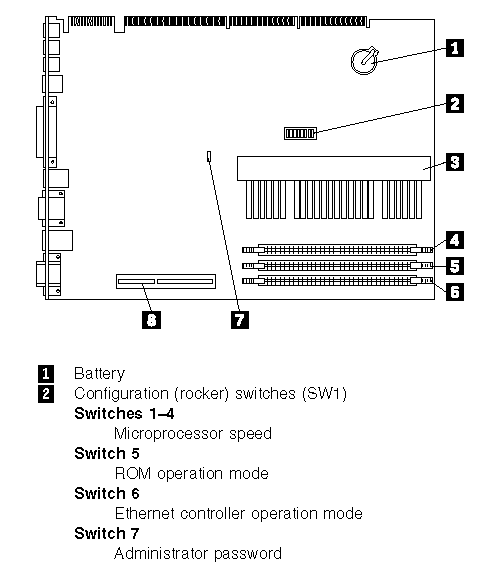
Switch 8

System Board Replacement
|
Attention |
|
Search Keywords |
| |
|
Document Category |
Processors | |
|
Date Created |
20-11-98 | |
|
Last Updated |
23-11-98 | |
|
Revision Date |
20-11-99 | |
|
Brand |
IBM PC Server | |
|
Product Family |
Netfinity 3000 | |
|
Machine Type |
8476 | |
|
Model |
ALL | |
|
TypeModel |
| |
|
Retain Tip (if applicable) |
| |
|
Reverse Doclinks |