

|
115.848 bytes |
Service Hints & Tips |
Document ID: DDSE-3QNJBL |
|
This document is provided to IBM and our Business Partners to help sell and/or service IBM products. It is not to be distributed beyond that audience or used for any other purpose. |
PCServer704 - System Board Information
Applicable to: World-Wide
System Board
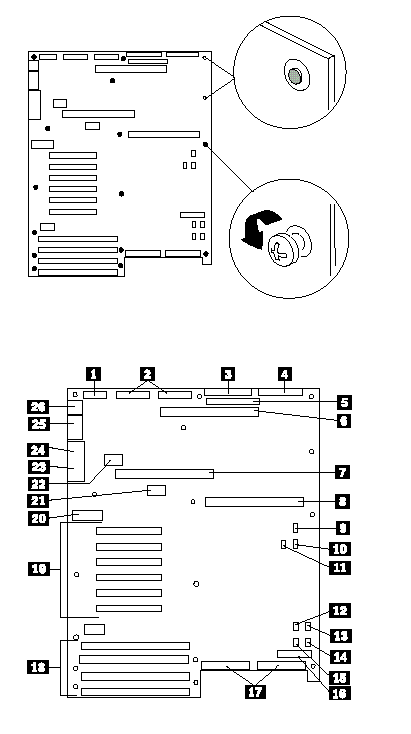
Connectors
1. Cable: Power control and status (PS3)
2. Cable:+ 5V,+ 12V, and+ 3.3V power connector (PS1 and PS2) (identical)
3. Cable: Diskette drive connector
4. Cable: Front panel connector
5. Not used
6. Memory board connector
7. Secondary processor board connector
8. Primary processor board connector
9. Fan 1 connector (not used)
10. Fan 2 connector (inner chassis fan)
11. Hard disk drive LED 1 connector
12. I C connector (not used)
13. Fan 3 connector (upper outer chassis fan)
14. Fan 4 connector (lower outer chassis fan)
15. Hard drive LED 2 connector (not used)
16. Connector for optional Server Management Module (not used)
17. SCSI bus connectors: Channel A to the right, Channel B to the left
18. EISA slots 1-4 for add-in boards (slot 1 toward top, 4 toward bottom)
19. PCI slots 1-6 for add-in boards (slot 1 toward top, 6 toward bottom: Bus 0 = slots 1 - 3; Bus 1= slots 4 - 6)
20. Configuration switches and jumpers
21. Real-time clock
22. Video DRAM expansion socket
23. VGA monitor connector
24. Parallel port connector
25. Serial port connectors A (COM1) and B (COM2)
26. PS/2-compatible keyboard and mouse connectors
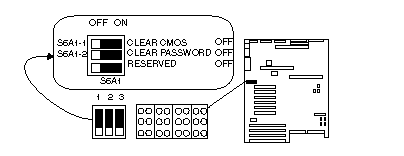
Configuration Switches
|
Switch Position Function |
|
S6A1-1 On Clear CMOS S6A1-2 On Clear password Factory default setting. |
Resetting NVRAM and the RTC (Switch S6A1-1)
Setting the CMOS switch to On clears the current values of NVRAM and the RTC when the server is reset.
This returns NVRAM and the RTC to the factory default.
When the CMOS switch is set to Off, the default, the current settings are preserved during system reset.
To reset the server's NVRAM and RTC settings to the factory default values, do the following steps:
1. Power-off the server and monitor.
2. Locate the configuration switches on the system board.
3. If necessary to access the configuration switches, remove the processor board.
4. Slide switch S6A1-1 to On.
5. If removed, replace the processor board.
6. Power-on the monitor and server; then, wait for POST to complete. This automatically reprograms the NVRAM and RTC to their factory settings.
7. Power-off the server and the monitor.
8. If necessary to access the configuration switches, remove the processor board.
9. Slide switch S6A1-1 to Off.
10. If removed, replace the bottom processor board.
Jumpers
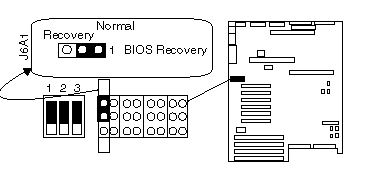
BIOS Recovery Jumper (J6A1)
|
Jumpers Function |
|
1-2 Normal BIOS boot block |
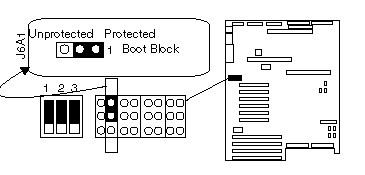
Boot Block Write Protect Jumper (J6A1)
|
Jumpers Function |
|
1-2 Boot block is write-protected Factory default setting |
BIOS Write Jumper J6A4
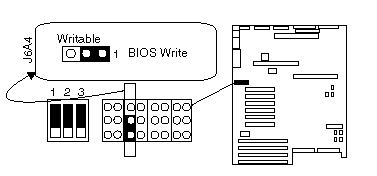
|
Jumpers Function |
|
1-2 Disables BIOS update of flash memory |
Floppy 0 Jumper at J6A4
Floppy 1 Jumper at J6A2
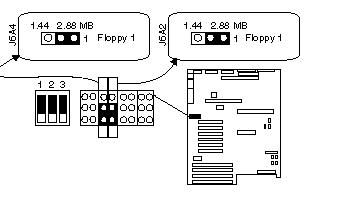
|
Jumpers Function |
|
1-2 For 1.44 MB diskette drive, disable automatic 2-3 For 2.88 MB diskette drive, enable automatic Factory default setting. |
Video Sleep Jumper, J6A2
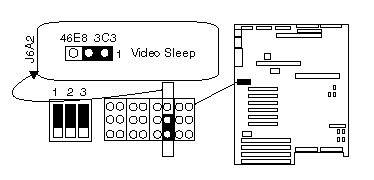
|
Jumpers Function |
|
1-2 Video Sleep register resides at 03C3H 2-3 Video Sleep register resides at 46E8H Factory default setting |
Power Control Jumper (J63A3)
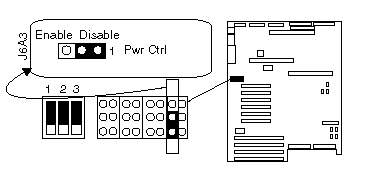
|
Jumpers Functions |
|
1-2 Disables RTC power supply control 2-3 Enables power supply control using Factory default setting |
|
Search Keywords |
| |
|
Hint Category |
Hardware Maintenance Information, Processors | |
|
Date Created |
14-06-96 | |
|
Last Updated |
22-01-99 | |
|
Revision Date |
29-05-99 | |
|
Brand |
IBM PC Server | |
|
Product Family |
PC Server 704 | |
|
Machine Type |
8650 | |
|
Model |
| |
|
TypeModel |
| |
|
Retain Tip (if applicable) |
| |
|
Reverse Doclinks |