
|
29.244 bytes |
Service Hints & Tips |
Document ID: MNOK-3Q5TSG |
Aptiva - 2176-C6V/9R2 How to reseat the video capture card and VESA feature connector
Applicable to: United States
1. Remove power cable from the back of the computer or from the wall socket.
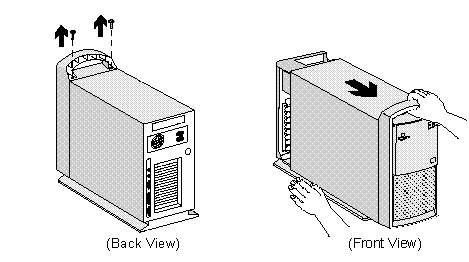
2. Remove the cover assembly by removing the two screws at the base of the top handle and pulling the cover toward the front of the computer.
3. Place the computer on its side to allow easy access to its internal components.
4. Locate the video card. It will be found in the bottom slot and has a gray ribbon cable attached to it.
5. Remove video cables from the card at the back of the computer.
6. Remove the gray ribbon cable from the video card. This can be easily accomplished by gripping each side of the black clip between the thumb and forefingers of each hand, supporting the card with the middle fingers, and pulling the wire and clip away from the card. It may help to alternate pulling more on one side, and then the other.
7. Remove black screw on video card bracket at rear panel of the computer.
8. Place right forefinger behind rear corner of the card and pull perpendicular from the riser card into which it is seated. With the left hand, grip the part of the card near the mounting screw bracket, pull and rock the card out of slot. Be careful not to pull on any of the components mounted on the card.
9. If the VESA feature connector cable is not to be reseated on the system board, the card can be reseated and the processes reversed for assembly. Be sure that the card seats solidly into its socket.
10. To reseat the VESA feature connector cable: remove the telephone line, speaker and microphone cable from the rear of the computer.
11. Remove the mounting screws from the remaining two cards: the sound card and the modem card. The internal cables can usually be left attached to these cards.
12. Pull each card out of its slot and place it out of the way on top of the power supply.
13. To remove the riser card, remove the screw at the bottom middle of the card.
14. Near the top of the card, just below the second black slot, locate the hidden slot behind the card. Place two fingers under the card, one on each side of the slot behind the card, and pull up to remove the riser card from its socket. Place the card to the side.
15. To reseat the VESA feature connector cable on the system board: Pinch the gray ribbon cable at each side close to the end. Pull and rock cable out of its connector.
16. After inspecting the pins for obvious damage (three pins are missing, this is normal), reinsert the gray ribbon cable, making sure that it is seated securely. It is also normal to find unconnected extra ribbon and power cables.
17. Insert riser card into its slot and seat securely. Ensure that the gray ribbon cable extends over the top of the riser card. Reinstall mounting screw.
18. Insert each card into its respective slot in the riser card and seat securely. Reinstall mounting screws.
19. Insert telephone line into back of modem card. Insert color-coded speaker and microphone cables into back of sound card.
20. Insert video cables into their respective sockets on video card.
21. Set computer upright. Replace cover assembly. Ensure that the cover is in the tracks on the bottom at each side, and that no wires are pinched with the cover as it slides on.
22. Reinsert power cable to computer.
|
Search Keywords |
| |
|
Hint Category |
Video, Adapter Cards, Hardware Installation/Configuration | |
|
Date Created |
26-12-97 | |
|
Last Updated |
18-03-99 | |
|
Revision Date |
16-03-2000 | |
|
Brand |
IBM Aptiva | |
|
Product Family |
Aptiva | |
|
Machine Type |
2176 | |
|
Model |
C6V; 9R2 | |
|
TypeModel |
| |
|
Retain Tip (if applicable) |
| |
|
Reverse Doclinks |