|
79.195 bytes |
Parts Information |
Document ID: DDSE-43TRB2 |
Netfinity 3500 - Adapters
Applicable to: World-Wide
|
Note
For a complete list of the adapters that the server supports, go to: http://www.pc.ibm.com/us/compat/ on the World Wide Web. |
When you are installing or removing adapters, it is important to resolve any resource conflicts that might arise. For example, if you install an ISA legacy adapter, you might need to manually configure the adapter by setting a variety of switches on the adapter and by using the Configuration/Setup Utility program.
Many adapters now use Plug and Play technology, which enables the server to automatically configure the adapter, provided that the required resources are available. Refer to the instructions that come with the adapter to determine if it is Plug and Play. For more information, see "ISA Legacy Resources".
Considerations: The server supports ISA and PCI adapters. You can install up to six adapters in the connectors on the system board. These connectors are known as expansion slot connectors.. The expansion slots are located on the rear of the server (see "Input/Output Connectors" for an illustration).
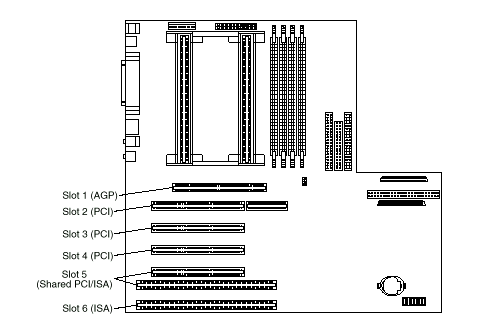
The server system board contains two 16-bit, ISA-bus expansion slot connectors and four 32-bit, PCI-bus expansion slot connectors. One expansion slot connector is a shared PCI/ISA slot connector. One slot connector supports only ISA adapters; the remaining slot connectors support only PCI adapters. The server supports only 5.0-volt adapters on the PCI bus.
|
Notes
1. Slot 1 is an Accelerated Graphics Port (AGP). You can install only a special AGP graphics adapter in this slot. The server comes with an AGP graphics adapter installed in this slot.
2. You can install only a half-length PCI adapter in expansion slot 2. You can
install half-length and full-length adapters in expansion slots 3 through 6.
3. If you have high-performance PCI adapters, such as RAID adapters, install them in expansion slots 3, 4, or 5. Do not use slot 2 for high-performance PCI adapters.
4. If a component in the server or on the adapter interferes with the installation, use another slot. |
The following figure shows the location of the expansion slot connectors on the system board.

|
Note
Expansion slot 5 is a shared slot. Shared slots can be
occupied by an adapter attached to either the PCI slot
connector or the adjacent ISA slot connector, but not both. |
|
Attention
To avoid possible damage to adapters and server components, be sure that the adapters that you install do not touch each other or the other components (such as the microprocessor) inside the server. |
Installing or Removing Adapters
|
Notes
See "Input/Output Connectors" for an illustration of the expansion slots on the rear of the server. If you remove an adapter, be sure to reassign the system resources as available
for ISA legacy adapters. See "ISA Legacy Resources". |
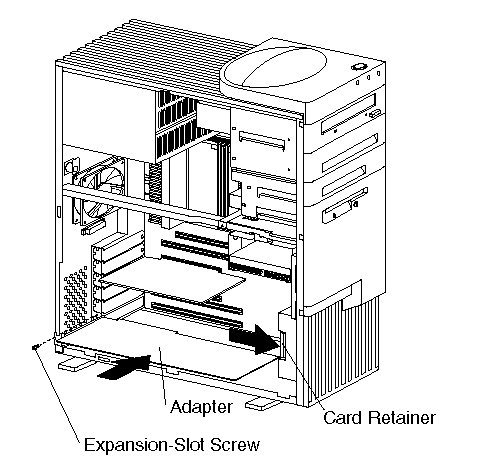
To install an adapter, do the following. If you want to remove an adapter, reverse the order of the following steps.
1. Review the instructions that come with the adapter to determine if it must be installed in an AGP, PCI, or ISA expansion slot; otherwise, use any empty, bus-compatible slot.
2. Remove the server cover (see "Side Access Cover")
3. Remove the appropriate expansion-slot cover:
a. Remove the expansion-slot screw on the top of the expansion-slot cover.
b. Slide the expansion-slot cover out of the server.
c. Store the expansion-slot cover in a safe place for future use.

4. Touch the static-protective package that contains the adapter to any unpainted metal surface on the server; then, remove the adapter from the package.
5. Install the adapter:
a. Carefully grasp the adapter and align it with the expansion slot.
|
Note
When installing full-length adapters in slots 3 through 6, align the end of the adapter with the card guide on the fan housing. When you remove an adapter, you must press the card retainer inward to slide an adapter out
of the server. |
b. Press the adapter firmly into the expansion slot connector.
c. Replace the expansion-slot screw on the top of the adapter bracket.
d. If necessary, connect any internal cables to the adapter. Refer to the documentation that comes with the option.
6. If you installed an ISA legacy adapter, go to "ISA Legacy Resources" to assign system resources.
7. If you want to install or remove any other options, do so now. Otherwise, go to "Completing the Installation."
|
|
Search Keywords |
|
|
Document Category |
Networking |
|
|
Date Created |
04-01-99 |
|
|
Last Updated |
04-01-99 |
|
|
Revision Date |
04-01-2000 |
|
Brand |
IBM PC Server |
|
Product Family |
Netfinity 3500 |
|
|
Machine Type |
8644 |
|
|
Model |
ALL |
|
|
TypeModel |
|
|
|
Retain Tip (if applicable) |
|
|
|
Reverse Doclinks
and Admin Purposes |
|


