
|
36.271 bytes |
Service Hints & Tips |
Document ID: GSMH-3D4FB4 |
|
This document is provided to IBM and our Business Partners to help sell and/or service IBM products. It is not to be distributed beyond that audience or used for any other purpose. |
TP 510 - Related Service Procedures
Applicable to: World-Wide
Related Service Procedures:
This section provides information on the following:
|
żStatus Indicators— |
|
żPCMCIA Test Card— |
|
żPower-On Password Override— |
|
żChecking the Installed Devices List— |
|
żPower-On Self Test (POST)— |
|
żAdvanced Diagnostics Diskette— |
|
żLoading the Diagnostics— |
|
żFormatting the Hard Disk Drive— |
|
żRestoring the TP 510 System Files— |
|
żError Log— |
|
żSetup Options— |
|
żStarting Setup— |
|
żUtilities— |
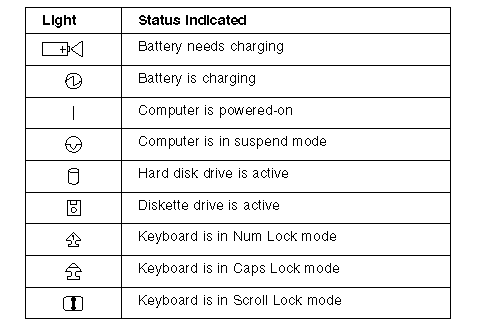
Status Indicators:
PCMCIA Test Card:
The green LED on the PCMCIA test card lights when the PCMCIA test is running. If the LED does not go on, check that the card is installed correctly by reseating the card. (For the docking station, if it still does not light after reseating, try using another slot for the test.) If the LED still does not go on and the test fails, replace the FRU shown in the diagnostic error code.
Power-On Password Override:
To override a password, do the following.
1. Power-off the computer.
2. Disconnect all cables attached to the computer.
3. Remove the memory card access panel and DRAM card (if installed).
4. Power-on the computer.
5. Locate the two pins labeled PAD1-2 on the system board (see żSystem Board Connectors— on page 21).
6. Short the two pins together.
7. Press Ctrl+ Alt+ F3 to access the System Parameters Setup Menu.
8. Press Esc.
9. Press F5 to reset the parameter to their default values.
10. The System Time, System Date, and Password (if required) parameters need to be set manually.
11. Press Esc , then F4 to save the values, exit the Setup program, and reboot the computer.
12. If a DRAM card was removed, power-off the computer and install the DRAM card.
13. Install the memory card access panel.
Checking the Installed Devices List:
If an adapter or device is missing from the Installed Devices list and you are able to add it to the list, do so and continue with the diagnostic tests.
If an adapter or device is missing from the installed devices list and you cannot add it to the list, you might have one of the following conditions:
The diagnostic code for the missing device is not on your Advanced Diagnostics diskette. The missing device is a 3.5-Inch External Diskette Drive Adapter, or another unrecognizable adapter. The missing device is defective. The adapter or device is not an IBM product.
If the number of drives installed in the computer differs from the number shown in the installed devices list, an error can occur during the diagnostic tests. Restart the computer and correct the drive information in the Set Configuration menu before running the diagnostic tests.
Power-On Self Test (POST):
Each time you power-on the computer, the POST is initiated. The POST takes up to 15 seconds to complete, depending on the options installed. The POST checks the following: system board, memory, display, keyboard, hard disk drive, parallel port, and serial port. To start the POST, power-on the computer. You hear one short beep when the POST successfully ends.
If the POST cannot be completed successfully, an invalid configuration error message appears. If F1 is pressed, the system bypasses the error and attempts to complete POST. Press F1 to continue or Press F2 to go to Setup.
Advanced Diagnostics Diskette:
The Advanced Diagnostics diskette contains diagnostic programs. The diskette is intended to test only IBM products. Non-IBM products, prototype cards, or modified options can give false errors and invalid computer responses.
Loading the Diagnostics:
To start advanced diagnostics from the Advanced Diagnostics diskette, do the following.
1. Insert the Advanced Diagnostics diskette into the diskette drive.
2. Power-on all external devices.
3. Power-on the computer. (The advanced diagnostics program will load from the diskette drive.)
To start advanced diagnostics from the hard disk drive, do the following.
1. Power-on all external devices.
2. Power-on the computer.
Note:
Some programs cause the diagnostic tests to give inaccurate results. The following steps prevent these programs from being loaded into memory while starting the advanced diagnostics.
3. When the message Starting PC DOS appears, press F5.
4. When the DOS prompt appears, type cd c:\thinkpad\diags
5. Press Enter.
6. Type command
7. Press Enter to start the advanced diagnostics program.
Accessing the Diagnostic Tests:
To access diagnostic tests from the SELECT AN OPTION Menu, do the following.
1. Select 0 (SYSTEM CHECKOUT) , then press Enter.
2. At the Installed Devices menu, press (Y ), then press Enter.
3. The SYSTEM CHECKOUT menu is then displayed.
4. Select0 or1 from the SYSTEM CHECKOUT menu. 5. Select the device to be tested.
Formatting the Hard Disk Drive:
Hard disk drives normally contain tracks in excess of their stated capacity to allow for defective tracks. The user is notified by a diagnostic message when the defect limit has been reached and service is recommended. The Advanced Diagnostics Format program is different from the operating system format program.
Warning:
All data on the selected hard disk drive is destroyed during a format operation or surface analysis.
Before the customer can transfer information from the backup diskettes to the hard disk drive, the hard disk drive must be formatted using the operating system format program. Have the customer refer to the operating system manual for a description of the hard disk preparation commands.
After formatting the hard disk drive, copy the System files from the Advanced Diagnostics diskette to the hard disk drive.
Restoring the TP 510 System Files:
The subdirectory C:\THINKPAD\DIAGS on the hard disk drive contains the ThinkPad 510 Diagnostics programs.
If the hard disk drive is reformatted or the files in the subdirectory on the hard disk drive are corrupted, use the Advanced
Diagnostics diskette to restore the diagnostic programs.
Important:
The following is required to complete this procedure:
- DOS must be installed on the hard disk drive.
- An external diskette drive must be attached to the computer.
1. Power-on the computer; then, insert the Advanced Diagnostics diskette.
2. At the DOS prompt, type A:UINSTALL then press Enter.
3. Select Install ThinkPad 510 Diagnostics from the menu. The files are copied from the diskette to the THINKPAD\DIAGS
subdirectory on drive C.
Error Log:
Use the following steps to create an error log, run the diagnostic tests, and automatically record any error messages in an error log. This procedure is normally used to diagnose an intermittent problem.
Note:
The errors must be logged to a diskette drive or to a printer. If recording errors on a diskette, use a copy of the Advanced Diagnostics diskette that is not write-protected. Do not run any diskette tests when logging to a diskette drive. Do not run a parallel port test when logging to a printer.
Creating the Error Log:
1. Insert the Advanced Diagnostics diskette into the diskette drive.
2. Press 0 (SYSTEM CHECKOUT) , then press Enter.
3. Depending on the options installed in the computer, questions about attached devices might appear on the display. Answer as required; then press Enter.
4. PressY or N (IS THE LIST CORRECT (Y/N)?) , then press Enter.
5. Press 2 (LOG UTILITIES) , then press Enter.
6. Press 0 (START ERROR LOG) , then press Enter.
7. Press0 or 1 (LOG TO DISKETTE, OR PRINTER (0/1)?) , then press Enter.
8. If you are logging to diskette, press A (ENTER THE DRIVE ID FOR ERROR LOG?) , then press Enter.
9. Press 9 (END LOG UTILITIES) , then press Enter.
Starting the Test:
1. Press 1 (RUN TESTS MULTIPLE TIMES) , then press Enter.
2. Select the device you suspect has a failure, then press Enter.
3. Select the number of times to run the test; then press Enter.
4. Press N (WAIT EACH TIME AN ERROR OCCURS (Y/N)?) , then press Enter.
5. Follow any instructions on the display and select all available tests.
Note:
Do not press any keys during the keyboard test.
6. To end (RUN TEST CONTINUOUSLY) , press and hold Ctrl ; then press Pause. The computer completes testing and returns to the Installed Devices menu.
Displaying the Error Log:
1. Depending on the options installed in the computer, questions about attached devices might appear on the display. Answer as required; then press Enter.
2. PressY or N (IS THE LIST CORRECT (Y/N)?) , then press Enter.
3. Press 2 (LOG UTILITIES) , then press Enter.
4. Press 2 (DISPLAY LOG) , then press Enter.
5. Press A (ENTER THE DRIVE ID FOR ERROR LOG?) , then press Enter.
6. If no errors occurred, the Log Utilities menu appears. If errors are displayed, go to żSymptom-to-FRU Index—.
Setup Options:
The computer has two setup options that allow you to specify how the computer operates. The System Parameters ( Ctrl+Alt+F3 from the DOS prompt or the Diagnostic Menu) provide access to the power management parameters and the following system elements.
- Time
- Date
- Password
- Personalization
- Diskette drive
- Hard disk drive
- Cache
- Parallel port
- ISO Monitor
- Clock Multiplier
Starting Setup:
Press the key combination for the setup program you want to start.
|
Key Combination |
Setup Program |
|
Ctrl+Alt+F3 |
System Parameters setup. (Must be started at the DOS prompt or the Diagnostic Menu.) |
|
Func+F3 |
Power Management setup (can be started at any time after the computer is powered-on). This is of System Parameters. |
Press Esc to display the Exit Menu.
Utilities:
The system is configured with several utility programs. These programs provide added function that enhances the usability of the system. These programs should be backed up to prevent loss of data. Use the Diskette factory in Microsoft Windows to make a backup copy of the Advanced Diagnostics diskette. The utility programs are:
SIMUL :
Allows you to enable/disable simultaneous display on both the LCD and external monitor.
Note:
The computer does not enter Suspend/Resume while in the Simultaneous mode. You must exit Simultaneous mode before Suspend/Resume is allowed. Also, the Func + F7 function is not recognized until you exit the Simultaneous mode.
EPP2:
Provides Enhanced Parallel Port Utility. This utility needs to be added to the AUTOEXEC.BAT and CONFIG.SYS if the option attached to the parallel port supports the enhanced parallel port mode.
PHDISK:
Prepares the hard disk drive for the hibernation feature, including formatting and the marking of defective areas.A partition is reserved on the hard disk drive to save data before the computer enters Hibernation mode.
Warning:
Running this utility causes loss of data on the hard disk drive. It is important that the customer backup all data prior to using this utility.
Important:
Run the PHDISK utility if you change the operating environment, reformat the hard disk drive, or add additional memory.
PCMCIA Drivers:
IBM2SS01.SYS and PCMCIA.SYS provide the ability to use PCMCIA cards in an OS/2* environment.
|
Search Keywords |
| |
|
Hint Category |
Hardware Maintenance Information | |
|
Date Created |
07-01-97 | |
|
Last Updated |
15-04-98 | |
|
Revision Date |
09-04-99 | |
|
Brand |
IBM ThinkPad | |
|
Product Family |
ThinkPad 510 | |
|
Machine Type |
2604 | |
|
Model |
Various | |
|
TypeModel |
| |
|
Retain Tip (if applicable) |
N/A | |
|
Reverse Doclinks |