
|
42.787 bytes |
Service Hints & Tips |
Document ID: MNOK-3SWTXZ |
Aptiva - How to create multiple partitions smaller than 2GB
Applicable to: World-Wide
To View Partition Information:
Go to an MS-DOS prompt:
1. Click on "Start", "Programs", "MS-DOS Prompt", or
2. Click on "Start", "Shut Down", "Restart the computer in MS-DOS mode". Click "Yes" or
3. Boot with Recovery disk and press "N" to recover software, or
3. Boot with Diagnostic CD and at menu, press "0" (zero).
4. Type "fdisk" and press "Enter".
If your computer is of the following series: 2159-S80/S90, 2161, 2162, 2136, 2137, 2138, 2140, or 2142 you will receive an option to enable large disk support, the default is "N" for no. Press "Enter" key to go to the "FDISK Options" Screen. Earlier models do not offer this option. Go to next step.

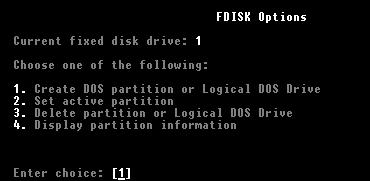
FDISK Options Screen
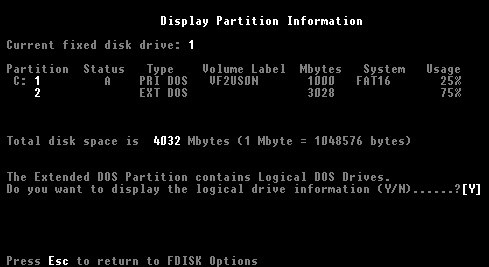
Enter choice "4" and press "Enter" key. This will bring you to the "Display Partition Information" screen similar to the one shown below. Earlier models usually only have one partition and will have no option for EXT DOS information.

Display Partition Information Screen
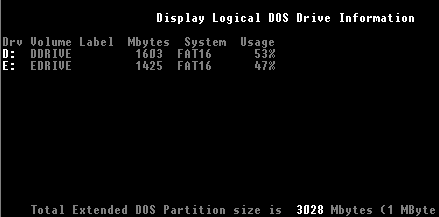
At the "Display Partition Information" screen, it is necessary for there to be a "C:" partition, Status "A," Type, PRI DOS, not greater that 2,000 Mbytes. If there is an EXTended DOS partition greater than 2,000 Mbytes, it must also be partitioned. This information may be viewed on the next screen. Ensure that a "Y" is in the option brackets to display the logical drive information, and press "Enter" key. (Note: The 2GB partition size limit does not apply if the FAT32 file system has been enabled. This version of Windows 95 is available only on the 2159-S80/S90, 2161, 2162, 2136, 2137, 2138, 2140, 2142 and later models).

Display Logical DOS Drive Information
Each of these drives must not be greater than 2,000 Mbytes. Press "Esc" to return to the FDISK main menu, and "Esc" again to close the FDISK screen.
To Create Multiple Partitions Less Than 2GB:
Warning: Repartitioning will delete ALL the information in the affected partitions on your fixed disk drive. You must first back up your data before starting this process. New partitions will also have to be reformatted.
From a DOS prompt, type "fdisk" and press "Enter" key. At the FDISK main menu. Type "4" and press "Enter" key to view partition information. Make note of desired changes. Press "Esc" to return to main menu.
To delete partitions or logical DOS drives, type "3" and press "Enter" key. Then type the number for respective partition to first delete. If there are logical drives in the extended DOS partition, they must be deleted first. If you attempt the wrong order, you will receive a message to that effect. Repeat the process until all partitions or desired partitions are deleted.
To recreate partitions, at the main menu type "1" and press "Enter" to create a partition or logical DOS drive. If all the partitions have been deleted, the first one to create will be the C: partition. Its status will need to be made "Active" at that option. The size of each partition will need to be specified (less that 2GB). Then repeat the process with option "2", "Create Extended DOS Partition". If this partition is created with over 2GB, you will need to then choose option "3" in the "Create Partition" menu to create Logical DOS drives in the Extended DOS partition.
When all desired partitions are created, they must then be formatted. The partitions will automatically be assigned sequential drive letters, starting with the active, bootable partition of C:. From a DOS prompt, type "Format C:" and wait for process to complete. Repeat process with each remaining drive letter.
To ensure that each logical drive has been formatted, from a DOS prompt, type, "dir c:" and press "Enter" key. Repeat with each drive letter. No data will be found on the formatted partitions but there should be no error messages when this action is performed. The software and data can then be reloaded onto the hard drive.
|
Search Keywords |
| |
|
Hint Category |
Hardware Installation/Configuration, Hard Drives | |
|
Date Created |
25-03-98 | |
|
Last Updated |
09-12-98 | |
|
Revision Date |
07-12-99 | |
|
Brand |
IBM Aptiva | |
|
Product Family |
Aptiva | |
|
Machine Type |
2134, 2136, 2137, 2138, 2140, 2142, 2144, 2159, 2161, 2162, 2168, 2176 | |
|
Model |
351; 353; 361; 440; 445; 446; 6R6; C21; J31; J3A; J3X; J51; J52; JDA; JSN; K01; K21; K22; K23; K31; K32; K52; L01; L21; L22; L23; L31; L32; L52; L6T; P01; P21; P22; P23; P31; P32; P52; E10; E11; E12; E13; E14; E15; E16; E20; E21; E22; E23; E24; E25; E26; E27; E30; E31; E32; E33; E34; E35; E36; E40; E42; E44; E45; E46; E54; E55; E56; E64; E65; E66; ED1; ED2; ED3; ED4; E02; E03; E04; E05; E06; E10; E11; E12; E13; E14; E15; E16; E17; E1F; E20; E21; E22; E23; E24; E25; E26; E27; E2F; E30; E31; E32; E33; E34; E35; E36; E37; E3F; E40; E41; E42; E43; E45; E46; E47; E4F; E50; E54; E64; E74; E84; E51; E53; E61; E63; E71; E73; EV1; EV3; EG1; EG3; E56; E5C; E76; E7C; E2H; E8F; E86; E8C; EL1; EK1; EL2; EK2; EL3; EK3; E80; E81; E82; E83; E48; E57; E58; EQ1; EQ2; EQ3; EV1; EV3; EV5; EG1; EG3; EG6; L17; L27; L31; L35; L37; L3F; L45; L47; L51; L5H; L61; L6D; L71; LG2; LQ1; LQ2; LQ3; LV2; SQ1; SQ2; S34; S35; S36; S44; S45; S46; S57; S61; S62; S67; S6F; S6H; S6S; SG1; SG2; SQ1; SQ2; SV1; SV2; M31; C31; 3R4; M41; C41; 3R5; M51; C51; 3R6; M52; 4R1; M53; C53; 4R2; M55; 2R9; M56; 3R3; M57; 3R1; M61; C61; 3R7; M62; 4R0; M63; 4R9; M71; 3R9; M72; 4R3; M91; 5R5; 900; 910; 911; 91W; 914; 921; 92W; 931; 93W; 932; 9W2; 934; 935; 937; 930; 941; 94W; 951; 95W; 964; 96W; LL1; LL2; LL3; LL4; LL5; LL6; X10; X20; X30; W30; X40; Y10; Y20; Y30; Y40; Z10; Z20; Z30; Z40; N30; N40; N41; N50; N51; N60; N61; N71; A10; A12; A14; A15; A40; A44; A45; A50; A51; A52; A90; A92; A94; C45; 120; 121; 123; 131; 132; 133; 141; 142; 152; 154; 161; 162; 163; 171; 172; 182; L11; L15; L16; K25; K26; L33; K33; L43; K43; L35; K35; L45; K45; KU5; L55; K55; L65; K65; L66; K66; U11; U15; U16; U33; U43; U35; U45; U55; U65; U66; X17; X27; X37; X47; Y17; Y27. Y37; Y47; Z17; Z27; Z37; Z47; S20; S50; S55; S65; S64; S74; S75; W37; W47; 13R; 14R; 15R; 16R; 17R; 18R; 19R; 20R; B60; B65; B75; B80; B85; B95; S64; S66; S74; S76; S78; S7H; S80; S90; 21R; 22R; 24R; 25R; 38R; 460; 461; 462; 471; C3D; C3E; C85; C8E; C8F; C8H; C8M; C8X; C9E; C9F; C9S; C9X; D34; D64; D84; E34 E64; E84; F34; F64; F84; G66; G76; H66; H76; J66; J76; L81; L91; M81; M91; N63; N64; N74; N81; N91; T71; T81; T84; T85; T8B; T8C; T8E; T8F; T94; T95; T9D; T9E; TAE; TAF; 28R; 29R; 30R; 31R; 33R; 35R; 37R; 41R; 54S; 56S; 57S; 58S; B86; B87; B97; D81; D91; E81; E91; G86; G96; G97; H86; H96; P81; P91; Q3C; Q81; Q91; S35; S3C; S8C; S8H; S9C; S9H; S9M; SIB; U81; U91; V86; V96; X8C; X9D; 352; 354; 355; 356; 357; 362; 363; 364; 372; 374; 381; 382; 384; 392; 442; 443; 447; 449; 454; 6R8; 6R9; 7R0; 7R1; 7R2; 7R3; 7R6; 7R7; 7R9; 8R1; 8R6; 8R8 ; 9R1; 9R2; 9R3; 9R4; 9R5; 9R6; C23; C31; C32; C33; C35; C3X; C53; C55; C5X; C65; C66; C67; C6B; C6D; C6E; C6V; C6X; C6Y; C6Z; C73; C77; C7X; F23; F31; F32; F33; F35; F67; F6B; H54; H55; H56; H5E; H5F; H64; H65; H6D; H6E; H6F; H7E; H7F; H7G; J33; J35; J3C; J3E; J3K; J3L; J3V; J3W; J3Y; J3Z; JCL; K53; J62; K74; L53; L62; P53; P62; T01; T33; T34; T62; T63; T65; T71; V34; V65; V71; W33; W55; W65; X01; X31; X33; X34; X52; X62; X63; X65; X71; Y01; Y04; Y31; Y33; Y34; Y52; Y62; Y63; Y65; Y71; Z01; Z31; Z33; Z34; Z52; Z62; Z63; Z65; Z71 | |
|
TypeModel |
| |
|
Retain Tip (if applicable) |
| |
|
Reverse Doclinks |