
|
29.095 bytes |
Service Hints & Tips |
Document ID: MNOK-3PZT36 |
Aptiva - How to properly connect a Voice Modem cable
Applicable to: World-Wide
1. Shut down and turn off the computer. Remove the power cord from the back of the machine. Open case according to regular procedure.
2. The system is shipped with two adapters: the modem and the sound card. Other adapters may have been added later. The sound card will have connections for the speakers, microphone, and the joystick. The modem card will have two external telephone jacks in the rear and two internal cables attached to it.
3. When the adapter cards are installed in the computer, it is difficult to see the cable sockets and nearly impossible to work with them. The modem card must be removed in order to connect or disconnect them with adequate space for maneuvering.
4. Before removing the card, ground yourself to the machine's electrical potential by touching the computer's frame or case. This will prevent damage occurring to the computer by an electrical discharge. To remove the card, simply unscrew the black screw on the back panel of the computer, which corresponds to the modem card. It is just above the green modem card at the rear of the computer. The card can then be pulled out. It is only held by the tension of the clips in which it is seated and has no other screw.
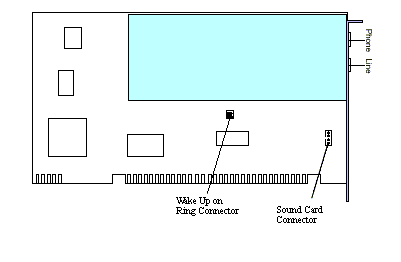
Figure 1. WinModem card
5. Starting from the top of the card or the end where the screw was against, there is a cable which has a brown socket call JP1 and has two wires. This cable goes from the card to the system board. This is not the one we want. It is used for the Wake-Up-On-Ring feature.
6. The other cable, or sound card cable, is connected lower on the modem and has four wires. The socket is white and rectangular. This cable is connected to the sound card above it.
On 2136 systems, the cable connects to the system board at connector (CN3).
On 2137 systems, the cable connects to the system board at connector (CN2).
On 2140 systems, the cable connects to the system board at connector (J32).
On 2142 systems, the cable connects to the system board at connector (J2).
The cable may have a tag with the part number 76H1616. This is the cable that we want. The diagram above shows the general area of the connection but the actual location may vary.
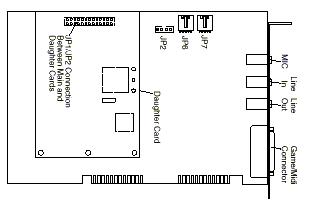
Figure 2. Crystal Audio card
7. The sound card has numerous connections on the card at the top as shown above. The first connection is unused and may say TV or JP7. The second connection is the Video or JP6. The third connector is the CD-ROM audio or JP2. The modem is connected to the JP6 or Video connection.
8. The cable goes from the sound card connection on the modem to the plug on the sound card, which says "VIDEO", between "TV" and "CDROM". The wire on the modem card installs only one way, as does the cable on the Mwave card.
9. The cable comes out of the white modem socket vertically. The wire is removed on the sound card by squeezing the small release while horizontally pulling cable from socket.
|
Search Keywords |
| |
|
Hint Category |
Audio, Modems, Hardware Installation/Configuration | |
|
Date Created |
22-12-97 | |
|
Last Updated |
03-12-98 | |
|
Revision Date |
02-12-99 | |
|
Brand |
IBM Aptiva | |
|
Product Family |
Aptiva | |
|
Machine Type |
2136, 2137, 2140, 2142, 2159, 2161, 2162 | |
|
Model |
L17; L27; L31; L35; L37; L3F; L45; L47; L51; L5H; L61; L6D; L71; LG1; LG2; LQ1; LQ2; LQ3; LV1; LV2; SQ1; SQ2; S34; S35; S36; S44; S45; S46; S57; S61; S62; S67; S6F; S6H; S6S; SG1; SG2; SQ1; SQ2; SV1; SV2; 21R; 22R; 24R; 25R; 38R; 460; 461; 462; 471; C3D; C3E; C85; C8E; C8F; C8H; C8M; C8X; C9E; C9F; C9S; C9X; D34; D64; D84; E34 E64; E84; F34; F64; F84; G66; G76; H66; H76; J66; J76; L81; L91; M81; M91; N63; N64; N74; N81; N91; T71; T81; T84; T85; T8B; T8C; T8E; T8F; T94; T95; T9D; T9E; TAE; TAF; 28R; 29R; 30R; 31R; 33R; 35R; 37R; 41R; 54S; 56S; 57S; 58S; B86; B87; B97; D81; D91; E81; E91; G86; G96; G97; H86; H96; P81; P91; Q3C; Q81; Q91; S35; S3C; S8C; S8H; S9C; S9H; S9M; SIB; U81; U91; V86; V96; X8C; X9D; S80; S90; 17R; 18R | |
|
TypeModel |
| |
|
Retain Tip (if applicable) |
| |
|
Reverse Doclinks |