
|
26.030 bytes |
Service Hints & Tips |
Document ID: MNOK-42QQRT |
Aptiva - 2168 (Service Level I) CD-ROM changer emergency disc removal
Applicable to: World-Wide
1033 - CD-ROM Changer Emergency Disc Removal
1. Remove the CD-ROM drive from the computer.
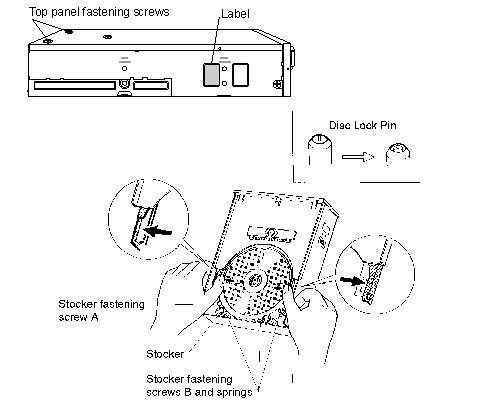
2. Remove the left adhesive label on the left side of the CD-ROM drive. Handle the label carefully; it will be used again.
3. Remove the two top panel screws, and remove the top panel.

4. Turn the emergency eject gear until the disc lock pin is pushed down.
5. Hold the CD-ROM drive as shown and carefully spread the left and right disc guide plates so that the disc drops into the stocker mechanism.
6. Remove the stocker fastening screw A.
7. Remove the three stocker fastening screwsB and the three springs.
8. While keeping the left and right disc guide plates spread, remove the disc together with the stocker. Carefully remove the disc, to prevent damage.
Note:
1. Replace the removed parts by reversing the above procedure.
2. To prevent dust from entering the CD-ROM drive, reattach the adhesive label (use cellophane tape or similar if necessary).
|
Search Keywords |
| |
|
Hint Category |
CD-ROM Drives, Hardware Installation/Configuration | |
|
Date Created |
30-11-98 | |
|
Last Updated |
11-01-99 | |
|
Revision Date |
11-01-2000 | |
|
Brand |
IBM Aptiva | |
|
Product Family |
Aptiva | |
|
Machine Type |
2168 | |
|
Model |
A44; A45; 5R3; 6R4 | |
|
TypeModel |
| |
|
Retain Tip (if applicable) |
| |
|
Reverse Doclinks |