
|
43.344 bytes |
Service Hints & Tips |
Document ID: LWIK-3S83ME |
TP 310,315 - Hard disk drive removal/installation
Applicable to: World-Wide
Hard disk drive removal:
1.) Turn the computer upside down with the front of the computer pointed towards you..
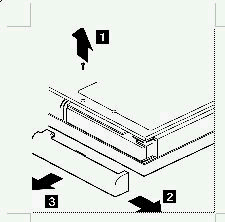
2.) In the lower right hand corner you will see two screws. The one that is closest to the front edge of the computer is the screw for the hard drive cover. Remove this screw.
3.) Slide the cover to the right, and then away from the computer to remove it.

|
Step |
Size (Quantity) |
Head and Color |
Memo |
|
1 |
M2 x 6L (1) |
Flat head, black |
Be sure to use correct screw when replacing.

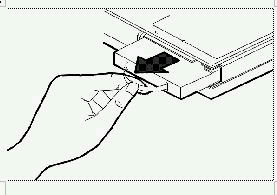
4.) Pull on the handle to remove the hard drive. When removing the hard drive, make note of the position of the connector so that when you go to install the hard drive, you install it correctly.
Hard disk drive installation:
Reverse the steps above to install a hard disk drive.
Warning:
Do not drop or apply any shock to the hard disk drive. The hard disk drive is sensitive to physical shock. Incorrect handling can cause damage and permanent loss of data on the hard disk. Before removing the hard disk drive, have the user make a backup copy of all the information on the hard disk. Never remove the hard disk drive while the system is operating or is in hibernation mode.
|
Search Keywords |
| |
|
Hint Category |
Installation/Removal Procedures | |
|
Date Created |
03-03-98 | |
|
Last Updated |
31-03-98 | |
|
Revision Date |
12-03-99 | |
|
Brand |
IBM ThinkPad | |
|
Product Family |
ThinkPad 310, ThinkPad 315 | |
|
Machine Type |
2600 | |
|
Model |
Various | |
|
TypeModel |
| |
|
Retain Tip (if applicable) |
| |
|
Reverse Doclinks |