
|
106.176 bytes |
Service Hints & Tips |
Document ID: GSMH-3DBGC7 |
TP Dock II - How To Run The Diagnostics
Applicable to: World-Wide
How To Run the Diagnostics:
Do the following to run the diagnostic tests.
Either the TrackPoint II or the cursor move keys can be used to interact with the tests. The Enter key works the same as selecting the OK icon to reply OK.
1. Press and hold F1 , then turn on the computer. Hold F1 until the Easy-Setup screen appears.
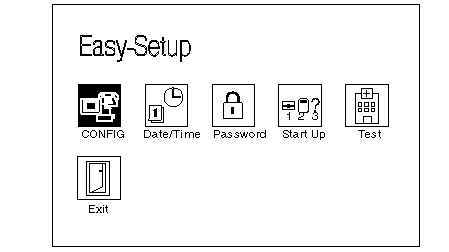
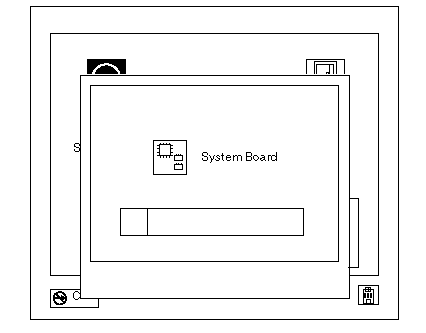
2. Select Test and press Enter. The basic diagnostic screen appears.
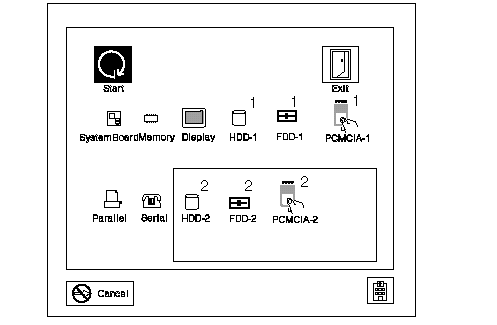
3. Select a device and press Enter to run the test.
4. The test progress screen appears.
5. OK appears when the test ends without any errors.
Advanced Diagnostic Tests:
1. Go to the advanced diagnostic screen by pressing Ctrl+A on the basic diagnostic screen.
2. Select Tool to install the tools.
3. Select a device, press the Spacebar , and install the tool. Multiple devices can be selected by repeating this step.
A | mark appears for the selected device.

4. Select OK and press Enter if the selection is OK.
5. Select a device and press Enter to start the tests.
How to Run All Tests:
In the advanced diagnostic screen, select Test All to test all devices.
How to Run the Loop Test:
1. Go to the advanced diagnostic screen by pressing Ctrl+A on the basic diagnostic screen.
2. Select the Looptest icon and press Enter or click the click button.
3. Select a device and press the Spacebar.A| mark appears for the selected device.
4. If the selection is OK, select OK and press Enter to start the loop test.
5. To exit the loop test, press and hold Ctrl+ Pause until the interrupt is accepted by the test program. A beep sounds when the interrupt is accepted. The test loop stops at the end of the current test.
How to Run the Keyboard Test:
Use the following procedure to run the keyboard key test.
1. Turn off the computer.
2. Remove the external keyboard, if one is attached.
3. Press and hold F1 key, then turn on the computer. Hold F1 until the Easy-Setup screen appears.
4. Select Test and press Enter. The basic diagnostic screen appears.
5. Press Ctrl+A to go to advanced diagnostic screen.
6. Press Ctrl+K (a keyboard graphic appears on the screen).
7. By pressing a key, the mark appears or disappears on the corresponding key position on the screen. Repeat this step for any keys that need to be tested.
8. To exit the test, press Esc or select the cancel icon.
How to Run the Audio Test:
Use the following procedure to run the audio tests.
1. Turn off the computer.
2. Insert the maintenance diskette into diskette drive A and turn on power.
3. Select the Audio Diagnostics from the main menu.
4. Select Tests from the menu bar and press Enter.
5. Select All tests from the pull-down menu and press Enter.
Run options are set to test once and stop on error as defaults. Other options can be selected by the pull-down menu of Setting-up.
6. Follow the instructions that appear on the screen to proceed with the tests.
7. If the tests end without detecting any error, the żAll tests passed OK— message appears.
8. If an error is detected, the FRU code and error description message appear. Go to żFRU Codes— and replace the FRU.
9. To exit the test screen, press Esc.
Notes:
a. If an instruction to plug the external loop cable appears, connect it between the microphone/line jack of the computer and the headphone jack of Dock II.
b. If an instruction to plug the headphone appears, connect it to the headphone jack of Dock II.
c. Volume Control Test does not work when the computer is docked to Dock II.
PC Test Card LED:
The green LED on the PC test card lights when the PCMCIA test is running. If the LED does not go on, check that the card is installed correctly by reseating the card. If it still does not light after reseating, try using another slot for the test. If the LED still does not go on and the test fails, replace the FRU shown in the diagnostic error code.
Diagnostic Error Indications:
If an error is detected, the following appears:
Large X on the left-side of the device icon.
Device ID (three digits).
Error code (two digits).
FRU code (four digits).
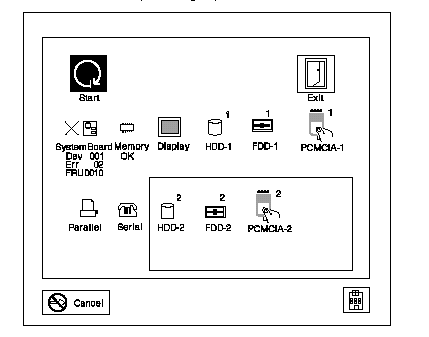
The FRU code represents two FRUs. The leftmost two digits indicates the higher priority of replacement.
The device ID and error codes are used to indicate the detail portion of the FRU which caused the error.
Errors during the POST:
If the POST detects an error, a three- to eight-digit error code is displayed.
Memory Errors:
If the POST detects a memory error in the first 640KB of system memory, all of the first bank memory is de-allocated and the test continues with the second 640KB of the second bank memory. If the total amount of error free memory becomes less than 2MB, a 2XX POST error occurs and the system stops. All of the remaining memory is used as system memory. When the POST memory test has completed, the usable memory size is compared with the configuration data and if a mismatch is detected, a 2XX error code occurs. The user can continue with system operation by pressing F1 and call for service at a later time. The memory sizes that are de-allocated because of the POST process is kept by the hibernation or suspend functions. To test this memory, it must be re-configured as part of the original memory size. The memory re-configuring is done by turning power off and on.
De-allocation support is done only by the POST for memory errors. All unrecoverable memory errors that occur during normal operation cause an interrupt to the operating system.
Error Log:
Diagnostic errors are printed on the printer that is attached to parallel port when the error is detected. The error is also logged in the system memory.
Use the following procedure to display the errors:
1. End the test, if it is running.
2. Press Ctrl+A to select the advanced diagnostic mode.
3. Press Ctrl+E.
4. The error log appears.
5. To exit the screen, select the cancel icon or press Esc.
The error log is not saved when system power is turned off.
|
Search Keywords |
| |
|
Hint Category |
Hardware Maintenance Information | |
|
Date Created |
14-01-97 | |
|
Last Updated |
10-08-98 | |
|
Revision Date |
07-08-99 | |
|
Brand |
IBM ThinkPad | |
|
Product Family |
ThinkPad Docking Stations | |
|
Machine Type |
3546 | |
|
Model |
001 | |
|
TypeModel |
| |
|
Retain Tip (if applicable) |
N/A | |
|
Reverse Doclinks |