
|
84.730 bytes |
Service Hints & Tips |
Document ID: GSMH-3BVFZT |
|
This document is provided to IBM and our Business Partners to help sell and/or service IBM products. It is not to be distributed beyond that audience or used for any other purpose. |
TP 700,720 - Related service procedure
Applicable to: World-Wide
Related Service Procedures:
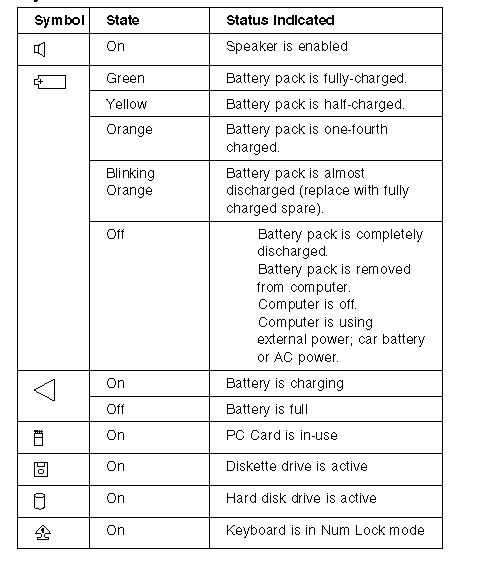
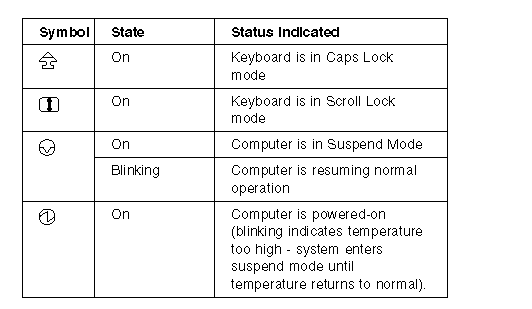
System Status Indicators:
The system status indicators show the current computer status in different colors (green, yellow, and orange).
Check Point (CP) Codes:
Codes beginning with żCP— are displayed on the LCD to indicate system status during POST. The CP codes vary with the level of microcode installed and the type of processor card installed. The CP codes are not error codes. If the system detects an error, the CP code is changed to a POST error message.
System Error Log:
The computer system maintains a system error log. The BIOS nonmaskable inter rupt (NMI) handler writes an entry to the error log each time the system detects an error.
Viewing the error log:
To view the error log, start the system programs and select More utilities from the Main Menu, then select Display system error log. For any error that is displayed, help screens guide you through the actions to take.
Error Storage:
The error log stores up to three unique errors (for example three parity errors at three different addresses). The multiple log counter (on the screen) displays the number of times each unique error occurred. You can page forward by pressing F8, or backward by pressing F7 to view the stored error logs. The date and time of the most recent occurrence also is displayed. If the POST finds that the error log has stored three unique errors, the POST displays a 000 179XX error.
Note:
If the system configuration is changed, the system clears any logged errors associated with the FRU that was changed. (For example, if the memory configuration was changed, memory errors are cleared from the error log). The conditions under which errors are cleared vary with the type of hardware and level of microcode installed.
Application:
If the system diagnostics run error-free, but you still suspect a problem, look at the error log. If errors were detected, press the F1 key and follow the instructions on the screen to help you determine which FRU might be causing the failure.
Checking the Installed Devices List:
The Installed Devices List shows the adapters and devices installed in the computer.
If an adapter or a device is missing from the list, one of the following conditions might be the cause.
Warning:
A customized setup configuration (other than default settings) might exist on the system you are servicing. Running Automatic Configuration can alter the settings. Note the current configuration settings (using the View configuration) and verify that the same settings are in place when service is complete.
The protected partition on the hard disk or the Reference Diskette you are using does not contain the code required to support the device.
- An adapter or device is defective.
- The device missing from the list is not recognized as a device or adapter.
- The device missing from the list requires an additional diskette. (See the device service manual.)
- A power supply voltage is not correct (see żPower Systems Checkout—).
If the adapter is on the list, run the adapter diagnostic tests.
If the list contains an adapter or device that is not installed, go to żUndetermined Problem—.
Power-On Password (700, 700C):
To disable the ThinkPad 700, 700C power-on password, do the following:
1. Power-off the computer.
2. Remove the battery pack and the bottom cover.
3. Locate the password-override connector on the system board. (See żSystem Board (700)—.)
4. Install a jumper between the two pins at position 1.
5. Power-on the computer and wait until the POST ends.
Important:
Remove the jumper from the password-override connector when service is completed.
Power-On Password (720, 720C):
To disable the ThinkPad 720, 720C power-on password, do the following:
1. Power-off the computer.
2. Remove the battery pack and the bottom cover.
3. Locate the password-override switch on the system board. (See żSystem Board (720, 720C)—.)
4. Slide the password-override switch to the left position.
5. Power-on the computer and wait until the POST ends.
Important:
Slide the password-override switch to the other position when service is complete.
To reactivate the password, start the system programs, select Set features from the Main Menu, then select Set password and unattended start mode , and follow the instructions on the screen.
Privileged-Access Password (PAP):
This is an option. If a PAP is set, the computer cannot start and you have to get the customer to unlock the PAP. If the PAP is set, then forgotten, it cannot be overridden or removed. The system board must be replaced.
Set Startup Sequence:
1. Power-off the computer.
2. Insert the backup copy of the Reference Diskette into the diskette drive.
3. Power-on the computer.
4. Select Set features from the Main Menu.
5. Select Set startup sequence. If you cannot set the startup sequence, replace the system board.
6. Check the list of devices on the Set startup sequence screen.
7. Is the hard disk drive in the list as a startup device?
Yes Exit from this screen and the Main Menu. Remove the backup copy of the Reference Diskette, and power-off the computer. Continue with step 8.
No Add the hard disk drive as a startup device.
8. Is an operating system installed?
Yes Go to step 10.
No Install the operating system.
9. After the operating system is installed, power-off the computer.
10. Power-on the computer.
Note:
After the programs have been restored, the Diskette and F1 prompts appear, unless an operating system is present.
Restore System Partition:
If the above sequence does not correct the problem, do the following:
1. Power-off the computer.
2. Insert the backup copy of the Reference Diskette into the diskette drive.
3. Power-on the computer.
Note:
If set. To disable the power-on password (see żPower-On Password (700, 700C)—) before continuing with the next step.
4. Select Backup/Restore system programs from the Main Menu, then select. Restore the System Partition.
5. When the restore process completes, select Set configuration, then select Run automatic configuration.
6. Power-off the computer and remove the backup copy of the Reference Diskette from the diskette drive.
7. Power-on the computer.
Hard Disk Low Level Format:
To format the hard disk and restore the system partition, do the following.
Warning:
The following procedure causes permanent loss of the data on the hard disk. Make sure that a backup of all the information on the hard disk is made.
1. Power-off the computer.
2. Insert the backup copy of the Reference Diskette into the diskette drive.
3. Power-on the computer.
4. Proceed to the Main Menu. Press Ctrl+A to display the Advanced Diagnostic Menu.
5. Select Format the hard disk and follow the instructions on the screen to perform a low level format of the hard disk.
6. After the hard disk format is completed, power-off the computer.
7. Restore the system partition.
8. Reinstall the operating system.
Replacing the Hard Disk Drive:
If you replace the internal hard disk drive, you must recopy all of the system programs onto the replacement hard disk drive. To recopy the programs:
1. Start the system using the customer's backup copy of the system partition.
2. Select Backup/Restore system programs from the Main Menu.
3. Run Restore the system partition to load the IML image, the system programs, and the diagnostic programs onto the hard disk drive just installed.
Notes:
a. If there is not a backup copy of the system partition, make one before replacing the hard disk drive. (See żMaking a System Partition Backup Copy—.)
b. If the customer's backup copy of the system partition is incomplete, you cannot restore the whole system partition. If this occurs, after you have ThinkPad 700, 700C, 720, 720C (9552) recopied the IML image, get the option diskettes and use Copy an option diskette to recopy the option files onto the system partition.
c. If the IML image is loaded onto the hard disk drive, but the customer's operating system has not been loaded, the insert diskette icon will appear on the screen.
System Diskettes (Reference and Diagnostic):
If the hard disk drive is not operational, you can run the system programs from the Reference Diskette.
Note:
The Reference Diskette contains the system programs and the Diagnostic Diskette contains the test programs. The Diagnostic Diskette is not self-starting. To run the Diagnostic Diskette, start the system from the Reference Diskette, select Test the computer , then follow the instructions on the screen.
Installing a New Version of the System Diskettes:
When you install the new system diskettes onto the hard disk, all existing files (including option files) in the system partition are written over. The new system diskettes provide the new system programs but they do not contain the option files; therefore, after completing the following process, you must reinstall the option files.
There are two methods to reinstall the option files.
1. From a backup copy of the current system partition. (this is the easiest way to reinstall the option files). For instructions on making a backup copy, see żMaking a System Partition Backup Copy—.
2. From the original option diskettes.
Do the following for both methods.
1. Insert the new version of the Reference Diskette into the diskette drive.
2. Power-off the computer, then power it on. After the cursor moves to the upper right corner of the screen, press Ctrl+ Alt + Insert.
Warning:
This process writes over all existing files in the system partition. Before continuing, you must have either a backup copy of the current system partition or all the option diskettes so you can reinstall the option files.
3. Go to the Main Menu of the Reference Diskette and select Backup/Restore system programs , then select Restore the system partition and follow the instructions on the screen. This transfers all files, programs, and the IML image of the new diskette onto the system partition.
4. When the Main Menu appears again, remove the diskette from the diskette drive and power-off the computer, then power it on.
5. After the cursor moves to the upper right corner of the screen, press Ctrl+ Alt+ Insert.
6. If you havea backup copy of the current system partition, continue with step 7. If you do not have a backup copy of the current system partition, but you have the option diskettes, go to step 8.
7. Select Copy an option diskette from the Main Menu. When the
INSERT YOUR OPTION DISKETTE message appears, insert the backup copy of the system partition and follow the instructions on the screen. (The backup copy of the system partition is used to reinstall the option files onto the system partition.) Then go to step 9.
8. Select Copy an option diskette and follow the instructions on the screen. Repeat the procedure with each option diskette until all option diskettes have been reinstalled.
9. If there is a customized configuration installed (settings have been changed via the żChange configuration— screen), continue with step 10 on page 35. If there is not a customized configuration installed, go to step 11.
10. Select Set configuration from the Main Menu. When you exit from Set configuration by pressing the F3 , the customized configuration files will be restored onto the system partition as files @CMOS and @NVRAM.
Warning:
Do not run Run automatic configuration now or you will write over the customized configuration.
11. You are finished with the updating process. Make a new backup copy of the system partition. (For information on making a backup copy, see żMaking a System Partition Backup Copy.—)
Making a System Partition Backup Copy
Note:
You might need two blank 2.0MB diskettes (or the old backup copy).
1. Power-off the computer, then power it on.
2. After the cursor moves to the upper right corner of the screen, press Ctrl+ Alt+ Insert.
3. When the Main Menu appears, select Backup/Restore system programs, then select Backup the system partition.
4. Insert a blank 2.0MB diskette into the diskette drive and follow the instructions on the screen.
Note:
If you receive a message indicating that the diskette is full, and you are not prompted to insert a second diskette, this means that you will not be able to make a backup copy of the entire system partition. The user should keep the system diskettes and option diskette as a backup of these files.
5. When the copies are completed, label each diskette.
Japanese Model Diskette Drive and Diskette:
The ThinkPad 700 uses a 1.44MB diskette drive. Both 1.0MB (formatted 720KB) and 2.0MB (formatted 1.44MB) capacity diskettes can be used in this drive.
The ThinkPad 700 Japanese model uses a diskette drive that supports 1.2MB format on 2.0MB capacity diskettes. When servicing a Japanese model, you must test all three formats.
Notes:
1. The ThinkPad 700C Japanese model has an 89-key keyboard. This keyboard is identified by the additional keys at the left and right sides of the spacebar.
2. A 2.0MB capacity diskette is required when testing the 1.2MB format.
173 and 11350 Error Combination:
If a POST error combination of 00017300 and 11350 appears and cannot be bypassed, do the following before replacing any FRUs.
1. Power-off the computer.
2. Remove the hard disk drive from the computer.
3. Insert the Reference Diskette and power-on the computer.
4. Ignore any error messages, press Esc, F8, and Enter, then run Automatic Configuration.
5. Ignore the message żAn error occurred while updating config— and power-off the computer.
6. Install the hard disk drive.
7. Keep the Reference Diskette in drive A and power-on the computer.
8. Ignore any error messages, pressY, and run Automatic Configuration.
PCMCIA Card Removal Tip:
For the Model 720x, you can insert or remove the PCMCIA card during most computer operations. However, do not remove the card when the PC Card in-use light is on.
|
Search Keywords |
| |
|
Hint Category |
Hardware Maintenance Information | |
|
Date Created |
29-11-96 | |
|
Last Updated |
17-04-98 | |
|
Revision Date |
16-04-99 | |
|
Brand |
IBM ThinkPad | |
|
Product Family |
ThinkPad 700, ThinkPad 720 | |
|
Machine Type |
9552 | |
|
Model |
Various | |
|
TypeModel |
| |
|
Retain Tip (if applicable) |
N/A | |
|
Reverse Doclinks |