
|
17.994 bytes |
Service Hints & Tips |
Document ID: BMOE-42JH83 |
TP 1400 - Power system checkout
Applicable to: World-Wide
The following information is intended for IBM Dealers and Authorized Servicers only. Customers attempting to follow any of the procedures below may void their warranty.
Power Systems Check
To verify the symptom of the problem power on the computer using each of the power sources as follows:
1. Remove the battery pack, diskette drive, and hard disk drive.
2. Connect the AC Adapter and check that power is sup-plied.
3. Install the diskette drive or hard disk drive one at a time, and check that power is supplied from each power source.
If you suspect a power problem, refer the the appropriate power supply check listed below:
Checking the AC Adapter:
If the computer fails only when the AC Adapter is used or if the power-on indicator of the AC Adapter does not turn on, make sure of the following:

If the above confirmation does not solve the problem, replace the AC Adapter.
If the power-on indicator of the AC Adapter is on, then proceed to the next step.
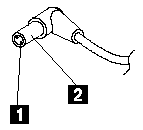
1. Unplug the AC Adapter cable from the computer and measure the output voltage at the plug of the AC Adapter cable.
|
Pin |
Voltage (V dc) |
|
1 |
19.0 20.5 |
|
2 |
Ground |
2. Unplug the AC Adapter cable from the AC power outlet and wait for five minutes or longer to allow the over-voltage protection circuit of the AC Adapter to be fully discharged and initialized.
3. Plug the AC Adapter cable into the AC power outlet.
4. Measure the output voltage of the AC Adapter.
5. If the voltage is still not correct, replace the AC Adapter.
Note: An audible noise from the AC Adapter does not always indicate a defective adapter.
Checking the Operational Charging:
To check operational charging, use a discharged battery pack or a battery pack that has less than 50% of the total power remaining when installed in the computer.
Perform operational charging:
1. If the battery indicator does not turn on, remove the battery pack and leave it to return to room temperature.
2. Reinstall the battery pack. If the charge indicator still does not turn on, replace the battery pack.
Checking the Battery Pack:
To check the battery pack, do the following:
1. Power off the computer.
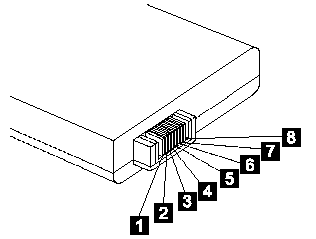
2. Remove the battery pack and measure the voltage between battery terminals 2(+) and 7(-). See the following figure:

|
Terminal |
Signal / Voltage (V dc) |
|
1 |
Sense |
|
2 |
Power ( > 8 V dc) |
|
3 |
Reserved |
|
4 |
Reserved |
|
5 |
Thermal |
|
6 |
Sense |
|
7 |
Ground |
Note: Signal lines, not used in these steps, are used for communications between the system and the battery.
3. If the voltage is less than +8 V dc, the battery pack. If the voltage is still less than +8 V dc after recharging, replace the battery.
|
Search Keywords |
| |
|
Document Category |
Error Messages | |
|
Date Created |
24-11-98 | |
|
Last Updated |
24-11-98 | |
|
Revision Date |
| |
|
Brand |
IBM ThinkPad | |
|
Product Family |
ThinkPad i Series 1400 | |
|
Machine Type |
2611 | |
|
Model |
Various | |
|
TypeModel |
| |
|
Retain Tip (if applicable) |
| |
|
Reverse Doclinks |