

|
74.043 bytes |
Service Hints & Tips |
Document ID: PMYS-3KNRPP |
Aptiva - 2134/2159/2176 FDISK, format and reload instructions
Applicable to: World-Wide
WARNING! All data on the hard drive will be removed by this procedure, therefore, all data MUST be backed up prior to proceeding or it will be lost! Also, the Product ID # from the certificate of authenticity that is included with your system documentation is needed to restore the product preload to a working state. Do not proceed unless you have this number.
NOTE: Australian and New Zealand owners should check the part no on their recovery CD before proceeding with this process. If the P/N is 76h3670 then you MUST download the file - Fixpar.exe  before proceeding with the recovery . Then use the file according to the instructions provided after removing the partitions using the Fdisk command described in this document.
1. Remove any added options from the system. (Additional Hard Drives, Scanners, Printers, Etc ...)
2. BOOT the system with the Diagnostic and Utilities CD in the CD-ROM drive.
3. At the Diagnostics and Utilities menu Enter "0" ("0" is not listed as an option, it is a hidden function, pressing it will bring you to an "A:\>" prompt). At the "A:\>" prompt Enter "fdisk". You should then see the main menu, Figure 1-1.
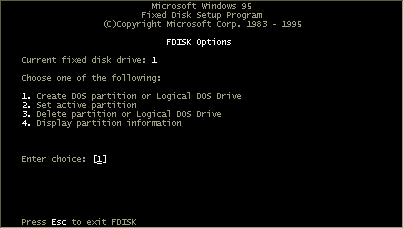
Figure 1-1 : FDISK - FDISK Options
4. Enter "4" to display partition information (Figure 1-2).
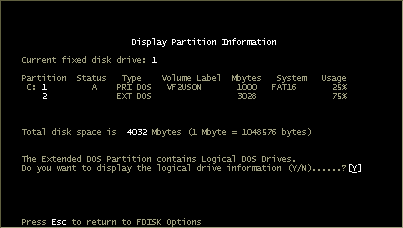
Figure 1-2 : FDISK - Display Partition Information
5. Record the partition information that is displayed. Enter "Y" to see the sizes of the Logical DOS Drives (Figure 1-3). Record this information also.
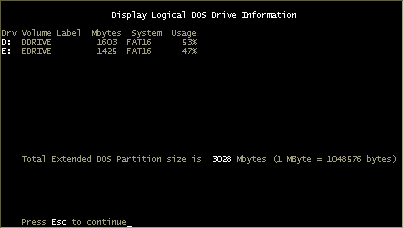
Figure 1-3 : FDISK - Display Logical DOS Drive Information
6. Press "ESC" until you are back at the main menu (Figure 1-1). Enter "3" to Delete Partition or Logical DOS Drive and Figure 1-4 should be displayed.
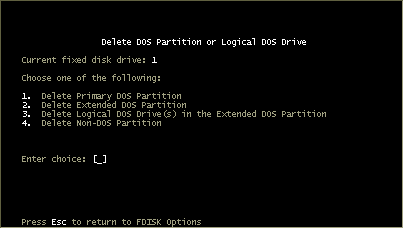
Figure 1-4 : FDISK - Delete DOS Partition or Logical DOS Drive
7. Enter "3" to Delete Logical DOS Drives in the Extended DOS Partition and Figure 1-5 should be displayed. Enter the drive letter of the partition you wish to delete. Enter the Volume Label of the partition you wish to delete. Enter "Y" when asked "Are you sure (Y/N)?" (Volume label entered must be exact, including any punctuation or capitalization).
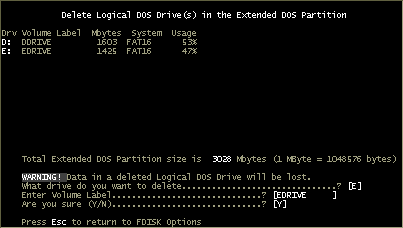
Figure 1-5 : FDISK - Delete Logical DOS Drive(s) in the Extended DOS Partition
8. Repeat step 7 until all logical drives have been deleted. Press "ESC" until you return to the main menu (Figure 1-1).
9. Enter "3" to delete partition or logical DOS drive. You should see Figure 1-4. Enter "2" to delete extended DOS partition. Press "ESC" until you return to the main menu (Figure 1-1).
10. Enter "3" to delete partition or logical DOS drive. You should see Figure 1-4. Enter "1" to delete primary DOS partition. Enter "1" when asked "What primary partition do you want to delete?" Enter the Volume Label of the primary partition you wish to delete. Press "ESC" until you return to the main menu (Figure 1-1).
11. Enter "4" to display partition information and ensure that no partitions are defined. You will actually get the message, "no partitions defined". Press "ESC" until you return to the main menu (Figure 1-1). If you still have partitions defined then go back to the beginning and ensure they are deleted.
12. Enter "1" to create DOS partition or logical DOS drive. You should see Figure 1-6.
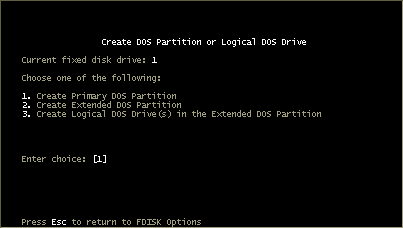
Figure 1-6 : FDISK - Create DOS Partition or Logical DOS Drive
13. Enter "1" to create primary DOS partition. Enter "N" when prompted to use the maximum available size. The system will ask what size or percentage you wish to make the drive. Enter the size you recorded in step 4. Press "ESC" until you return to the main menu (Figure 1-1). WARNING! Do not enter a size greater than 1900MB under any circumstance, a partition size greater than 2GB is not supported through the help center. (DOS limitation)
14. At the main menu you will receive a warning that no partition is active. Enter "2" to set active partition. Enter "1" (for 'c:') as the active partition. Press 'ESC' until you return to the main menu (Figure 1-1).
15. Enter "1" to create DOS partition or logical DOS drive. You should see Figure 1-6. Enter "2" to create extended DOS partition. Enter "Y" to use the entire remaining amount for the partition. After you have created the extended DOS partition you will be prompted to create a logical DOS drive. Enter '"Y" then enter the size in MB. Use the original size, or choose about one half of the available drive space.
16. Repeat step 15 until the extended DOS partition is filled with logical DOS drives. Press "ESC" until you are at a DOS prompt.
17. Reboot the system leaving the diagnostics and utilities CD in the CD-ROM drive.
18. At the Diagnostics and Utilities menu Enter "0" and at the "A:\>" prompt Enter "format c: /u". Press Enter when prompted for Volume Label.
19. Repeat step 18 for all drive letters.
20. Reboot the system with the Product Recovery CD in the CD-ROM drive. Press enter at the first prompt in order to continue.
21. Enter "Y" when prompted for a response. This will occur three times. When the format is completed press Enter if prompted for a Volume Label.
When "Making Windows 95 System Directories" appears onscreen the system has begun restoring the original preloaded software to the hard disk. From this point the process becomes automated. Many file names will start scrolling rapidly with "Exploding, Extracting, and Inflating" beside them. This will go on for another 20 minutes or so. At that time the you will be prompted to start entering information and setting up Windows95. This will take another 15-20 minutes. It is recommended that no additional software be added to the system until the problem that resulted in the FFR (FDISK, Format, Reload) has been isolated.
|
Search Keywords |
| |
|
Hint Category |
Software Installation/Configuration | |
|
Date Created |
05-08-97 | |
|
Last Updated |
12-03-99 | |
|
Revision Date |
12-03-2000 | |
|
Brand |
IBM Aptiva | |
|
Product Family |
Aptiva | |
|
Machine Type |
2134, 2159, 2176 | |
|
Model |
All | |
|
TypeModel |
| |
|
Retain Tip (if applicable) |
| |
|
Reverse Doclinks |