
|
59.818 bytes |
Service Hints & Tips |
Document ID: LWIK-3NHN59 |
TP 760C/CD/L/LD/EL/ELD - Power systems checkout
Applicable to: World-Wide
The following information is intended for IBM Dealers and Authorized Servicers only. Customers attempting to follow any of the procedures below may void their warranty.
Power Systems Checkout:
To verify the symptom of the problem, power-on the computer using each of the power sources as follows.
1. Remove the battery pack, diskette drive, and hard disk drive.
2. Connect the AC Adapter and check that power is supplied.
3. Install the diskette drive or hard disk drive one at a time, and check that power is supplied from each power source.
4. Disconnect the AC Adapter, remove the hard disk and diskette drive, and install the charged battery pack; then check that power is supplied by the battery pack.
If you suspect a power problem, see the appropriate power supply check listed below.
Checking the AC Adapter.
Checking Operational Charging.
Checking the Battery Pack.
Checking the Car-Battery Adapter.
Checking the Backup Battery.
Checking the Standby Battery.
Port Replicator Power Overload.
Checking the AC Adapter
You are here because the computer fails only when the AC Adapter is used.
If the power problem occurs only when the port replicator is used, replace the replicator. If the power-on indicator does not turn on, check the power cord of the AC Adapter for correct continuity and installation.
If the operational charge does not work, go to Checking Operational Charging.
Note : For Model 760CD, 760ED, 760LD, and 760ELD, there are two types of adapters. The procedure for checking both types is the same.
1. Unplug the AC Adapter cable from the computer and measure the output voltage at the plug of the AC Adapter cable. See the following figure.
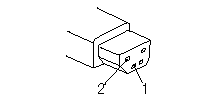
(20 - 10 V)
Pin Voltage (V dc)
1+ 18.0 to+ 21.0
2 Ground
(16 - 10 V)
Pin Voltage (V dc)
1+ 14.5 to+ 17.0
2 Ground
If the voltage is correct, replace the DC/DC card.
If the problem is not corrected, replace the system board.
If the problem is not corrected, go to "Undetermined Problems"
If the voltage is not correct, go to the next step.
2. Unplug the AC Adapter cable from the ac power outlet and wait five minutes or longer to allow the over-voltage protection circuit to be fully discharged and initialized.
3. Plug the AC Adapter cable into the ac power outlet.
4. Measure the output voltage of the AC Adapter.
5. If the voltage is still not correct, replace the AC Adapter.
Note : An audible noise from the AC Adapter does not always indicate a defective adapter.
Checking Operational Charging
To check operational charging, use a discharged battery pack or a battery pack that has less than 50% of the total power remaining when installed in the computer.
Perform operational charging. If the battery status indicator does not turn on, remove the battery pack and leave it to return to room temperature. Reinstall the battery pack. If the charge indicator still does not turn on, replace the battery pack.
Checking the Battery Pack
Battery charging will not start until the Fuel-Gauge shows that less than 95% of the total power remains; with this condition the battery pack will charge to 100% of its capacity. This protects the battery pack from being over-charged or having a shortened life.
Do the following:
1. Power-off the computer.
2. Remove the battery pack and measure the voltage between battery terminals 1 (+ ) and 4 (- ). See the following figure.
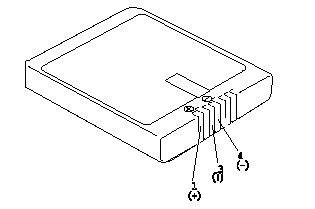
Terminal Voltage (V dc)/Signal
1 +0 to +13.5
2 Send
3 Thermal
4 Ground(-)
5 Select
Note : Signal lines, not used in these steps, are used for communication between the system and the battery.
3. If the voltage is less than+ 11.0 V dc, the battery pack has been discharged. Recharge the battery pack. If the voltage is still less than+ 11.0 V dc after recharging, replace the battery.
Note : If the voltage of the battery pack is 0 V, it is not defective.
4. If the voltage is more than+ 11.0 V dc, measure the resistance between battery terminals 3 and 4. The resistance must be 4 to 30 K ohm.
If the resistance is not correct, replace the battery pack.
If the resistance is correct, replace the DC/DC card.
Checking the Car-Battery Adapter
1. Unplug the Car-Battery Adapter cable from the computer.
2. Plug the Car-Battery Adapter into the cigarette lighter socket.
Note : If the adapter is already plugged in, reseat it.
3. Measure the output voltage of the Car-Battery Adapter cable. See the following figure.
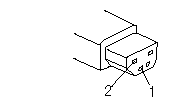
Pin Voltage (V dc)
1+ 19.0 to +21.0
2 Ground
If the voltage is correct, the Car-Battery Adapter is working correctly. Check that the computer runs with the AC Adapter. If it runs correctly with the AC Adapter, check the system board. If the problem still remains, replace the following FRUs one at a time.
a. DC/DC card
b. System board
If the problem is not resolved when the system board is replaced, go to "Undetermined Problems"
If the voltage is outside the normal voltage range, do one of the following:
Try the above test procedures in a different car, if one is available.
Replace the Car-Battery Adapter if the computer works correctly with the AC Adapter.
Note : If the output voltage from the cigarette lighter socket of the car is less than 10.5 V dc, a continuous noise may be heard. The condition of the car battery should be checked by appropriate service personnel.
Checking the Backup Battery
1. Power-off the computer and unplug the AC Adapter from the computer.
2. Open the keyboard, and remove the diskette drive/CD-ROM drive, the battery pack, and the hard disk drive.
3. Remove the top cover and keyboard unit.
4. Open the keyboard unit; then remove the keyboard card.
5. Remove the backup battery from the keyboard card. (Refer to 1085 Backup Battery, Speaker, Standby Battery to remove the battery.)
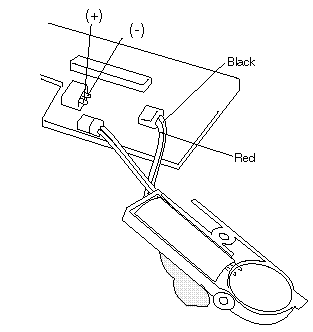
6. Measure the voltage of the backup battery. See the following figure.
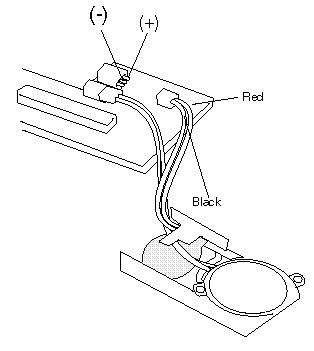
Wire Voltage (V dc)
Red +2.5 to +3.7
Black Ground
If the voltage is correct, replace the system board.
If the voltage is not correct, the backup battery has been discharged. Replace the backup battery.
If the backup battery discharges quickly after replacement, replace the system board.
Checking the Standby Battery
1. Power-off the computer and unplug the AC Adapter from the computer.
2. Open the keyboard, and remove the diskette drive/CD-ROM drive, the battery pack, and the hard disk drive.
3. Remove the top cover and keyboard unit.
4. Open the keyboard unit; then remove the keyboard card.
5. Remove the standby battery from the keyboard card.
Warning : Be careful not to cause a short circuit when measuring the voltage.
6. Measure the voltage of the standby battery.
If the voltage between red and black is 3.5 V dc or greater, the voltage is correct.
If the voltage is less than 3.5 V dc, go to the next step.
7. Plug the AC Adapter into the computer and power-on the computer.
Warning : Be careful not to cause a short circuit when measuring the voltage.
8. Measure the output voltage at the connector on the system board.
Pin Voltage (V dc)
+ +4.0
- Ground
If the voltage is less than+ 4.0 V dc, replace the DC/DC card. If the voltage is still low, replace the system board.
If the voltage is more than+ 4.0 V dc, power-off the computer, replace the standby battery, and go to the next step.
9. Ensure that the AC Adapter is plugged into the computer; then power-on the computer.
10. Charging of the standby battery starts. A depleted battery needs approximately 30 minutes to be recharged to the operational voltage of+ 3.5 V dc.
11. Unplug the AC Adapter.
12. Verify the standby battery function by removing and installing the battery pack during suspend mode.
Note : Removing and installing the battery pack during suspend mode should be done within one minute. The resume operation must start. If the resume operation does not work, switching of power from the battery pack to standby battery will not be correct. Replace the DC/DC card.
If replacing the DC/DC card does not resolve the problem, replace the system board.
Power Management Features
Three power management modes are provided by the computer to reduce power consumption and prolong battery power.
Standby Mode
When in standby mode the following occurs:
The LCD backlight turns off.
The hard disk motor stops.
Events that cause the computer to enter standby mode:
Standby requested by the Fn key. (Fn+ F3)
No activity under auto-standby enabled by the ThinkPad Features program.
Events that cause the computer to exit or resume standby mode:
(Resume) Any key operation.
Suspend Mode
When in suspend mode, the following, in addition to the four actions of standby mode, occur:
The LCD is powered-off.
The hard disk is powered-off.
The CPU is stopped.
Notes :
1. In the ThinkPad Features Program, the computer can be set to "Will not suspend even if LCD is closed"
2. When the computer is powered with ac power and is used with one of the communication PC cards, the computer enters standby mode ; the PC card and application program remain active.
3. In the following conditions, the computer cannot enter suspend mode.
While a communication link is running.
While the computer is attached to a Dock I.
Events that cause the computer to enter suspend mode:
Suspend mode is requested by the Fn key (Fn+ F4).
The LCD is closed.
The keyboard is opened.
The specified time has elapsed from the last operation with the keyboard, mouse, hard disk drive, parallel connector, or diskette drive; or the AC Adapter is plugged in. The time is specified by Suspend Timer in the ThinkPad Features program.
The battery condition is low. The battery power indicator blinks orange.
Either the PS2 OFF or PS2 SUSpend command is set in the ThinkPad Features program.
Events that cause the computer to exit or resume suspend mode:
(Resume) The LCD is opened.
(Resume) The keyboard is closed.
(Resume) The real time clock alarm is signaled.
(Resume) The ring indicator (RI) is signaled by a serial or PCMCIA device.
(Resume) The Fn key is pressed.
(Resume) An external keyboard key is pressed while operating with ac power.
(Exit) Timer conditions are satisfied for entering hibernation mode.
Hibernation Mode
When in hibernation mode, the following occurs:
The system status, RAM, VRAM, and setup data are stored on the hard disk.
The system is powered-off.
Notes :
The computer cannot enter hibernation mode when:
The computer is powered with ac power and a communication PC cards is used.
The computer is attached to the expansion unit.
Events that cause the computer to enter hibernation mode:
Hibernation mode is requested by the Fn key (Fn+ F12).
Timer conditions are satisfied in suspend mode.
A critical low battery condition occurs.
The PS2 HIB ernation command is set in the ThinkPad Features program.
Event that causes the computer to exit hibernation mode.
The power-on switch is operated.
When power is turned on, the hibernation history in the boot record on the hard disk is recognized and system status is restored from the hard disk to resume operation.
Port Replicator Power Overload
If power shut downs occur intermittently when using PCMCIA-2 devices via a port replicator, suspect an over-current problem.
Some PCMCIA devices use much power; if the maximum usage of each device occurs simultaneously, the total current will exceed the limit, thereby causing a power shut down. Isolate this problem by removing one of the devices, and use the computer under the same condition to see whether a power shut down occurs. Do this procedure for all devices; then determine the cause.
|
Search Keywords |
| |
|
Hint Category |
Power | |
|
Date Created |
31-07-96 | |
|
Last Updated |
19-08-98 | |
|
Revision Date |
18-08-99 | |
|
Brand |
IBM ThinkPad | |
|
Product Family |
ThinkPad 760C, ThinkPad 760CD, ThinkPad 760L/LD, ThinkPad 760EL/ELD | |
|
Machine Type |
9546, 9547 | |
|
Model |
Various | |
|
TypeModel |
| |
|
Retain Tip (if applicable) |
| |
|
Reverse Doclinks |