
|
120.099 bytes |
Service Hints & Tips |
Document ID: GSMH-39DEHN |
|
This document is provided to IBM and our Business Partners to help sell and/or service IBM products. It is not to be distributed beyond that audience or used for any other purpose. |
IBM Monitor service aid for PS/2 and ValuePoint
Applicable to: World-Wide
Service Information:
1. The basic functional units of the monitor.
2. Importance of Self Test.
3. Using the monitor to diagnose itself.
4. Sequence of adjustments
5. Correct tool.
6. Definition of "color point".
7. Degaussing
8. "New Defective" analog cards/card tray assemblies
9. Burned spot on the screen.
The basic functional units of a display are:
a. The power supplies. The low voltage P.S. must be working to provide input to the High voltage P.S. which provides anode or screen voltage to the display. If anything is "visible" on the screen, both power supplies are functional.
b. The video amplifier board. The analog video signals from the system unit monitor adapter are amplified and controlled on this board. The red, green and blue signal channels are separate, but nearly identical circuits. All three must be adjusted properly to provide the correct color balance. (example: RED, BLUE, and GREEN, at the proper intensity or "gain" = WHITE).
c. The deflection circuits (analog board). This board controls the deflection (movement) of the electron beams controlled by the three video channels (red, green, blue) and the final geometry (shape) of the raster on the screen.
d. The ITC (Integrated Tube Component, or CRT assembly). This assembly is adjusted at the factory for color convergence. These adjustments are sealed. There is no requirement to
adjust them in the field and this should NOT BE ATTEMPTED!
The deflection coil on the ITC is an "electro-magnet" that controls the electron beam deflection.
The following block diagram is representative of most PS/2 and Valuepoint monitors:
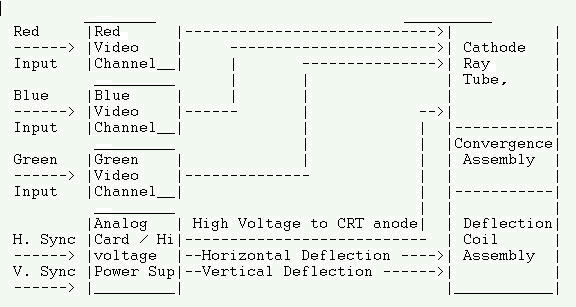
* ITC
* Integrated Tube Component Assembly
Page 2-4, "SELF TEST":
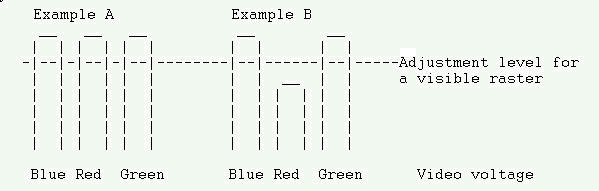
This test is SIGNIFICANT in that it provides a great deal of information concerning not only the operational condition of the display, but also the "state" of its color purity (color point) adjustments.
Note:
The most difficult and complex operation a color monitor must perform is to produce a full "white" screen (raster). The appearance of the Self-Test raster provides a direct indication of the following monitor functions:
a. Both power supplies are functioning. (If either fails, the screen would be totally blank.)
b. The horizontal and vertical deflection circuits (analog board) are working. During self-test Monitor signal cable dis-connected), the horizontal and vertical deflection circuits (oscillators) are "free running". This is why the edges of the self-test raster are poorly defined. The monitor adapter in the system unit provides precise vertical and horizontal Sync signals that "synchronize" the deflection circuits and produce the sharply defined edges of the raster during normal operation.
c. The general condition of the video board and the ITC (Cathode Ray Tube assembly).
To produce the self test "white" screen, the display must be"in sync" (no horizontal or vertical rolling, etc.) and all three video channels (red, green blue) must be in proper signal balance (Video Level and Cutoff Voltage, Page 8-20).
If the self test raster does not appear "white", it is most likely due to a mal-adjustment of one or more of the video level or cutoff voltages. Refer to page 8-20 of the Display Hardware Maintenance Manual and perform these adjustments prior to doing the Geometry adjustments.
Note:
In example A, a white self test raster is visible because RED, BLUE and GREEN video gains are in close balance, therefore the human eye actually perceives "White". Without this balance, a color other than white will be seen. In example B, a non-white raster is visible because the Red video gain is too low for proper "white balance." In extreme cases of mal-adjustment, the Self-Test raster may not be visible. Adjusting one of the video gains "up" may provide a visible raster, which by following the adjustment procedure on page 8-20, can be adjusted to meet all functional criteria without FRU parts replacement.
Using the monitor to diagnose itself:
Diagnosis Example: A "White line" failure.
The symptom is a horizontal white scan line across the center of the monitor. It is usually caused by a component failing in the vertical oscillator or deflection circuits of the monitor. Using the block diagram above, we can often determine the missing functions and the most likely failing unit.
1. Both power supplies are working. (Any image on the screen indicates BOTH power supplies are functional.)
2. The line is "white," therefore all three video channels (red, blue, and green,) appear to be working.
3. The horizontal deflection circuits are working (The electron beam is being deflected across the screen.)
4. No vertical deflection is apparent. (All of the horizontal scans are in one place). If the white line was vertical and in the center of the screen, horizontal circuits would be suspect.
5. The missing vertical deflection control comes from the Analog card, therefore it is suspect of being defective.
Sequence of Adjustments:
The adjustments of magnetically deflected displays tend to be somewhat interactive. Some adjustments may interact with others which have already been done. This can require more than one pass through the adjustments to obtain the best resolution.
In many cases, such as dim or off-color self test, adjusting the "Video Levels and Cutoff Voltages" prior to doing the geometry adjustments may be required.
Correct Tool for Adjustments:
Only Plastic tools should be used for adjusting the display, with the exception of P/N6247769. The metal tip on one end of this trimming tool is correct for adjusting the Video Levels and Cutoff Voltages, as referenced on Page 8-20.
"Colorpoint":
This refers to the combination of adjustments that provide the best color purity to the observer (reds that are the most pure, etc.).
Degaussing:
Any outside magnetic interference may cause color or image irregularities. An automatic degaussing coil surrounds the CRT to demagnetize the ITC if it be comes magnetized. In addition to the information provided on page 2-5 of the manual, it should be noted that in some circumstances several degaussing cycles may be required to eliminate the effects of a magnetized ITC assembly.
Sometimes, the physical relocation of a display from one area to another or its orientation relative to magnetic north, may require more than one degaussing cycle to clear up the effects of the monitor being magnetized by its environment. (The Earth's magnetic field, though weak, will cause objects to become slightly magnetized. This is why degaussing is sometimes necessary after a physical move.) If appliances, transformers, or any device that creates a magnetic field, are in close proximity to a monitor, color variations or distortions should be expected. Eliminating the source of the magnetic interference or relocation of the monitor to a non-affected area, is the only way to correct extreme problems.
New "Defective" Analog Card/Card tray assembly FRU's:
Analog cards and card tray assemblies are shipped from the plant with the G2 Pot and the "screen" pots turned all the way down (CCW). This is to prevent circuit damage during initial power-on. This necessary plant adjustment sometimes results in the appearance of a new defective FRU..(The screen will be be blank-no raster visible and the power-on indicator will be green (on). A slight Adjustment of this control will often be necessary to see the raster in self-test. Video Levels and cutoff voltages should be checked first, then proceed to the geometry adjustme Refer to page 2-25 in Volume 2 of the Hardware Maintenance Manual, S71G-4197-02 dated September 1993 for additional information.
Burned spot(s) in the center of the CRT screen:
A small burned spot in the phosphor coating of a CRT screen of some monitors will occur if the monitor power is turned on and the Deflection Yoke (located on the CRT neck) is NOT connected to the proper location on the analog card,l eaving the Deflection Yoke connector disconnected with power on may allow full CRT beam current on some monitors. This beam current is normally intended to be scanned over the entire screen area, however, when the Deflection Yoke is not connected it can be directed to a single spot. The result is a phosphor burn which will occur quicker than the power can be turned off.
Replacement of the ITC will be required once such damage to the CRT screen phosphor has been done.
Note:
Additional information on monitors and their magnetic environment may be found in "PS/2 Installation Planning and Beyond," form # G41G-2927-00, which is available through normal publications ordering procedures.
|
Search Keywords |
| |
|
Hint Category |
General Information | |
|
Date Created |
23-03-94 | |
|
Last Updated |
20-01-99 | |
|
Revision Date |
20-01-2000 | |
|
Brand |
IBM Monitors | |
|
Product Family |
Personal System/2, PS/ValuePoint, Size labeled (14R/15V/etc.) | |
|
Machine Type |
63xx, 95xx, Various | |
|
Model |
various | |
|
TypeModel |
| |
|
Retain Tip (if applicable) |
N/A | |
|
Reverse Doclinks |