
|
51.194 bytes |
Service Hints & Tips |
Document ID: MNOK-3Z7PN8 |
Aptiva - 2139/2153 Installing IBM 10/100 EtherJet PCI Adapter
Applicable to: United States
1. In the manual provided with your PC, locate the instructions for installing an adapter. Be sure to follow any safety instructions in that manual.
2. Switch OFF the PC and all connected devices.
3. Remove the power cord from the outlet.
Note: In the U.K., by law, the telephone line cable (if connected) must be disconnected before the power cord.
4. Remove all cables from your PC to the connected devices.
Note: Make sure to label the cables for correct reconnection later.
5. Remove the system cover.
- Click here for cover removal instructions for 2139 systems -  .
.
- Click here for cover removal instructions for 2153 systems - .
6. Remove the screw and cover for the appropriate PCI Busmaster-capable expansion slot. (Refer to your PC manual.) Keep the cover to use again if you remove the adapter.
7. Identify a black cable that is connected to the modem and to the system board. Note: Care must be taken not to damage this cable during installation of the IBM 10/100 EtherJet Adapter.
8. Plug the IBM 10/100 EtherJet Adapter firmly into the slot, making sure that black cable that was identified in the last step is routed under the adapter and through the slot in the card near the rear of the machine.
Note: Most PCI slots in PCs are Busmaster-enabled, but some are not. If you have configuration problems, refer to your PC manual.
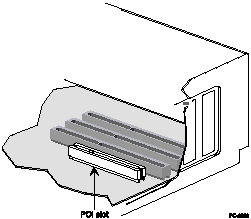
Figure 2-1. PCI Slot Illustration
9. Secure the adapter bracket with a screw.
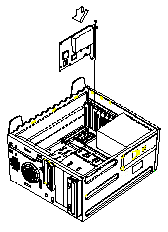
Figure 2-2. Installing an adapter in a 2139 system
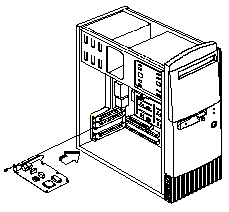
Figure 2-3. Installing an adapter in a 2153 system
10. Replace the cover on the PC, connect the cables to the connected devices, connect the signal cables to the receptacles, and finally, connect the power cord to the outlet.
Note: In the U.K., by law, the power cord must be connected before the telephone line cable.
11. Connect a twisted-pair Ethernet category 3 or category 5 cable to the adapter and to your Ethernet hub. See "Using the Correct Adapter Cable" for more information.
Notes:
a. If you use the 10/100 EtherJet PCI Adapter with Wake on LAN and connect the cables as described, the LNK LED should be lit even if the PC is powered off. This indicates that the Wake on LAN power cable has been correctly connected to your adapter.
b. To use Wake on LAN, you must enable the Wake on LAN function in your system configuration. Refer to your PC documentation for more information.
12. Insert the IBM 10/100 EtherJet Adapter Diagnostic diskette in Drive A: and power up the machine. You should see the following information:
IBM 10/100 EtherJet PCI Adapter
Configuration and Diagnostic Utility - Setup Version 4.11
After that screen, the diagnostic will scan the system looking for the installed adapter.
Note: If the diagnostic program fails to locate the adapter, power down the system and move the adapter to another PCI slot and power up the system again. If the diagnostic fails to locate the adapter after performing this step replace the adapter.
13. Select View Adapter Configuration and you should see:
View Adapter Configuration
Adapter Type: ........................................ IBM 100/10
Adapter Part Number:........................... XXXXXXXX
Network Address : ..................................XXXXXXXXXXXXX.
Interrupt: ......................................................XX (set by PCI Bus)
Bus:.............................................................. PCI 0
Slot: ............................................................. 16
Device: ...................................................... 10h
Network Speed:...................................... 10Mbps
Physical Layer device: ...................... Link type 10BaseT
Duplex:...................................................... Half
Adapter capabilities
10 Mbps Full or half duplex
100 Mbps Full or half duplex
Press any key to continue ...
Note: this option provides information such as Network Address, Interrupt and PCI Bus used for this adapter.
14. Press any key and return to the main menu. Remove the UTP cable from the adapter. Select View Adapter configuration option from the menu and you should see the following change the above screen
Network Speed .............................. No Cable
Physical Layer device: ................... 1
Reconnect the cable and press any key to return the main menu.
15. Select Test adapter. This option will launch a series of test to check out the adapter.
Note: The first test is a internal hardware test, much like a post test. the next test runs an internal loop-back test at both 10 Mbps and 100 Mbps. The last test checks out the network.
If all tests pass, the adapter is functioning properly. Return to the Test Adapter menu.
16. Remove the UTP cable from the adapter and run the same test. Note the error message that appears.
Note: This message states that the adapter is not receiving packets and that there may be a problem with the cable or the adapter.
17. Reconnect the cable and select the Test Again option.
Note: You may notice that the system will look for a responder for part of the network test. The responder is another machine on that segment that is setup to return frames that are broadcasted by the adapter that is performing the test.
Do not use the install option provided on the Diagnostic Diskettes
18. This completes the diagnostic process for the 10/100 EtherJet PCI adapter
Using the Correct Adapter Cable
To reliably operate your network at 100 Mbps, you must use category 5 Data Grade cabling with this adapter. Although category 3 or 4 cabling might work initially, it will soon cause data loss. For more information, see the Hardware Specifications and Cabling topic on the Diagnostics and Help diskette. ("Help Files" of your "10/100 EtherJet PCI Adapter Installation and User's Guide" on page 1-6 describes how to access this information.)
You can use category 3, 4, or 5 cabling at 10 Mbps.
Note: The adapter Ethernet address is printed on a sticker on the edge of the adapter as shown in Figure 2-4. The Ethernet address is sometimes called the Node address or the MAC address. This unique, 12-digit hexadecimal address was stored in the adapter memory at the factory. You can use this address to match the adapter to the slot number when configuring multiple adapters.
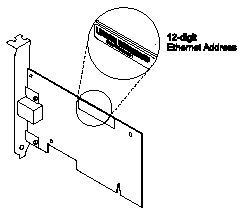
Figure 2-4. Ethernet Address Location
|
Search Keywords |
Ethernet, IBM Adapter Cards | |
|
Hint Category |
Networking, Adapter Cards, Hardware Installation/Configuration | |
|
Date Created |
12-10-98 | |
|
Last Updated |
09-12-98 | |
|
Revision Date |
09-12-99 | |
|
Brand |
IBM Aptiva | |
|
Product Family |
Aptiva | |
|
Machine Type |
2139, 2153 | |
|
Model |
All | |
|
TypeModel |
| |
|
Retain Tip (if applicable) |
| |
|
Reverse Doclinks |