
|
92.788 bytes |
Service Hints & Tips |
Document ID: MNOK-3QHNCX |
Aptiva - How to use Video Quality Slide Bar to adjust performance of Aptiva Video Phone
Applicable to: World-Wide
Note: This procedure allows the resetting of the Aptiva Video Phone for incoming Guest Video Quality. It will reset the video quality that you receive and is shown in the guest video section. Video quality depends upon the speed of the modem, applications running, video window size, and telephone lines. The figures shown below have been modified to better focus on the image details and to shrink the file size.
1. If there is an Aptiva Video Phone icon, double-click on the Aptiva Video phone icon which should open up the Aptiva Video Phone Window.
2. If there is no Aptiva Video Phone Icon, click the "Start" button and go to "Programs", "Aptiva Productivity", "Aptiva Communication Center", and "Ring Central". Click on "Ring Central" to open Ring.
3. When the Ring Central Program Opens up, it should the Ring Central version is at least 3.03.31. The version of 3.00.61 does not support the video software and does not include the software in the Ring Central menu options.
4. Click the Ring Central Menu button. A menu should come up below the menu button with several options. One of the options will be Start Video. This is shown in figure 1 below.
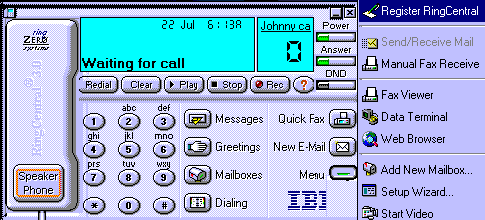
Figure 1. Video Phone on Ring Central Menu
5. Click on the "Start Video" section and the Aptiva Video Phone Window should come up.
6. Click on the "Aptiva Video Phone" menu View Item and a drop down menu should appear. Select the Options Menu selection by clicking on "Options". This should look like Figure 2 below.
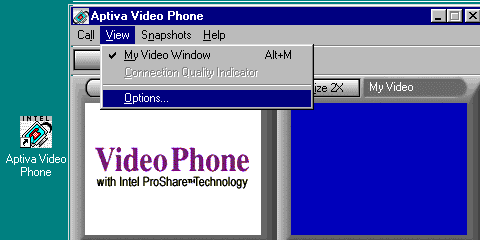
Figure 2. Aptiva Video Phone
7. This will open the Options Window which has numerous tabs. Click on the Video Tab to bring the Video Tab forward. The Video Phone's Windows will look like Figure 3 below.
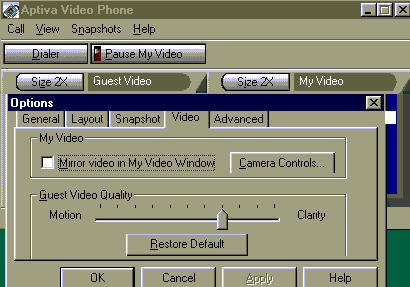
Figure 3. Aptiva Video Phone Video Options
8. In order to improve the video quality, the Guest Video Quality slider must be moved to the right toward clarity. If more motion or frames are required, then the slider can be moved to the left. Click and hold the left mouse button while sliding the slider to the right toward clarity. This should improve the video quality but it is depended upon the phone line and other environmental factors.
9. Click on the "Apply" button.
10. Click the "OK" button to close the Options Window.
11. The video has now been changed. Close and then reopen the program for the changes to take effect.
|
Search Keywords |
| |
|
Hint Category |
Communications Software, Software Installation/Configuration, Video | |
|
Date Created |
07-01-98 | |
|
Last Updated |
08-12-98 | |
|
Revision Date |
08-12-99 | |
|
Brand |
IBM Aptiva | |
|
Product Family |
Aptiva | |
|
Machine Type |
2136, 2137, 2140, 2142, 2159, 2161, 2162, 2176 | |
|
Model |
E10; E11; E12; E13; E14; E15; E16; E20; E21; E22; E23; E24; E25; E26; E27; E30; E31; E32; E33; E34; E35; E36; E40; E42; E44; E45; E46; E54; E55; E56; E64; E65; E66; E03; E05; E06; E10; E11; E12; E13; E14; E15; E16; E17; E1F; E20; E21; E22; E23; E24; E25; E26; E27; E2F; E30; E31; E32; E33; E34; E35; E36; E37; E3F; E40; E41; E42; E43; E45; E46; E47; E4F; E50; E54; E64; E74; E84; L17; L27; L31; L35; L37; L3F; L45; L47; L51; L5H; L61; L6D; L71; LG1; LG2; LQ1; LQ2; LQ3; LV1; LV2; SQ1; SQ2; S34; S35; S36; S44; S45; S46; S57; S61; S62; S67; S6F; S6H; S6S; SG1; SG2; SQ1; SQ2; SV1; SV2; 17R; 18R; S80; S90; 21R; 22R; 24R; 25R; 38R; 460; 461; 462; 471; C3D; C3E; C85; C8E; C8F; C8H; C8M; C8X; C9E; C9F; C9S; C9X; D34; D64; D84; E34 E64; E84; F34; F64; F84; G66; G76; H66; H76; J66; J76; L81; L91; M81; M91; N63; N64; N74; N81; N91; T71; T81; T84; T85; T8B; T8C; T8E; T8F; T94; T95; T9D; T9E; TAE; TAF; 28R; 29R; 30R; 31R; 33R; 35R; 37R; 41R; 54S; 56S; 57S; 58S; B86; B87; B97; D81; D91; E81; E91; G86; G96; G97; H86; H96; P81; P91; Q3C; Q81; Q91; S35; S3C; S8C; S8H; S9C; S9H; S9M; U81; U91; V86; V96; X8C; X9D; 9R2; C6V | |
|
TypeModel |
| |
|
Retain Tip (if applicable) |
| |
|
Reverse Doclinks |