
|
18.284 bytes |
Service Hints & Tips |
Document ID: BMOE-42JGWK |
TP 390,172x - Power system checkout
Applicable to: World-Wide
The following information is intended for IBM Dealers and Authorized Servicers only. Customers attempting to follow any of the procedures below may void their warranty.
Power System Checkout
To verify the symptom of the problem power on the computer using each of the following power sources:
1. Remove the battery ASM.
2. Connect the AC Adapter and check that power is supplied.
3. Disconnect the AC Adapter and install the charged battery ASM; then check that power is supplied by the battery ASM.
If you suspect a power problem, refer the the appropriate power supply check listed below:
Checking the AC Adapter:
You are here because the computer fails only when the AC Adapter is used:
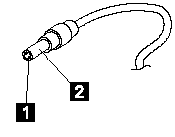
Unplug the AC Adapter cable from the computer and measure the output voltage at the plug of the AC Adapter cable. See the following figure.
|
Pin |
Voltage (V dc) |
|
1 |
+14.5 to +17.0 |
|
2 |
Ground |
Note: An audible noise from the AC Adapter does not always indicate a defective adapter.
Checking the Operational Charging:
To check operational charging, use a discharged battery pack (Battery ASM) or a Battery ASM that has less than 50% of the total power remaining when installed in the computer.
Perform operational charging. If the battery status indicator does not turn on, remove the Battery ASM and let it return to room temperature. Reinstall the Battery ASM.
If the charge indicator still does not turn on, replace the Battery ASM. If the charge indicator still does not turn on, replace the DC-DC & BATT board, then the planar board. Then reinstall the Battery ASM. If the reinstalled Battery ASM is not charged, go to the next section.
Checking the Battery ASM:
Battery ASM charging will not start until the Fuel-Gauge shows that less than 95% of the total power remains; with this condition, the Battery ASM can charge to 100% of its capacity. This protects the Battery ASM from being overcharged or having a shortened life.
Do the following:
1. Power off the computer.
2. Remove the Battery ASM and measure the voltage between battery terminals 1(+) and 7(-). See the following figure:
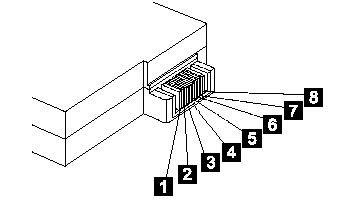
Note: Signal lines, not used in these steps, are used for communications between the system and the battery.
3. If the voltage is less than 10.6V (Li-Ion) or 9.6V (NiMH), the Battery ASM has been discharged, recharge the Battery ASM. If the voltage is still less
than 10.6V (Li-Ion) or 9.6V (NiMH), replace the battery.
4. If the voltage is more than 10.6V (Li-Ion) or 9.6V (NiMH), measure the resistance between battery terminals 5 and 7. The resistance must be 390 ohm (Li-Ion) or 4 to 3K ohm. If the resistance is not correct, replace the Battery ASM. If the resistance is correct, replace the DC-DC & BATT board then the planar board.
|
Search Keywords |
| |
|
Hint Category |
Error Messages | |
|
Date Created |
24-11-98 | |
|
Last Updated |
06-04-99 | |
|
Revision Date |
06-04-2000 | |
|
Brand |
IBM ThinkPad | |
|
Product Family |
ThinkPad 390, ThinkPad 390E, ThinkPad i Series 172x | |
|
Machine Type |
2626, 2627 | |
|
Model |
Various | |
|
TypeModel |
| |
|
Retain Tip (if applicable) |
| |
|
Reverse Doclinks |