
|
11.405 bytes |
Service Hints & Tips |
Document ID: MNOK-3ZXMXJ |
Aptiva - 2138 Removals and replacements - Power supply
Applicable to: World-Wide
BEFORE REMOVING ANY FRU, POWER-OFF THE COMPUTER, UNPLUG ALL POWER CORDS FROM ELECTRICAL OUTLETS, THEN DISCONNECT ANY INTERCONNECTING CABLES.
À Rotate the feet of the system unit inward.
À Position the unit so it lies flat on the table.
À Release the cable tie that secures the power supply cables.
NOTE: Please refer to the note on Bays 1, 2, 3 (5.25-In. Internal/External Bays) on page 4-9.
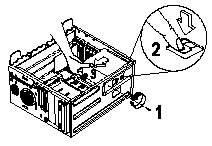
À Remove the screw that secures the power supply to the chassis. See step 1 in the figure below.
À Locate and press the tab on top of the power supply frame. See step 2 in the figure below.
À Firmly hold the power supply frame and pull it toward the front of the system unit. See step 3 in the figure below.

Figure 4- 14 Remove the power supply
À Carefully place the power supply on top of the disk drive frame.
À Detach the power supply from the frame by releasing 4 screws.
|
Search Keywords |
| |
|
Hint Category |
Hardware Installation/Configuration, Power | |
|
Date Created |
05-11-98 | |
|
Last Updated |
09-03-99 | |
|
Revision Date |
09-03-2000 | |
|
Brand |
IBM Aptiva | |
|
Product Family |
Aptiva | |
|
Machine Type |
2138 | |
|
Model |
All | |
|
TypeModel |
| |
|
Retain Tip (if applicable) |
| |
|
Reverse Doclinks |