
|
88.542 bytes |
Service Hints & Tips |
Document ID: MNOK-3T5RCC |
Aptiva - 2140/2142 - How to add/remove video memory
Applicable to: World-Wide
Before removing any FRU, power-off the computer, unplug all power cords from electrical outlets, then disconnect any interconnecting cables.
Attention: The system board, processors, adapter cards, DIMMs, and upgrade processors can be damaged by electrostatic discharge. Use an electrostatic discharge (ESD) strap to establish personal grounding. If you don t have an ESD strap, establish personal grounding by touching a ground point with one hand before touching the static-sensitive FRUs.
Note: Machine Type 2140, 2142 might contain drives and devices not illustrated in this documents. Follow replacement instructions for the same size device if in doubt.
Begin all removals by removing the cover (and rear cover, if applicable).
When other FRUs must be removed prior to removing the failing FRU, they are listed at the top of the page. Go to the removal procedure for each FRU listed, remove the FRU, and then continue with the removal of the failing FRU.
To replace a FRU, reverse the removal procedure and follow any notes that pertain to replacement.
Before disconnecting any cables, note their locations. Reinstall any new FRUs with cables in the same locations.
Use the following instructions to install video memory:
1. Turn off your computer.
2. Remove the tower cover.
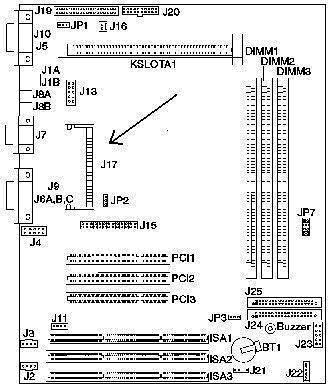
3. Locate the SODIMM socket. The 2140 and 2142 systems use one of two planar boards, but the SODIMM socket is in a similar location on both boards. The SODIMM socket is J17 on systems using the Intel Pentium II processor, and J11 on systems using the Intel Pentium MMX processor.

Figure 1-1. Location of SODIMM Socket on Planar Board

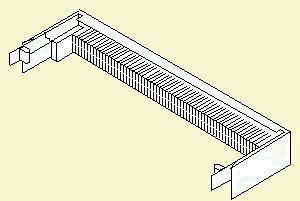
Figure 1-2. SODIMM Socket
4. Insert memory module (The module fits in one direction, due to its shape.) The memory module has the following specifications: 144-pin, 2MB small outline dual inline memory module (SODIMM).
5. Replace tower cover.
6. Press the button to turn the Aptiva computer back on. No software changes are needed after doing the preceding steps.
|
Search Keywords |
| |
|
Hint Category |
Video, Memory, Hardware Installation/Configuration | |
|
Date Created |
01-04-98 | |
|
Last Updated |
10-12-98 | |
|
Revision Date |
10-12-99 | |
|
Brand |
IBM Aptiva | |
|
Product Family |
Aptiva | |
|
Machine Type |
2140, 2142 | |
|
Model |
all | |
|
TypeModel |
| |
|
Retain Tip (if applicable) |
| |
|
Reverse Doclinks |