
|
99.986 bytes |
Product Information |
Document ID: DDSE-3ZURSL |
Netfinity 5000 - Configuration / Setup Utility
Applicable to: World-Wide
Configuration/Setup Utility
For most configurations, the server will operate using the default system settings. You need to change the settings only to resolve configuration conflicts or to enable or change device functions.
When you want or need to change the default settings, the Configuration/Setup Utility program provides a convenient way to display and change the settings.
After you run and exit the Configuration/Setup Utility program, configuration information is stored in nonvolatile random-access memory (NVRAM). While the server is powered off, the configuration information remains available for the next system startup.
Always run the Configuration/Setup Utility program if you add or remove any hardware option, or if you receive an error message instructing you to do so. Review this chapter and the information that comes with the option before making changes. Also, record the current settings before making any changes.
To start the Configuration/Setup Utility program:
1. Turn on the server and watch the screen.
2. When the messages Press F1 for Configuration/Setup and Press F2 for Diagnostics appear, select the action you need. To configure your server, press F1 to select Configuration/Setup Utility.
The Configuration/Setup Utility main menu appears. For information about the menus, see Configuration/Setup Utility Usage.
|
Note |
To run the system diagnostics, press F2 to select Diagnostic Utility.
The Diagnostic Utility main menu appears. For information about running the system diagnostics, see Diagnostic Test Programs.
|
Important |
Configuration/Setup Utility Usage
From the Configuration/Setup Utility program main menu you can select settings you want to change.
Pressing F1 displays Help information for a selected menu item.
|
Notes |
To change configuration settings:
1. Use the Up Arrow key to select the item you want to change; then, press Enter.
2. Select the configuration setting you want to change. Use the Right Arrow or Left Arrow key to highlight the menu, if needed.
3. Use the Right Arrow or Left Arrow key to select the appropriate setting for the selected item.
4. Repeat Steps 1 through 3 for each setting that you want to change. Press Esc to return to the Configuration/Setup Utility main menu.
5. After making changes, you can select:
- Save Settings to save the selected changes.
- Restore Settings to delete the selected changes.
- Load Default Settings to cancel the changes and restore the factory settings.
6. To exit from the Configuration/Setup Utility main menu, select Exit Setup.
7. The system prompts you to confirm your choice. You can return to the Configuration/Setup Utility main menu, or exit.
System Summary: Select this choice to display configuration information, such as the type and speed of the microprocessor, and amount of memory.
Changes that you make to configuration settings appear on this summary screen. You cannot edit the fields.
System Information: Select this choice to display information about your Netfinity 5000.
Changes that you make on other menus might appear on this summary screen.
Product Data: Select this choice to view system information such as the machine type and model, the system serial number, the system board identifier, and the revision level or issue date of the flash electronically erasable programmable ROM (EEPROM) and BIOS.
System Card Data: Select this choice to view the system board model, submodel, system serial number, system board identifier, DASD backplane identifier, and identifiers for power supply 1 and power supply 2.
PCI Routing:
Select this choice to view the interrupt request (IRQ) settings for PCI adapters and for the Ethernet, SCSI, and other controllers on the system board. See PCI Bus Control on page 30 for information about changing the PCI IRQ settings.
Devices and I/O Ports: Software recognizes ports from their port assignments. Each port must have a unique port assignment. The Configuration/Setup Utility program normally handles this, but you might have special hardware or software that requires you to change these assignments.
|
Note |
Select the Devices and I/O Ports choice to view or change the assignments for devices and input/output ports.
You can add serial ports by installing a serial adapter in an expansion slot. See the documentation that comes with the serial adapter for information about port assignments.
You can configure the parallel port as standard, as bidirectional, as an Extended Capabilities Port (ECP), or as an Enhanced Parallel Port (EPP). Bidirectional, ECP, and EPP are all bidirectional modes; in all three modes, data can be both read from and written to a device. ECP and EPP are industry-standard, high-performance bidirectional modes. Which one of these modes you choose depends on what mode your device supports.
|
Note |
You can configure the mouse and diskette controller as enabled or disabled, and configure the type of diskette drive.
You can view the type of video controller and the amount of video memory installed.
You can configure the IDE channel (enabled or disabled) and view the IDE Primary Master Device (type, size, transfer selection and mode, and logical block addressing (LBA) mode).
To display or change the port assignments:
1. Select Devices and I/O Ports.
2. Select a device or port; then, use the Left Arrow or Right Arrow key to advance through the settings available.
Date and Time: Select this choice to set the system date and time.
The system time is in a 24-hour format: hour/minute/second. The system date is in standard format for your country. For example, in the United States, the format is MM/DD/YYYY (Month/Day/Year).
Select Date and Time; then, use the Left Arrow or Right Arrow key to advance through each data field. Type the new information; the system saves the information as you type it.
System Security: To control access to the information in your server, you can implement security features, such as adding passwords and defining a system owner's name that displays during startup. Implementing these security measures helps you to ensure the integrity of the data and programs that are stored in your server.
After setting a power-on password, you can enable the unattended-start mode. This locks the keyboard and mouse, but allows the server to start the operating system. The keyboard and mouse remain locked until you enter the correct password.
To set, change, or delete a password:
1. Select System Security.
2. Select the password that you want to change.
3. Follow the instructions on the screen.
After you have set a power-on or administrator password, you must enter the password whenever you turn on the server. (The passwords do not appear on the screen as you type them.)
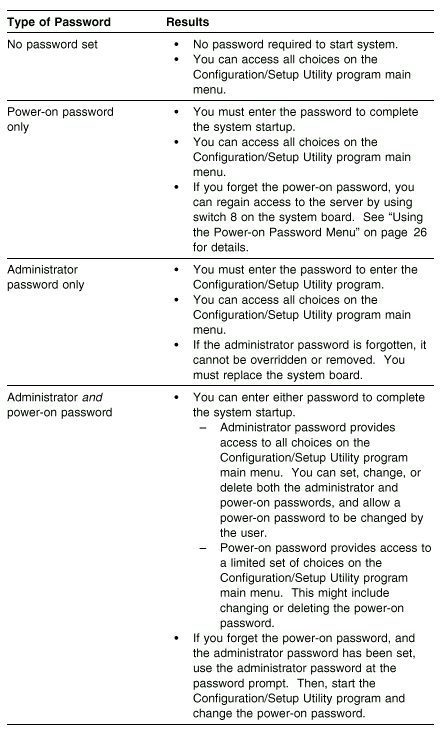
Using the Power-on Password Menu: When a power-on password is set, you must enter a password each time you start the system.
To set a power-on password:
1. Select Power-on Password from the System Security menu; then, press Enter. The Power-on Password menu appears.
2. Type the password in the Enter Power-on Password data field. You can use any combination of up to seven characters (A Z, a z, and 0 9) for your power-on password. Keep a record of your password in a secure place.
3. Move the cursor to the Enter Power-on Password Again data field and type the password again.
|
Note |
4. Select Change Power-on Password to save the new password; then, press Enter.
5. A confirmation window appears. Press Enter to change the power-on password. Press Esc to return to the System Security menu.
When a power-on password is set, POST does not complete until you enter the password. If you forget the power-on password, you can regain access to the server through one of the following methods:
- If an administrator password has been set, enter the administrator password at the power-on prompt (see Using the Administrator Password Menu for details). Start the Configuration/Setup Utility program and change the power-on password as described in steps 1 through 5 above.
Use the Bypass-Power-On-Password switch on the system board to temporarily bypass the power-on password.
1. See Option Installation through Preparing a Tower Model or through Preparing a Rack Model for instructions on powering off the server and removing the cover. Then, refer to the system-board diagram inside your server for the location of the switch block.
2. Locate switch 8 (see System Board Switches).
3. Set switch 8 on the switch block to On, to bypass the power-on password.
4. Restart the server, then start the Configuration/Setup Utility program and change the power-on password as described in steps 1 through 5 above.
5. Turn the server off again.
6. Set switch 8 back to Off.
7. Restart the server.
To delete a power-on password:
1. Select Power-on Password from the System Security menu; then, press Enter. The Power-on Password menu appears.
2. Select Delete Power-on Password; then, press Enter.
3. A confirmation window appears. Press Enter to delete the power-on password. Press Esc to cancel the request and return to the System Security menu.
To allow the server to start in unattended mode when a power-on password is set:
|
Note |
1. Select Power-on Password from the System Security menu; then, press Enter. The Power-on Password menu appears.
2. Select Allow for unattended boot with password. Press the Left Arrow or Right Arrow key to toggle the entry to On. If no power-on password is set on the server, this option has no effect.
Using the Administrator Password Menu: The administrator password (sometimes called a supervisor-level password) controls access to some features of the server, including the Configuration/Setup Utility program.
|
Important |
To set an administrator password:
1. Select Administrator Password from the System Security menu; then, press Enter.
2. Type the password in the Enter Administrator Password data field. A password can contain any combination of up to seven alphanumeric characters (A Z, a z, and 0 9). Keep a record of your password in a secure place.
3. Move the cursor to the Enter Administrator Password Again data field and type the password again.
|
Note |
4. Select Change Administrator Password to save the new password; then, press Enter. The password becomes effective immediately.
To delete an administrator password:
1. Select Administrator Password from the System Security menu; then, press Enter.
2. Select Delete Administrator Password; then, press Enter.
3. A confirmation window appears. Press Enter to delete the administrator password. Press Esc to return to the System Security menu.
To enable a user to change the power-on password:
1. Select Administrator Password from the System Security menu; then, press Enter.
2. Select Power-on password changeable by user. Press the Left Arrow or Right Arrow key to toggle the entry to Yes.
When this choice is enabled, System Security appears on the limited Configuration/Setup menu. The System Security menu contains the Power-on Password choice.
Defining a System Owner's Name: You can specify a system owner's name that displays during POST each time that your server is started. If you set an administrator password, only the administrator can set, change, or delete the system owner's name.
To set the system owner's name:
1. Select System Owners Name from the System Security menu; then, press Enter. The System Owners Name screen appears.
2. Type the name in the Enter System Owners Name String data field. You can use any combination of up to 15 characters and spaces in your system owner's name.
3. Press the Down Arrow (�) key to select the Set or Change System Owners Name data field.
4. Press Enter to set the name or change a previously defined name. To delete the system owner's name, select Delete Stored System Owners Name; then, press Enter.
Start Options: Start options take effect when you start your server.
You can select keyboard operating characteristics, such as the keyboard speed. You also can specify whether the keyboard number lock (NumLock) starts on or off. You also can enable the server to run in disketteless and monitorless operation.
You can specify the startup sequence the server is to use to determine the device from which the operating system loads. For example, you can define a startup sequence that checks for a CD-ROM, then checks an installed hard disk drive, and then checks a network adapter.
|
Attention: If the CD-ROM drive contains a startable CD, you must remove the CD if you want to use a startup sequence that begins with a startable diskette. |
You can enable a virus-detection test that checks at startup for changes in the master boot record. You also can also choose to run POST in the enhanced mode or in the quick mode.
Select Start Options; then, use the Left Arrow (�) or Right Arrow ( ) key to advance through each data field. Advanced Setup: Select Advanced Setup to change values for advanced hardware features, such as cache control, PCI bus control, memory settings, and advanced ISA settings.
|
Note |
Use the Left Arrow or Right Arrow key to highlight the options for the selected menu item.
Core Chipset Control: Select this choice to modify settings that control features of the core chip set on the system board. The chipset control choices are:
|
IOQ Depth |
Use this setting to control the in order queue (IOQ) depth in the system. The value can be varied from 1 to 8. This value should normally be set at 8 (default) |
|
Grant Timers |
Use this setting to enable or disable the grant timer mechanism for each the 5 PCI slots. Enabling this will cause grant to be asserted to a PCI bus agent for a minimum of two clocks. This setting should normally |
|
Note |
Select PCI Bus Control to:
- Change the master latency timer values for PCI bus 0 and PCI bus 1. Specify the system board interrupt routing (IRQs) for
SCSI, Ethernet, video, and USB.
- Specify the slot interrupt routing (IRQs) for PCI slots.
- Enable and disable PCI device types (SCSI, video, Ethernet) and slots. When a PCI adapter is defective, you can use Alt+F1 at startup and then disable the PCI adapter in order to enable the system to start up successfully.
|
Note |
Cache Control: Select this choice to define the microprocessor cache state as enabled or disabled, and to define the microprocessor cache type as Write-back or Write-through.
Selecting write-back mode will provide the maximum system performance.
Memory Settings: Select this choice to view the server banks of memory and to enable or disable selected rows of memory within those banks.
If a memory error is detected during POST or memory configuration, the server can automatically disable the failing row of memory and continue operating with reduced memory capacity. If this occurs, you must manually enable the row of memory after the problem is corrected. Choose Memory Settings from the Advanced Setup menu; then use the the Up Arrow or Down Arrow key to highlight the row that you want to enable. Use the Left Arrow or Right Arrow key to select Enable.
Advanced ISA Settings: Use this selection to set the timer delay for ISA I/O recovery.
Service Processor IRQ Settings: Use this selection to specify the IRQ the system-management processor is to use and to synchronize the service processor clock to the system clock.
Plug and Play: Most adapters designed for PCI slots are Plug and Play devices that are auto-configuring. However, many ISA adapters are not Plug and Play devices and you must allocate the system resources that the adapter will use. Select Plug and Play to identify the available system resources:
Memory
I/O ports
DMA
Interrupt
|
Note |
Select Plug and Play; then, use the Up Arrow and Down Arrow key to highlight the system resource that you want to change. Use the Left Arrow or Right Arrow key to toggle from Plug and Play to ISA Legacy for the selected menu choice.
Error Log: Select Error Log to view the three most recent power-on self-test (POST) errors the system has generated, or to view the system error log. You can clear both error logs from this screen by selecting Clear Error Logs.
Configuring PCI Features and Options: PCI devices automatically communicate with the server configuration information. This usually results in automatic configuration of a PCI device. If a conflict does occur, see Resolving Resource Conflicts on page 50. Multiple-function PCI adapters use more than one interrupt. When you install one of these adapters, review the IRQ assignments in the Configuration/Setup utility programs (see PCI Bus Control on page 30). Verify that the IRQ
assignments are correct. Your Netfinity 5000 server uses a rotational interrupt technique to configure PCI adapters. This technique enables you to install a variety of PCI adapters that currently do not support sharing of PCI interrupts. For information on manually overriding the interrupt setting, see PCI Bus Control.
|
Search Keywords |
| |
|
Document Category |
Configuration | |
|
Date Created |
02-11-98 | |
|
Last Updated |
06-01-99 | |
|
Revision Date |
06-01-2000 | |
|
Brand |
IBM PC Server | |
|
Product Family |
Netfinity 5000 | |
|
Machine Type |
8659 | |
|
Model |
ALL | |
|
TypeModel |
| |
|
Retain Tip (if applicable) |
| |
|
Reverse Doclinks |