
|
80.171 bytes |
Service Hints & Tips |
Document ID: MNOK-3QHMZM |
Aptiva/ThinkPad - How to reinstall Dial-Up Networking and setup TCP/IP in Windows 95
Applicable to: World-Wide
Reinstalling Dial-Up Networking (DUN)
1. From the Windows 95 desktop, click Start->Settings->Control Panel, and then double-click the Add/Remove Programs icon.
2. Click the Windows Setup tab. A white "Components" list box will be displayed. Double-click on the word Communications.
3. Another screen will appear with a "Components" list box showing all the Windows 95 communications components (see Figure 1). Click once on the checkbox next to Dial-Up Networking (DUN) to remove the check from the box.
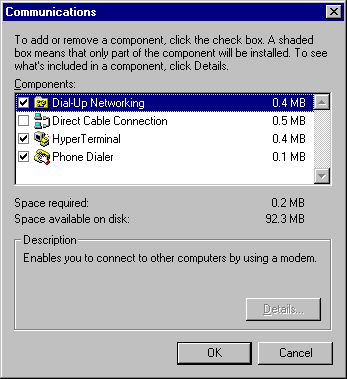
Figure 1: Communications page of Add/Remove Programs
4. Click OK at the bottom of the "Communications" screen, and then click OK again on the following screen. The system will take a few seconds to remove the DUN software from your system. When it has finished removing the files, the uninstall process is complete.
5. To reinstall the DUN software, double-click the Add/Remove Programs icon, and then click the Windows Setup tab to display the list of available components.
6. Double-click on Communications in the "Components" listbox. A listbox showing the available communications components will appear.
7. Click once in the checkbox next to Dial-Up Networking to place a check back in the box.
8. Click OK at the bottom of this page, and again on the following screen. Windows will copy the DUN files back to their correct locations on the hard disk and update the startmenu. When the copy operation is complete, click OK to close the Add/Remove Programs applet.
9. A message box will appear stating that you will need to restart Windows before using DUN, click OK. A "System Settings Change" box will appear asking if you want to restart Windows now. Click YES.
10. Windows will restart. DUN has now been reinstalled.
Setting up TCP/IP
Windows 95 Dial-Up Networking can be used to establish TCP/IP connections to Internet Service Providers (ISPs), or other online providers. Most of the information required to configure this type of connection will need to be provided by your ISP, but the information below outlines the first few steps of the procedure.
1. Double-click the My Computer icon on the Windows 95 desktop. Inside the "My Computer" folder, double-click the Dial-Up Networking icon.
2. Double-click the Make New Connection icon. A "Make New Connection" screen will appear. Type a name (this value is arbitrary) in the name field, and make sure your modem is selected in the Select a modem listbox. Click Next.
3. The following screen will prompt you for the area and phone number of your online provider. You will need to enter the number you need to dial to connect to your provider here. When you have entered the phone number, click Next.
4. Click Finish on the informational screen that appears. An icon for your new connection will appear in the DUN folder.
5. To complete the TCP/IP setup, right-click the icon for your new connection and click Properties from the pop-up context menu. A properties sheet will appear for your connection, click Server Type.
6. A Server Type screen similar to Figure 2 will appear. Your ISP, or online provider will need to provide you with the correct settings for this screen.
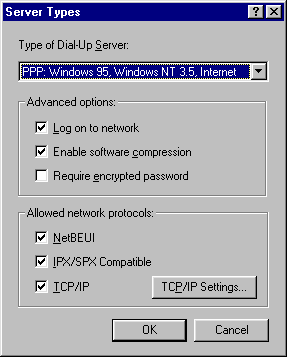
Figure 2: Server Types settings screen. These values will be determined by your ISP.
7. Click TCP/IP Settings. A screen similar to Figure 3 will appear. Your online provider will need to provide you with the correct values for each of these fields.
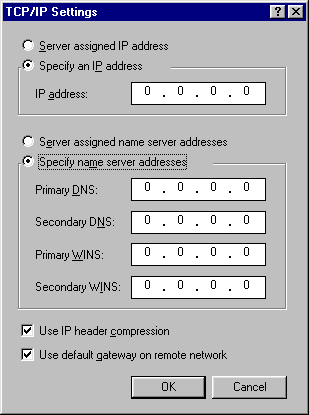
Figure 2: TCP/IP Settings screen. These values will be determined by your ISP.
8. Your online provider may require you to modify settings in other locations as well. TCP/IP setups will be unique for each DUN connection, and will always be determined by the online provider.
|
Search Keywords |
| |
|
Hint Category |
Communications Software, Software Installation/Configuration, Windows 95 | |
|
Date Created |
07-01-98 | |
|
Last Updated |
04-05-99 | |
|
Revision Date |
06-05-2000 | |
|
Brand |
IBM Aptiva, IBM ThinkPad | |
|
Product Family |
Aptiva, ThinkPad 310, ThinkPad 315, ThinkPad 365X/XD, ThinkPad 365C/CS, ThinkPad 365CD/CSD, ThinkPad 365E/ED, ThinkPad 380, ThinkPad 380D, ThinkPad 380E, ThinkPad 380ED, ThinkPad 380XD, ThinkPad 385D, ThinkPad 385E, ThinkPad 385ED, ThinkPad 385XD, ThinkPad 560, ThinkPad 560E, ThinkPad 560X, ThinkPad 600, ThinkPad 701, ThinkPad 755CE/CSE, ThinkPad 755CX, ThinkPad 755CV, ThinkPad 755CD, ThinkPad 755CDV, ThinkPad 760C, ThinkPad 760E, ThinkPad 760CD, ThinkPad 760L/LD, ThinkPad 760ED, ThinkPad 760XD, ThinkPad 760EL/ELD, ThinkPad 760XL, ThinkPad 765L, ThinkPad 765D, ThinkPad 770, ThinkPad 770E/ED, ThinkPad 380Z, ThinkPad 560Z, ThinkPad 770X, ThinkPad 600E, ThinkPad 390, ThinkPad 770Z, ThinkPad 390E, ThinkPad 570 | |
|
Machine Type |
2134, 2137, 2140, 2142, 2144, 2159, 2161, 2162, 2168, 2176, All, 2136 | |
|
Model |
351; 353; 361; 440; 445; 446; 6R6; C21; E03; E05; E06; E17; E1F; E2F; E3F; E41; E47; E4F; E50; E74; L3F; L51; L5H; L61; L6D; L71; LG2; LQ1; LQ2; LQ3; LV2; S34; S36; S44; S45; S46; S57; S61; S62; S67; S6F; S6H; S6S; SG1; SG2; SQ1; SQ2; SV1; 2R5; 2R7; 2R8; 3R4; 3R6; 4R1; 5R1; 6R3; A10; A12; A14; M31; M51; M52; M63; 13R; 14R; 15R; 16R; 17R; 18R; 19R; 20R; B60; B65; B75; B80; B85; B95; S66; S76; S78; S7H; S80; S90; 21R; 22R; 24R; 25R; 38R; 460; 461; 462; 471; C3D; C3E; C85; C8E; C8F; C8H; C8M; C8X; C9E; C9F; C9S; C9X; D34; D64; D84; E84; F34; F64; F84; G66; G76; H66; H76; J66; J76; L81; L91; M81; N63; N64; N74; N81; N91; T81; T84; T85; T8B; T8C; T8E; T8F; T94; T95; T9D; T9E; TAE; TAF; 28R; 29R; 30R; 31R; 33R; 35R; 37R; 41R; 54S; 56S; 57S; 58S; B86; B87; B97; D81; D91; E81; E91; G86; G96; G97; H86; H96; P81; P91; Q3C; Q81; Q91; S35; S3C; S8C; S8H; S9C; S9H; S9M; U81; U91; V86; V96; X8C; X9D; 2R9; 3R1; 3R3; 3R5; 3R7; 3R9; 4R0; 4R2; 4R3; 4R9; 5R2; 5R3; 5R5; 5R6; 5R8; 5R9; 6R0; 6R4; 6R5; A15; A40; A44; A45; A50; A51; A52; A90; A92; A94; M41; M53; M55; M56; M57; M61; M62; M71; M72; M91; 6R8; 6R9; 7R0; 7R1; 7R2; 7R3; 7R6; 7R7; 7R9; 8R1; 8R6; 8R8; 9R1; 9R4; C23; C31; C32; C33; C35; C53; C55; C65; C66; C67; C6D; C6V; C6Y; C6Z; C73; C77; F23; F31; F35; All; J31; J3A; J3X; J51; J52; JDA; JSN; K01; K21; K22; K23; K31; K32; K52; K62; L01; L21; L22; L23; L31; L32; L52; L6T; P01; P21; P22; P23; P31; P32; P52; P62; E10; E11; E12; E13; E14; E15; E16; E20; E21; E22; E23; E24; E25; E26; E27; E30; E31; E32; E33; E34; E35; E36; E40; E42; E44; E45; E46; E54; E55; E56; E64; E65; E66; L35; L45; S64; S74; 352; 354; 355; 356; 362; 363; 364; 372; 374; 381; 382; 384; 392; 442; 443; 447; 449; 454; 9R2; 9R3; 9R5; 9R6; C3X; C5X; C6B; C6E; C6X; C7X; F32; F33; F67; F6B; H54; H55; H56; H5E; H5F; H64; H65; H6D; H6E; H6F; H7E; H7F; H7G; J33; J35; J3C; J3E; J3K; J3L; J3V; J3W; J3Y; J3Z; JCL; L62; T01; T33; T34; T62; T63; T65; T71; V34; V65; V71; W33; W55; W65; X01; X31; X33; X34; X52; X62; X63; X65; X71; Y01; Y04; Y31; Y33; Y34; Y52; Y62; Y63; Y65; Y71; Z01; Z31; Z33; Z34; Z62; Z63; Z65; Z71; E37; K53; K74; L53; P53 | |
|
TypeModel |
| |
|
Retain Tip (if applicable) |
| |
|
Reverse Doclinks |