
|
166.245 bytes |
Service Hints & Tips |
Document ID: BMOE-3Q8PK3 |
Aptiva - How to remove and reinstall a hard drive
Applicable to: World-Wide
Before removing any part, power-off the computer, unplug all power cords from electrical outlets, then disconnect any interconnecting cables. Begin all removals by removing the cover (and rear cover, if applicable). To replace a part, reverse the removal procedure and follow any notes that pertain to replacement. Before disconnecting any cables, note their locations. Reinstall any new parts with cables in the same locations.
Attention: Some computer parts are sensitive to static discharge. Use an electrostatic discharge (ESD) strap to establish personal grounding. If you donÆt have an ESD strap, establish personal grounding by touching the bare metal frame of your system unit to dissipate the static electricity from your body. Do not touch any of the components inside the frame before you touch the frame. Do not touch any component with a voltage warning label.
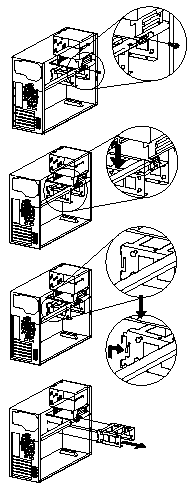
2134, 2144 models (desktop)
Remove cover from computer:
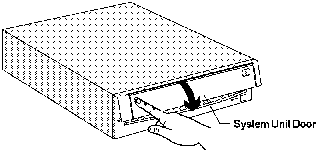
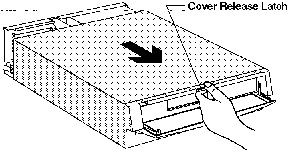
Push in on the door - Pull out on the cover.
The hard drive is located underneath the CD ROM drive. As you face the computer, it is at the front right area of the computer.
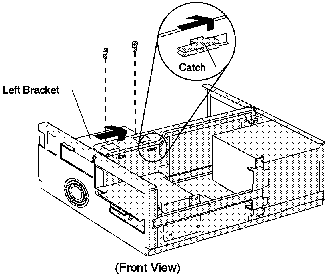
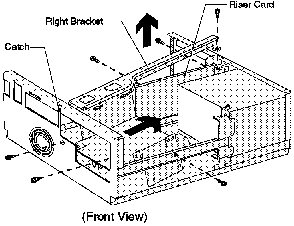
Left Drive Support Bracket - Right Drive Support Bracket
Remove cables from drives. Remove bracket screws and lift out bracket with drives attached.
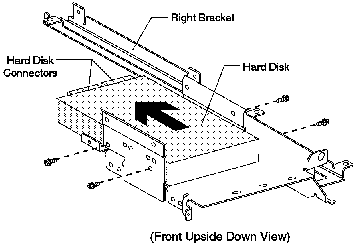
Hard Disk Drive Bay
Remove screws from hard drive bracket and remove hard drive.
Install new hard drive and follow above procedures in reverse order. The new hard drive may need to be partitioned with
Fdisk, Formatted and reloaded with software.
2136, 2137, 2159, 2162, 2168 models (tower)
Remove cover from computer:
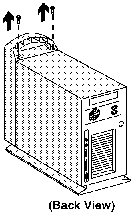

Remove the screws - Pull out on the cover.
The hard drive is located at the rear top of the computer. It is mounted on top of the power supply.
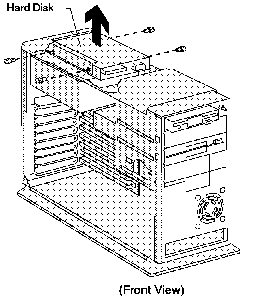
Disconnect cables from drive.
Remove the screws.
Lift out the Hard disk drive.
Install new hard drive and follow above procedures in reverse order. The new hard drive may need to be partitioned with
Fdisk, Formatted and reloaded with software.
2140, 2142 models
Remove service panel:
Pull out on the rear tab to release the side service panel.
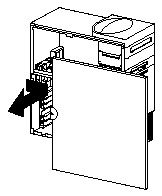
3 1/2 inch Cage
The hard disk drive is located in the bottom bay of the 3 1/2 inch cage. The data cable is a flat, grey cable containing 40 small wires. It is also known as a 'ribbon' cable because of its configuration. Each cable can be gripped between the thumb and forefinger, on each side of the cable, close to the plug. The wire can then be worked out of its socket toward the front of the computer.
Remove 2 screws from each side of the 3 1/2 inch Cage and remove hard drive.
Install new hard drive and follow above procedures in reverse order. The new hard drive may need to be partitioned with Fdisk, Formatted and reloaded with software.
Reseat cables in the reverse order. Ensure that each plug is seated securely into its socket. Replace cover on computer.
|
Search Keywords |
| |
|
Hint Category |
Hard Drives, Hardware Installation/Configuration | |
|
Date Created |
29-12-97 | |
|
Last Updated |
08-12-98 | |
|
Revision Date |
07-12-99 | |
|
Brand |
IBM Aptiva | |
|
Product Family |
Aptiva | |
|
Machine Type |
2134, 2136, 2137, 2138, 2140, 2142, 2144, 2159, 2161, 2162, 2168, 2176 | |
|
Model |
All | |
|
TypeModel |
| |
|
Retain Tip (if applicable) |
| |
|
Reverse Doclinks |