
|
62.683 bytes |
Service Hints & Tips |
Document ID: PMYS-3LLMXW |
Aptiva - 2137 Power supply
Applicable to: World-Wide
BEFORE REMOVING ANY FRU, POWER-OFF THE COMPUTER, UNPLUG ALL POWER CORDS FROM ELECTRICAL OUTLETS, THEN DISCONNECT ANY INTERCONNECTING CABLES.
1. Disconnect all cables necessary before removal (note location of cables).
2. Release the power supply cable tie.
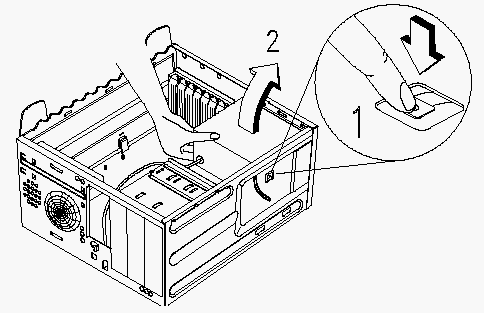
3. Press the tab (1) located on top of the housing frame just above the power supply.
4. Gently swing (2) the power supply outward to detach it from the chassis.

5. Detach the power supply from the frame by releasing 4 screws.
NOTE: Replace the power supply
1. Insert the power supply into the power supply frame and secure with four original screws.
2. Reconnect the power supply cable tie to the chassis.
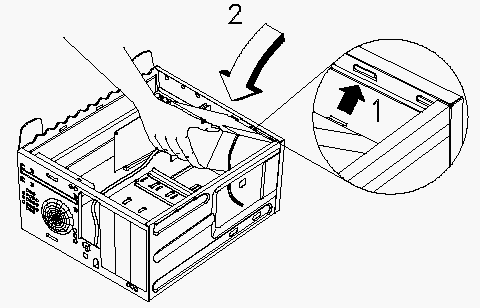
3. Insert the three notches (1) of the power supply frame into its corresponding cut-away openings on the chassis.
4. Align the top rails and slide (2) in to lock.
5. Reconnect the cables to their original slots and devices.

|
Search Keywords |
| |
|
Hint Category |
Hardware Installation/Configuration, Power | |
|
Date Created |
04-09-97 | |
|
Last Updated |
15-12-98 | |
|
Revision Date |
14-12-99 | |
|
Brand |
IBM Aptiva | |
|
Product Family |
Aptiva | |
|
Machine Type |
2137 | |
|
Model |
All | |
|
TypeModel |
| |
|
Retain Tip (if applicable) |
| |
|
Reverse Doclinks |