
|
75.421 bytes |
Service Hints & Tips |
Document ID: BMOE-42JPF7 |
TP 390,1720 - Running Diagnostics
Applicable to: World-Wide
The following information is intended for IBM Dealers and Authorized Servicers only. Customers attempting to follow any of the procedures below may void their warranty.
Running the Diagnostics
The Diagnostic Program Diskette contains the following seven programs:
To download the PQA Diagnostics diskette, click here.
PQA System Diagnostics
Attention: Before running the PQA Diagnostic Program, make sure that the write enable tab of the Diagnostic Program Diskette is set to enable.
Note: Some test items require tools as shown below:
Boot from the Diagnostic Program Diskette and select PQA System Diagnostics Program from PC DOS 7.0 Startup Menu. The PQA main menu appears on the screen.
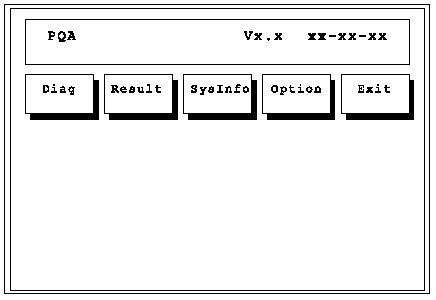
Press the left and right arrow keys to move around the main menu. Press Enter to enable the selected option.
The main options are Diag, Result, SysInfo, Option and Exit.
The Diag option lets you select testing items and testing times.
The following screen appears when you select Diag from the main menu.
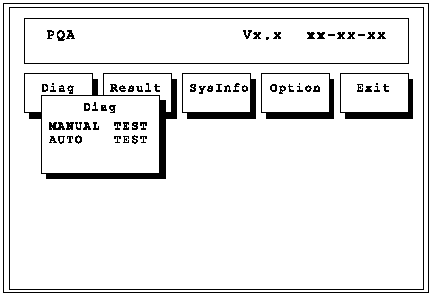
This screen allows you to specify the number of tests to perform. The options are as follows:
The screen below appears if you select Auto Test.
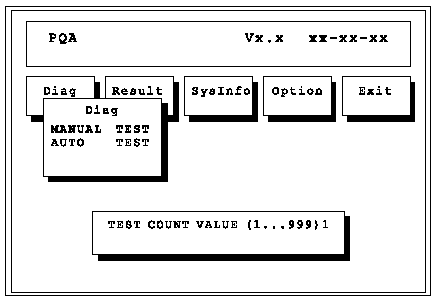
Specify the desired number of tests and press Enter.
After you specify the number of tests to perform, the screen shows a list of test items (see below).
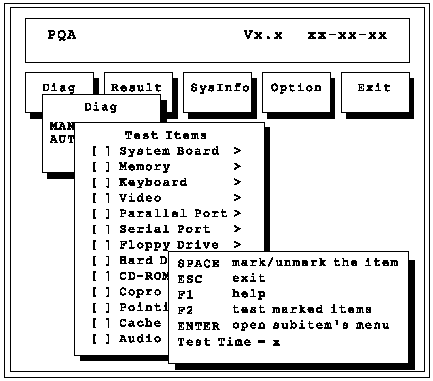
Press the up and down arrow keys to move the highlight bar from one item to another. Press Space to enable or disable the item. The > mark indicates that there are available sub-options. Press Enter to view the available sub-options of each selected item. Press Esc to close the submenu.
The right corner screen information gives you the available function keys and the specified test number.
PQA Diagnostic Program Error Codes and Messages
|
Error Code |
Message |
FRU/Action in |
|
16XX |
Backup battery error |
Backup battery (RTC) |
|
1XXX |
CPU or planar board error |
|
|
2XXX |
Memory error |
|
|
3XXX |
Keyboard error |
|
|
4XXX |
Video error |
Planar board |
|
5XXX |
Parallel port error |
Planar board |
|
6XXX |
Serial port or planar board error |
Planar board |
|
7XXX |
Diskette drive error |
|
|
8XXX |
Hard disk error |
|
|
9XXX |
CD-ROM error |
|
|
10XXX |
CPU or planar board error |
|
|
11XXX |
Pointing device error |
|
Attention: You should execute this program two times (one for internal and the other for external speakers) to verify if the system's audio function is in working order.
PCMCIA WrapCard Test
Boot from the Diagnostic Program Diskette and select PCMCIA WrapCard Test from PC DOS 7.0 Startup Menu. Follow the instructions on the screen to run the PCMCIA test.
The green LED on the PC test card lights up when the PCMCIA test is running. If the LED does not light up, check whether the card is installed correctly by reseating
the card. If it still does not light up after it is reseated, try using another slot for the test. If the LED still does not turn on and the test fails, replace the FRU shown by the diagnostic error code.
Modem Dial and Data Transfer Test
Boot from the Diagnostic Program Diskette and select Modem Dial and Data Transfer Test from PC DOS 7.0 Startup Menu. Follow the instructions on the screen to execute modem test. If the test fails, go to "Modem Board Checkout".
Note: A telephone line is required for completing the modem test.
FIR Data Transfer Test
Boot from the Diagnostic Program Diskette and select Running FIR Data Transfer Test from PC DOS 7.0 Startup Menu. Follow the instructions on the screen to
execute FIR test.
USB Connect/Disconnect Test
Boot from the Diagnostic Program Diskette and select Running USB Connect/Disconnect Test from PC DOS 7.0 Startup Menu. Follow the instructions on the screen to execute the USB test.
Fan Diagnostics
The system is equipped with sensors to protect against system overheating. By setting the video controller and processor thermal thresholds, the system can turn on the cooling Fan ASM or shut down automatically when temperatures reach the defined threshold parameters. Systems experiencing frequent auto sensor shutdown may need to reset the thermal sensor threshold (refer to "Setting the Thermal Sensor" ) and execute the fan test to ensure the cooling Fan ASM is operating normally.
Follow the steps below to use the Fan Diagnostics program:
1. Boot from the Diagnostics Program Diskette.
2. Select Fan Diagnostics from PC DOS 7.0 Startup menu.
3. Follow the instructions on the screen to execute the fan diagnostics.
Note: If the test fails, try reseating the Fan ASM connector or replacing the Fan ASM.
|
Search Keywords |
| |
|
Document Category |
Hardware Maintenance Information | |
|
Date Created |
24-11-98 | |
|
Last Updated |
27-01-99 | |
|
Revision Date |
05-01-2000 | |
|
Brand |
IBM ThinkPad | |
|
Product Family |
ThinkPad 390, ThinkPad i Series 172x | |
|
Machine Type |
2626, 2627 | |
|
Model |
Various | |
|
TypeModel |
| |
|
Retain Tip (if applicable) |
| |
|
Reverse Doclinks |