
|
359.820 bytes |
Service Hints & Tips |
Document ID: GSMH-3BNJRX |
TP 701C/CS - FRU Removals And Replacements
Applicable to: World-Wide
FRU Removals and Replacements:
This section contains information about removals and replacements.
Follow the numerical sequence in 'Disassembling the TP701C/CS.—and the three exploded views to remove or disconnect parts in the correct order. Reverse the numerical sequence to replace FRUs. Note exceptions and special instructions for replacement throughout the FRU removal procedure.
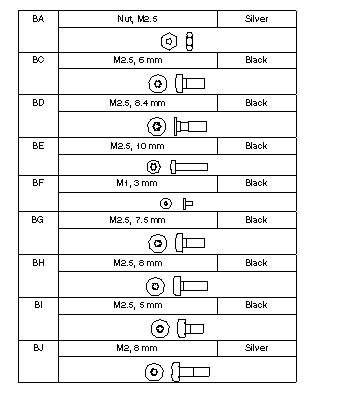
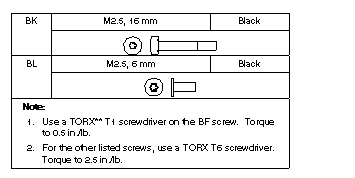
The letters in parentheses in the list indicate screw types. Consult the following screw size chart to match the letters to the correct screw type and size before replacing each screw.
Safety Notice 8:
Before removing any FRU, power-off the computer, unplug all power cords from electrical outlets, remove the battery pack, then disconnect any interconnecting cables.
Safety Notice 1:
Before the computer is powered-on after FRU replacement, make sure all screws, springs, or other small parts are in place and are not left loose inside the computer. Verify this by shaking the computer and listening for rattling sounds. Metallic parts or metal flakes can cause electrical shorts.
Note:
Before removing any FRU, remove any attached devices, including the , the diskette drive and diskette drive cable, and Multiport II if they are attached.
Safety Notice 2:
Some standby batteries contain a small amount of nickel and cadmium. Do not disassemble it, recharge it, throw it into fire or water, or short-circuit it. Dispose of the battery as required by local ordinances or regulations. Use only the battery in the appropriate parts listing when replacing the RTC or backup battery. Use of an incorrect battery can result in ignition or explosion of the battery.
Disassembling the TP701C/CS:
This procedure provides the steps required to completely disassemble the TP701C/CS.
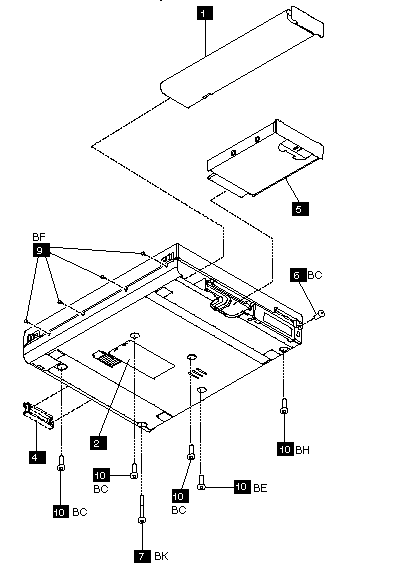
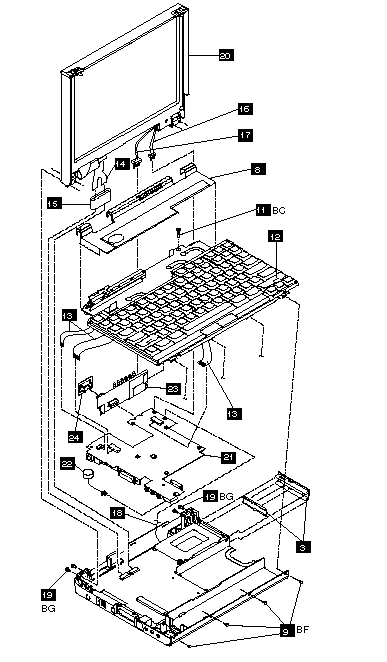
The three exploded views show the parts of the computer that are removed at various stages of the disassembly process. The numbered callouts in the figures correspond to steps in the procedure.
TP701C/CS Exploded View:
TP701C/CS Exploded View:
TP701C/CS Exploded View:
If you follow all of the steps in this procedure, you completely disassemble the .
However, for some replacement operations, you may not need to completely disassemble the. In those situations, the relative sequence of steps in this procedure is important. Some FRUs must be removed to reach the failing FRU, or to make it easier to work with another FRU.
This procedure contains instructions for the following:
- Removing the Keyboard Cover
- Removing the Keyboard
- Separating the Display and Base Units
- Removing the Top System Board and Inverter Card
- Removing the Bottom System Board and Modem
- Taking Apart the Base Assembly
1. Remove the battery shown in the figure.
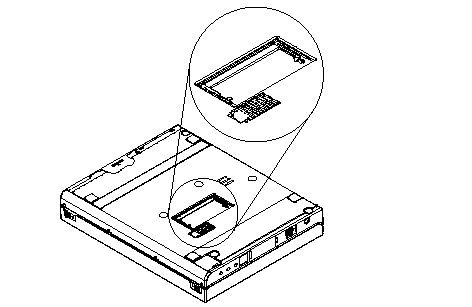
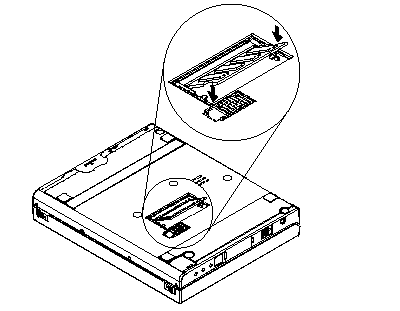
2. Remove the SO-DIMM cover and any installed SO-DIMM cards, shown in the figure.
See żRemoving and Replacing the SO-DIMM Card— for more detailed information.
3. Remove the PCMCIA cover and filler plug shown in the figure. Remove any installed PCMCIA cards.
See żRemoving PCMCIA. Cards— for more detailed information.
4. Remove the parallel port cover, shown in the figure.
Warning:
Do not drop or apply any shock to the hard disk drive. The hard disk drive is sensitive to physical shock. Incorrect handling can damage it and cause permanent loss of data on the hard disk. Before removing the hard disk drive, have the user make a backup copy of all the information on the hard disk. Never remove the hard disk drive while the system is operating or while it is in Suspend mode.
5. Remove the hard disk drive, shown in the figure.
Note:
Remove the hard disk drive by inserting a coin in the slot and twisting until the hard disk drive. is unseated. Do not apply any extra force to the hard disk drive when removing it.
Removing the Keyboard Cover:
6. Remove the screw (BC) located on the right side toward the back of the computer,shown in the figure.
7. Remove the screw (BK) located on the rear bottom left of the computer shown in the figure.
8. Open the computer lid all the way (180 Degrees ) and remove the keyboard shelf, shown in the figure.
To release the keyboard shelf from the base assembly:
1. Gently pull up on the right side of the keyboard shelf.
2. Insert a tool into the slots on the back of the computer and gently push in to release the tabs holding in the shelf.
Removing the Keyboard:
9. Remove the four screws (BF) located on the front, below the keyboard, shown in the figures.
10. Remove the five remaining screws from the bottom of the base. (For the screw types that are removed in this step, see the figure.)
Replacement:
Warning:
When you reinstall the screws, be careful when tightening the middle screw toward the rear of the computer. If you tighten the screw too much you can break the plastic base. If you are using an electric screwdriver, set it to a low or sensitive setting to prevent breakage.
11. Remove the screw (BC) located below the right hinge.
Replacement:
When you replace the screws in the base and the keyboard shelf, perform the steps in the following order:
1. Replace the screw (BC) in step (11) shown in the figure. Do not tighten the screw until the front keyboard screws are in place.
2. Replace the keyboard shelf.
3. Replace the front keyboard screws in step (9) shown in the figure.
4. Tighten the BC screw.
5. Replace the screws in step 10.
12. Remove the keyboard, shown in the figure.
To remove the keyboard, push it backward slightly, and then pull it up, then forward and out.
Replacement:
When you reinstall the keyboard, follow these steps:
Warning:
When you reinstall the keyboard, be careful not to damage the keyboard cables by pinching or crushing them.
1. Attach the three flat cables.
2. Tilt the front of the keyboard up and push the rear of the keyboard toward the back of the computer.
3. Press the keyboard down.
4. Pull the keyboard slightly forward to engage the latches located at the back right, and in the middle of the left and right sides.
Warning:
Do not pull out the cable before releasing the sliding latch connector.
13. Detach the three keyboard cables from the top system board shown in the figure.
The keyboard cables use zero insertion force (ZIF) connectors. Instructions for working with ZIF connectors:
To detach the cables, pull out the small sliding latch under each cable using a small tool to pull on each side. Try to pull the latch out incrementally on each side, or pull out both sides simultaneously.
Replacement:
When you reinstall cables in ZIF connectors, insert the cable connector end, metal side facing up, into the connector, and then gently push in each sliding latch to secure the cable. Do not twist the cables.
Warning:
Do not pull out the cable before releasing the sliding latch connector.
Separating the Display and Base Units:
14. Detach the LCD cable shown in the figure. Slide up the ferrite core on the cable to reach the latches.
The LCD cable uses ZIF connectors.
Replacement: For information about reconnecting the LCD cable, see 'Replacing the LCD Assembly—.
15. Remove the ferrite core from the LCD cable shown in the figure.
Replacement: For information about replacing the ferrite core, see 'Replacing the LCD Assembly—.
16. Detach the microphone cable from the top system board, shown in the figure. Replacement: Make sure that the two aluminum spacers are in place. After you reattach the microphone cable, place any excess cable behind the PCMCIA slot assembly. For information on routing the backlight cable, see 'Routing the Backlight Cable—.
17. Detach the LCD backlight cable from the inverter card, shown in the figure.
Replacement: For information on routing the backlight cable, see 'Routing the Backlight Cable—.
18. Detach the speaker cable from the top system board, shown in the figure.
Replacement:
After you reattach the speaker cable, place any excess cable behind the PCMCIA slot assembly.
19. Remove the four hinge screws (BG) shown in the figure.
Close the computer lid before removing the screws.
20. Remove the LCD assembly, shown in the figure.
Replacement:
See 'Disassembling the LCD Assembly— for instructions on FRU removals and replacements for the LCD assembly. See
'Replacing the LCD Assembly— for instructions on replacing the LCD assembly.
Removing Top System Board and Inverter Card:
21. Remove the top system board and the attached standby battery and inverter card, shown in the figure. Reuse the rubber spacers. Separate the metal spacers between the top and bottom system boards. Gently pull up the front of the top system board and insert a tool at the slot located near the battery connector. Press down with the tool and gently pry up to detach the top system board from the bottom system board.
Replacement:
See 'Replacing the Top System Board— for information about replacing the top system board.
Safety Notice 3:
The battery pack contains small amounts of nickel. Do not disassemble it, throw it into fire or water, or short-circuit it. Dispose of the battery pack as required by local ordinances or regulations. Use only the battery in the appropriate parts listing when replacing the battery pack. Use of an incorrect battery can result in ignition or explosion of the battery.
22. Remove the Standby Battery, shown in the figure.
Replacement:
When you replace the standby battery, fold the cable and place the standby battery in the space beside the battery pack connector .
To avoid shock, do not remove the plastic cover that surrounds the lower portion of the inverter card.
23. Remove the inverter card from the top system board, shown in the figure.
24. Remove the infrared window from the inverter card, shown in the figure. Removing Bottom System Board and Modem
25. Remove the screw (BL) holding in the bottom system board, shown in the figure.
26. Remove the two screws (BC) located on the docking connector shown in the figure.
Replacement: When you replace these screws, use the following order:
1. Install one docking connector screw.
2. Install the bottom system board screw (from step 25 ).
3. Install the other docking connector screw.
Safety Notice 4:
The backup battery is a lithium battery and can cause a fire, explosion or severe burn. Do not recharge it, remove its polarized connector, disassemble it, heat it above 100 degrees C (212 degrees F), incinerate it, or expose its cell contents to water. Dispose of the battery as required by local ordinances or regulations. Use of an incorrect battery can result in ignition or explosion of the battery. Replacement batteries can be ordered from IBM or IBM Authorized Dealers.
27. Remove the bottom system board and the attached modem shown in the figure.
To remove the bottom system board, push in lightly on the modem connector to free it from the base. Make sure that the modem connector has been freed from its slot in the base before removing the bottom system board.
Replacement:
When you replace the bottom system board, keep the speaker cable toward the rear of the computer.. Do not leave it folded under the bottom system board. Reuse the rubber spacers.
28. Remove the two bolts (BJ) and nuts (BA) holding the PCMCIA slot assembly to the bottom system board, shown in the figure.
29. Remove the PCMCIA slot assembly, shown in the figure.
30. Remove the modem shown in the figure.
The modem is held in place with an adhesive gasket. You may need to pry gently on the modem to remove it from the bottom system board. When you reinstall the modem, you may need to apply a new adhesive gasket.
Taking Apart the Base Assembly:
31. Remove the power switch cover, shown in the figure.
Warning:
The speaker can magnetize metal and corrupt a diskette.
Warning:
A scratch can damage the speaker. Be careful not to damage it with screwdrivers, screws, or other objects.
32. Remove the speaker, shown in the figure.
After you have removed the speaker, carefully remove any metal particles that might have flaked off.
33. Remove the adhesive gasket shown in the figure.
Replacement:
Follow these steps in order:
1. Remove the old adhesive gasket and applya new one to the base.
2. With the front of the base facing you, rotate the speaker so that the speaker wires are at 'one o'clock,— then attach the speaker to the gasket.
3. Position the speaker cable under the bottom system board and between the inverter card and the top system board to the connector on the top system board.
34. Remove the screen over the speaker, shown in the figure. If the screen over the speaker is damaged, replace it.
Disassembling the LCD Assembly:

Safety Notice 5:
If the LCD breaks and the fluid from inside the LCD gets into your eyes or on your hands, immediately wash the affected areas with water for at least 15 minutes. Seek medical care if any symptoms from the fluid are present after washing.
1. Remove the two bottom screws (BH).
2. Remove the left hinge cover (cam).
3. Remove the four bezel screws (BD).
4. Carefully unsnap the T-shaped snaps along the bottom edge of the bezel, and lift it out.
Be sure to use the correct replacement bezel for the LCD. The TFT bezel has adhesive on its top side wall. When you install a new TFT bezel, remove the backing first.
5. Remove the microphone.
6. Remove the backlight cable protective sleeve.
Replacement:
For detailed information about replacing the microphone and sleeve, see 'Replacing the Microphone and Sleeve—.
7. Remove the LCD. When you replace the LCD, be sure to replace it with the correct type of LCD (STN or TFT).
8. Remove the LCD cable from the LCD.
9. Remove the latches from the bezel.
10. Remove the latch springs from the latches.
Replacement:
When replacing the latches, place the latch in the bezel, and then slide the spring over the post on the latch. Compress the spring slightly and slip it into the recess in the bezel.
11. Remove the two right hinge screws (BI).
12. Remove the right hinge.
The left hinge is part of the top cover assembly, and should be replaced with it as a unit.
Note:
To clean the LCD, use rubbing alcohol and a soft cloth.
To avoid damaging the LCD, do not scratch or apply any force to its surface.
Important:
The LCD for the TP701C contains over 921 000 thin film transistors (TFTs).A small number of missing, discolored, or lighted dots (on all the time) is characteristic of TFT LCD technology, but excessive pixel problems can cause viewing concerns. The LCD should be replaced if the number of missing or discolored, or lighted dots in any background is 21 or more.
Replacing the Microphone and Sleeve:
The right hinge should already be installed. To replace the microphone and cables, perform the following steps:
1. Insert the microphone wires into the small slit in the backlight cable protective sleeve.
2. Holding the microphone and sleeve near the hinge, insert the yellow backlight cable through the slit in the sleeve, and then the brown cable. Do not allow the microphone cable to twist around the backlight cables.
3. Slip the sleeve into place so that the flange is inside the computer lid, toward the LCD.
4. Insert the microphone into the space between the hinge and the LCD, with the foam block against the right side of the space. Press the block gently to ensure that it is completely inserted. Make sure that the foam does not cover the microphone diaphragm. When installed correctly, the microphone lines up with the two small slots in the bezel.
Replacing the LCD Assembly:
To reattach the LCD assembly, follow these steps:
1. With the LCD cable flat, carefully wrap the end of the LCD cable around the attached sleeve on the cable, finishing with the end of the cable coming from behind the sleeve.
2. To prevent possible damage, tape the end of the cable to the bezel while you reattach the LCD assembly.
3. Place the LCD assembly on the base in the closed position. Make sure that the backlight and microphone cables are inside the base unit.
4. Replace the four hinge screws (BG).
5. Open the computer lid all the way (180 Degrees) and remove the tape from the the LCD cable.
6. Slide the ferrite core over the end of the LCD cable, pushing the core onto the cable just far enough to expose the two sets of silver contacts on the cable.
7. Connect the LCD cable to the connectors on the bottom system board by inserting the flat ends of the cable. Then, push in the small sliding latch under each cable to secure the cable in the connector. Do not bend or fold the LCD cable. Press on the loop of cable around the sleeve to insert the cable ends into the connectors.
8. Pull the ferrite core forward on the cable until the core touches the connectors and it can be pressed down flat on top of the bottom system board.
Routing the Backlight Cable:
1 Brown wire.
2 Yellow wire.
Warning:
Incorrect routing of the backlight cable may cause it to break after repeated opening and closing of the computer lid. Routing the cable correctly is important to prevent this breakage.
To route the backlight cable, follow these steps:
1. Plug the LCD backlight cable into the inverter card. Do not twist the wires.
2. Position the brown wire behind the connector so that after it exits the connector housing, it goes down between the inverter card and back wall of the base cover. (It must be outside of the inverter insulator.)
3. Loop the brown wire toward the LEDs and over the top of the connector.

Backlight cable routing from the rear, shown without the computer lid:
1 Brown wire.
2 Yellow wire.
4. Route the yellow wire in the same manner as the brown wire. Position the yellow wire beside the brown wire where it runs over the connector on the side toward the back of the computer. Do not allow the wires to cross.
5. Be careful to keep the cable in the correct position as you complete the assembly of the computer..
Replacing the Top System Board:
Perform the following steps when you replace the top system board:
1. Before inserting the top system board, move the power switch cover forward toward the front of the base assembly. Make sure that the spring in the power switch is fully inside the plastic housing.
2. Insert the top system board, tilting the board to the left and aligning the appropriate connectors with the slots on the base assembly. Be careful to align the power switch cover with the switch mechanism on the board.
3. Gently press the battery pack connector down to place the connector in the slot on the base assembly.
4. Ensure that the inverter card is firmly attached to the top system board, and that the infrared window is attached to the inverter card. The infrared window has a top and bottom. Install the window with the long side with the partial cutout facing the top of the inverter card.
5. Feed the speaker cable between the inverter card and the top system board to the right of the inverter card connector to the board.
6. As you press lightly down on the top system board and the inverter card, slip the bottom corners of the inverter card into the slots in the base assembly.
7. Gently but firmly press on the middle of the top system board to finish inserting the board and to ensure a complete connection between the board-to-board connectors.
Removing and Replacing the SO-DIMM Card:
Warning:
The SO-DIMM card is sensitive to physical shock. Incorrect handling of the card can damage it.
To remove a SO-DIMM card, follow these steps:
1. Power-off the computer.
2. Remove the battery.
3. Disconnect all cables and other devices, including the AC adapter.
4. Close the computer and turn it upside down.
5. Open the SO-DIMM door.
6. Press the metal tabs on each side of the SO-DIMM away from the card. The card should raise slightly as the tabs are pulled away from it.
7. Remove the card by holding it at a 15 to 20 degree angle and pulling it firmly away from the SO-DIMM socket.
8. Replace the SO-DIMM door.
9. Reattach all cables and other devices, including the AC adapter.
10. Power-on the computer. The computer will display error code 164.
To insert a SO-DIMM. card, follow these steps:
1. Power-off the computer.
2. Remove the battery.
3. Disconnect all cables and other devices, including the AC adapter.
4. Close the computer and turn it upside down.
5. Remove the SO-DIMM door.
6. Locate the notch on the SO-DIMM.
Warning:
Do not insert the SO-DIMM too far. You might damage the SO-DIMM or SO-DIMM socket.
7. Position the card at a 15 to 20 degree angle to the &sodimm. socket with the notch facing to the right when you are looking into the socket, and push it into the socket firmly.
8. The card is fully inserted when the gold connectors are almost completely concealed by the SO-DIMM socket and only the top of each connector is visible.
Warning:
The card will not lock into place if it has not been fully inserted into the socket.
9. Once the card is fully inserted into the socket, press the card down until it locks into place. It is held in place by two tabs, one on either side of the card.
10. Replace the SO-DIMM door.
11. Reattach all cables and other devices, including the AC adapter, and power-on the computer.
12. Verify that the memory count displayed during the POST is correct. (See 'Memory Checkout— for information on memory size.)
|
Search Keywords |
| |
|
Hint Category |
Hardware Maintenance Information | |
|
Date Created |
22-11-96 | |
|
Last Updated |
19-08-98 | |
|
Revision Date |
18-08-99 | |
|
Brand |
IBM ThinkPad | |
|
Product Family |
ThinkPad 701 | |
|
Machine Type |
2630 | |
|
Model |
Various | |
|
TypeModel |
| |
|
Retain Tip (if applicable) |
N/A | |
|
Reverse Doclinks |