
|
83.999 bytes |
Service Hints & Tips |
Document ID: LWIK-3UXQGY |
TP 770/E/ED - Installing the IBM EtherJet PC Card under Windows NT 4.0
Applicable to: World-Wide
Directions - Installing IBM EtherJet PC Card (Windows NT 4.0)
1. Boot up the system and logon to Windows NT 4.0.
2. Attach the EtherJet Adapter Cable to the PC Card.
3. Insert the PC Card into the bottom PC Card slot and connect the cable to the ethernet port.
4. You will hear a beep and CardWizard will display the detection of the PC Card. Select Correct to proceed with the installation.
5. Select OK, then Yes to install the network components.
The Network Setup Wizard will prepare the system for the installation of the network settings.
6. Select Next to accept the option Wired to the Network.

7. The Network Setup Wizard will prompt you to search for a network adapter.
8. Select Select from list, insert the EtherJet PC Card Device Driver diskette 1.
9. Select Have Disk, then select OK to accept the path A:\.
10. Select OK to accept the IBM EtherJet PC Card Adapter.
11. Select Next to continue to the next screen.
12. Select your desired Network Protocols and then select Next to continue.

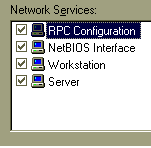
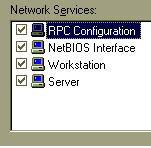
13. Select your desired services and then select Next to continue.

Windows NT 4.0 is now ready to install networking components. This process will install individual components and present dialog boxes so that they may install correctly.
MAKE SURE the Windows NT CD is in the CD-ROM drive before selecting Next.
14. Select Next, then Next to begin installing network components.
15. Insert the Windows NT Workstation 4.0 CD-ROM.
Close the welcome screen that appears a few seconds after you insert the CD-ROM.
16. At the Windows NT Setup window, type F: for the path, then select Continue.
This is where NT will look for the files to install to your ThinkPad. Windows NT will begin copying files to your ThinkPad.
17. Select Continue.
18. On the next screen IBM EtherJet PC Card Setup set the appropriate settings for your adapter. An example of some resource settings are (note: these settings are just an example based on a default configuration. If you have changed your system settings or installed new hardware, these settings may not work):
I/O Port Address: 0x300
IRQ Level: 9
Duplex Option: HDX
19. Select Continue.
20. Select Continue leaving the NetAddr blank.
21. Check with your network administrator to see if you should enable DHCP.
22. The system might prompt you to insert the EtherJet PC Card Device driver diskette once more. If this is the case insert diskette 1 and select OK.
Windows NT will begin configuring bindings, prompt the user for network information, and launch the Microsoft TCP/IP Properties window.
23. You will be prompted to enter your IP address, Subnet Mask, Gateway, etc. depending on the protocols you selected earlier. Enter your network information here. If you do not know these then you will need to contact your network administrator who controls the network you are attaching to for that information.
24. Select OK after all entries have been made.
25. At the bindings window, you will want to check with your network administrator to determine your binding order. After doing so, select Next to continue.
26. Select Next to start the network.
The next window prompts you to participate in a workgroup or a domain. Again, check with your network administrator for the proper setting.
Select Next to accept the services defaults.

The next window prompts you to participate in a workgroup or a domain. Using the Identification tab verify that the information is correct.
27. Select Next, then Finish.
28. Remove the diskette and CD-ROM from the drives, then select Yes to restart the computer.
29. When the system restart you will receive a PC Card insertion notification from CardWizard.
30. If you receive the following error messages follow the suggestions provided to correct the problem:
TrackPoint Error:
Press OK. This error indicates the TrackPoint device driver is corrupt. This is not a critical error, however to fix the problem simply reinstall the TrackPoint device driver.
Service Control Manager Error:
This problem will occur if Windows NT is installed and the latest Service Pack is installed before the network card is installed. If Srv.sys is not present when the Service Pack is applied it will not be updated because Update.exe will only update components that are installed on the Windows NT system. When Windows NT starts up after the network card has been installed, Windows NT SRV.SYS is being used. To correctly work with the rest of the updated system files, the Server service must be updated to the same version as the installed Service Pack. The resolution is to reapply the Windows NT Service Pack.
You have successfully completed the installation of the IBM EtherJet PC Card.
|
Search Keywords |
| |
|
Hint Category |
Installation/Removal Procedures, Networking, Windows NT | |
|
Date Created |
29-05-98 | |
|
Last Updated |
11-06-98 | |
|
Revision Date |
09-06-99 | |
|
Brand |
IBM ThinkPad | |
|
Product Family |
ThinkPad 770, ThinkPad 770E/ED | |
|
Machine Type |
9548, 9549 | |
|
Model |
Various | |
|
TypeModel |
| |
|
Retain Tip (if applicable) |
| |
|
Reverse Doclinks |