
|
73.182 bytes |
Product Information |
Document ID: DDSE-43ALH3 |
Netfinity 3500 - Parallel Port Connector
Applicable to: World-Wide
Parallel Port Connector
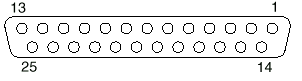
Parallel ports are used to communicate with printers and other devices, such as some CD-ROM and tape drives. The server provides one 25-pin, D-shell connector on the back of the server.
This parallel port connector conforms to the Institute of Electrical and Electronics Engineers (IEEE) Standard 1284.
There are three standard modes of operation:
Standard Parallel Port (SSP)
Enhanced Parallel Port (EPP)
Extended Parallel Port (ECP)
Table 7 shows the pin-number assignments for the parallel port connector. The signal names for all three modes are shown. SSP and ECP signal names are the same; EPP signal names that are different are shown in parentheses.
|
Pin |
Signal |
Pin |
Signal |
|
1 |
STROBE (-WRITE) |
14 |
-AUTO FD (-DSTRB) |
|
2 |
Data 0 |
15 |
-ERROR |
|
3 |
Data 1 |
16 |
-INIT |
|
4 |
Data 2 |
17 |
-SLCT IN (-ASTRB) |
|
5 |
Data 3 |
18 |
Ground |
|
6 |
Data 4 |
19 |
Ground |
|
7 |
Data 5 |
20 |
Ground |
|
8 |
Data 6 |
21 |
Ground |
|
9 |
Data 7 |
22 |
Ground |
|
10 |
-ACK |
23 |
Ground |
|
11 |
BUSY (-WAIT) |
24 |
Ground |
|
12 |
PE 25 |
25 |
Ground |
|
13 |
SLCT |
Table 7. Parallel Port Connector Pin-Number Assignments
ROM Operation Mode Switch
If the power to the server is interrupted while POST/BIOS is being updated, the server might not restart correctly. If this happens, perform the following procedure to recover.
1. Locate the configuration switches on the system board. For more information, refer to the label inside the server, or see "System Board".
2. To set the ROM operation mode to the appropriate value, set switch 5 as shown in the following illustration. It might be helpful to use the end of a small screwdriver to set the switch.

3. Move the switch to the ON position.
4. Insert the POST/BIOS update (flash) diskette into drive A.
5. Turn on the server.
6. After the update session completes, turn off the server and remove the diskette from drive A.
7. Move the switch back to the OFF position.
8. Reinstall the cover and reconnect any cables that you disconnected.
9. Turn on the server to restart the operating system.
10. After changing configuration switch settings, you must reconfigure the server. After reassembling the server (see "Completing the Installation"), use the Configuration/Setup Utility program to reconfigure the server. For more information, see "Configuration/Setup Utility Program Menus".
SCSI Connectors
The server comes with an &scsirol. on the system board. This controller has two 68-pin, shielded, high-density connectors. You can use these connectors to install SCSI devices in the server or to attach an external SCSI device to the server.
See "SCSI Drives" for additional information about the SCSI subsystem.
Internal SCSI Connector: A 4-drop, 68-pin (16-bit) cable is installed in the server. This cable is connected to the internal connector for the &scsirol.. You can use this cable to install additional SCSI devices in the server. A hard disk drive might also be installed in bay 6, depending on the model of the Netfinity 3500 server.
For information about termination requirements, see "Termination Requirements".
External SCSI Connector: A 16-bit, 68-pin external SCSI cable is installed in the server. The external SCSI cable provides a connector to which you can attach an external SCSI device. Table 8 shows the pin-number assignments for the 68-pin SCSI connectors.
|
Pin |
Signal |
Pin |
Signal |
|
1 |
Ground |
35 |
Data 12 |
|
2 |
Ground |
36 |
Data 13 |
|
3 |
Ground |
37 |
Data 14 |
|
4 |
Ground |
38 |
Data 15 |
|
5 |
Ground |
39 |
Data P1 |
|
6 |
Ground |
40 |
Data 0 |
|
7 |
Ground |
41 |
Data 1 |
|
8 |
Ground |
42 |
Data 2 |
|
9 |
Ground |
43 |
Data 3 |
|
10 |
Ground |
44 |
Data 4 |
|
11 |
Ground |
45 |
Data 5 |
|
12 |
Ground |
46 |
Data 6 |
|
13 |
Ground |
47 |
Data 7 |
|
14 |
Ground |
48 |
Data P0 |
|
15 |
Ground |
49 |
Reserved |
|
16 |
Ground |
50 |
-PRSN |
|
17 |
Terminal power |
51 |
Terminal power |
|
18 |
Terminal power |
52 |
Terminal power |
|
19 |
Reserved |
53 |
Reserved |
|
20 |
Ground |
54 |
Ground |
|
21 |
Ground |
55 |
-Attention |
|
22 |
Ground |
56 |
Ground |
|
23 |
Ground |
57 |
-Busy |
|
24 |
Ground |
58 |
-Acknowledge |
|
25 |
Not connected |
59 |
-Reset |
|
26 |
Ground |
60 |
-Message |
|
27 |
Ground |
61 |
-Select |
|
28 |
Ground |
62 |
-Control/Data |
|
29 |
Ground |
63 |
-Request |
|
30 |
Ground |
64 |
-Input/Output |
|
31 |
Ground |
65 |
Data 8 |
|
32 |
Ground |
66 |
Data 9 |
|
33 |
Ground |
67 |
Data 10 |
|
34 |
Ground |
68 |
Data 11 |
Serial Port Connectors
Serial ports are used to communicate with printers, plotters, external modems, auxiliary terminals, and other computers. The server provides two serial ports (1 and 2). You can add more serial ports by installing a serial adapter in one of the expansion slots.
Serial ports transfer data asynchronously; they can transmit any number of bits at any time, with no restriction on the duration of the pauses between characters.
The serial ports transmit and receive data and commands at a rate of 300 bits per second (bps) up to 115 200 bps. The bits-per-second measurement is commonly referred to as the baud rate.
Both of the serial connectors on the server use a 9-pin, D-shell connector.
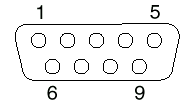
Table 9 shows the pin-number assignments for the serial port connectors. The pin-number assignments conform to the industry standard.
|
Pin |
Signal |
Pin |
Signal |
|
1 |
Data carrier detect |
6 |
Data set ready |
|
2 |
Receive data |
7 |
Request to send |
|
3 |
Transmit data |
8 |
Clear to send |
|
4 |
Data terminal ready |
9 |
Ring indicator |
|
5 |
Signal ground |
Table 9. Serial Port Connector Pin-Number Assignments Pin Signal Pin Signal
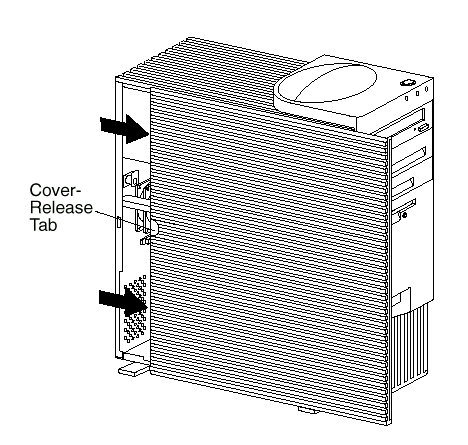
Side Access Cover
To remove the side cover, do the following.
1. If necessary, unlock the server side cover.
2. Remove the side cover by pulling out on the cover-release tab at the rear of the side cover. Then, slide the cover toward the front of the server and lift it off.
|
Search Keywords |
| |
|
Document Category |
Diagrams | |
|
Date Created |
18-12-98 | |
|
Last Updated |
21-12-98 | |
|
Revision Date |
18-12-99 | |
|
Brand |
IBM PC Server | |
|
Product Family |
Netfinity 3500 | |
|
Machine Type |
8644 | |
|
Model |
ALL | |
|
TypeModel |
| |
|
Retain Tip (if applicable) |
| |
|
Reverse Doclinks |